How can I help you?
Behavior Settings in ASP.NET Webforms DateRangePicker
DateRangePicker has some default behavior settings which helps you to perform more operation by Built-in.
Selected Date Range
DateRangePicker value can be selected through picking two date values from available two DatePicker calendar or you can set it by using Value property.
<ej:DateRangePicker ID="dateRange" runat="server" Value="11/1/2016 - 11/2/2017" ClientSideOnChange="onChange"></ej:DateRangePicker>function onChange(args) {
//args contains entire model of DateRangePicker to get the value of all properties.
//alert DateRangePicker shows the start date and end date.
alert(" start date is : " + args.startDate + " \n end date is : " + args.endDate);
}Separator
The value of the DateRangePicker popup will presented with two date strings which is separated by Separator (e.g. “”11/1/2016 - 11/2/2017””). Separator will be “- “by default and this can be changed using API called Separator. Please check with below code example to setting/changing the separator using Separator API.
<ej:DateRangePicker ID="dateRange" runat="server" Separator="&"></ej:DateRangePicker>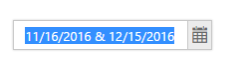
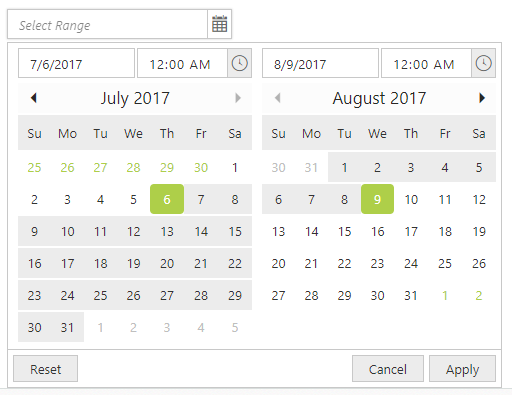
Start Date
Start Date of the date range can be pick from date range picker calendar. We can select the start date from any one of calendar in a popup.
While selecting the date on calendar in following cases, the clicked date will be considered as StartDate.
-
Click on empty calendar (with no start date, range, end date)
-
Click on date which is lesser than existing start date
-
Click on calendar when already there is start date and end date is updated.
Start Date of range, can be set using API called StartDate also please refer the below code example:
<ej:DateRangePicker ID="dateRange" runat="server" StartDate="11/2/2016"></ej:DateRangePicker>StartDate can be set to popup, by entering the date value into first input box in popup also.
End Date
End Date of the date range can be selected from popup directly. Else this can be also updated by using the API called “EndDate”.
The Selection next to the StartDate will be considered as end Date. This selected date should be higher or equal date than the existing start date. Else this selection will be considered as StartDate as we discussed in StartDate section above.
Below code will explain to use the EndDate API to set the end Date in popup.
<ej:DateRangePicker ID="dateRange" runat="server" StartDate="11/2/2016" EndDate="11/3/2018"></ej:DateRangePicker>End Date can be set to popup by entering the date into the second input box in popup
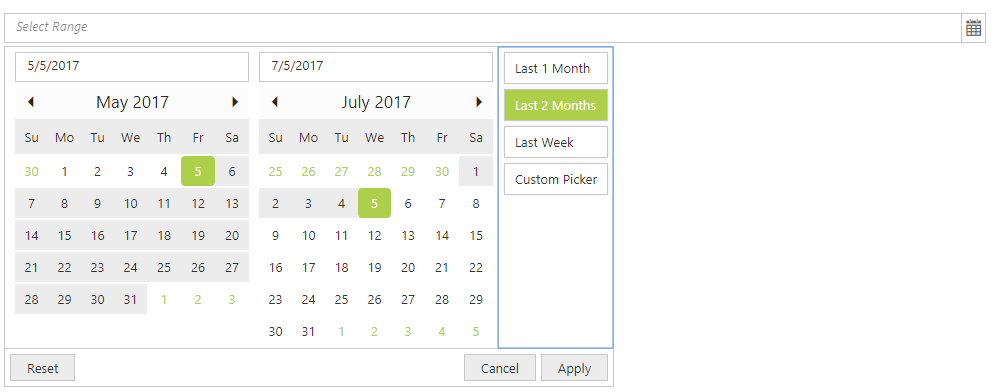
Preset Ranges
We can make use of preset range for easy selection on popup.
<ej:DateRangePicker ID="dateRange" runat="server"></ej:DateRangePicker>protected void Page_Load(object sender, EventArgs e)
{
DateTime Today = DateTime.Now;
this.dateRange.Ranges.AddRange(new[] { new Syncfusion.JavaScript.Models.DateRanges() {
Label = "Last 1 Month",
Range = new List<Object>() { Today.AddMonths(-1).ToString(), Today.ToString() }
},
new Syncfusion.JavaScript.Models.DateRanges
{
Label = "Last 2 Months",
Range = new List<Object>() { Today.AddMonths(-2).ToString(), Today.ToString() }
},
new Syncfusion.JavaScript.Models.DateRanges{
Label = "Last Week",
Range = new List<Object>() { Today.AddDays(-7).ToString(), Today.ToString() }
}
});
}
These ranges can be processed and updated to popup by using the setRange method also like below code example.
//bind below onClick action to button
function onClick() {

            //create instance for dateRangePicker.

            // create instance only after control creation, to get dateRangeObj otherwise it throws exception.

            var dateRangeObj = $('#<%=dateRange.ClientID%>').ejDateRangePicker('instance');

            //call setRange using label

            dateRangeObj.setRange("Last 1 Week");

            //get value using date range object and displays in alert box

            alert(dateRangeObj.option('value'));
        }
TimePicker Option
The ranges can be set with time value also by enable the TimePicker in popup using EnableTimePicker API. Each start date and end date, have separate Time Pickers. Please check with the below code example to enable the time picker.
<ej:DateRangePicker ID="dateRange" runat="server" EnableTimePicker="true"></ej:DateRangePicker>