How can I help you?
Context Menu
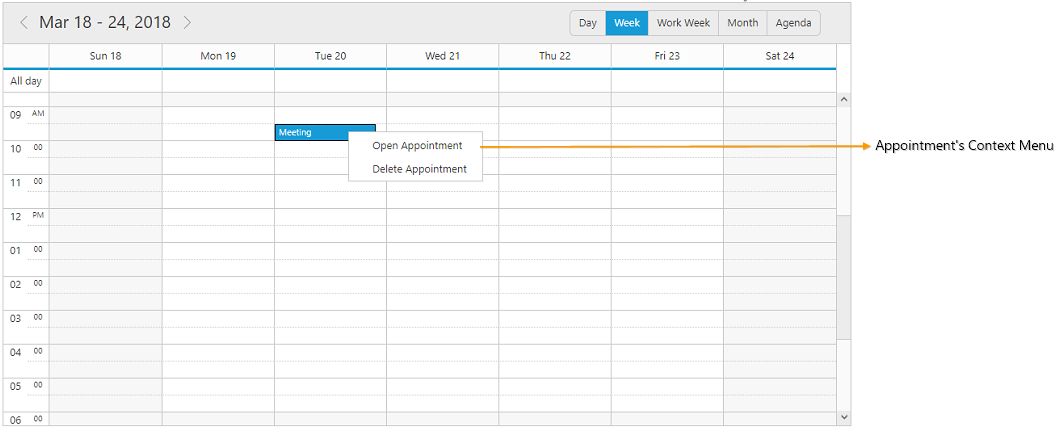
Scheduler provides default context menu options for both appointments as well as work cells. It also allows to define additional custom context menu options.
The options that are available under ContextMenuSettings are as follows,
- Enable - Enables/disables the context menu option in Scheduler.
- MenuItems - Contains the sub-menu collections related to both the appointment and cells.
Default Menu Options
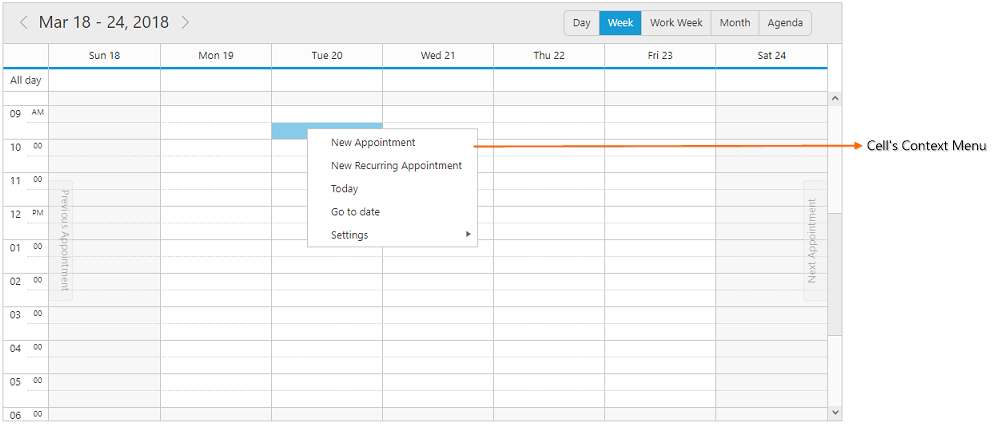
The menu items contains two separate collection based on the appointment and cells.
Appointment
The appointment collection includes the following options.
| Open Appointment (default) |
| Delete Appointment (default) |
| Print Appointment |
| Categorize |
Cells
The default options available within the cell collection includes -
| New Appointment |
| New Recurring Appointment |
| Today |
| Go to date |
| Settings (View, TimeMode, Work Hours) |
The following code snippet shows how to enable the context menu settings in Scheduler and to make use of it with default available options.
@using MyProject.Models; // Here MyProject defines your project name to access the model class
@{
    <!-- Datasource for Appointments -->
    List<ScheduleFields> Appoint = new List<ScheduleFields>();
    Appoint.Add(new ScheduleFields { Id = "1", Subject = "Meeting", StartTime = new DateTime(2015, 11, 10, 10, 00, 00), EndTime = new DateTime(2015, 11, 10, 11, 00, 00), Description = "", AllDay = false, Recurrence = false, RecurrenceRule = "" });
}

<ej-schedule id="Schedule1" width="100%" height="525px" current-date="new DateTime(2015, 11, 8)">
    <e-context-menu-settings enable="true">
        <e-menu-items>
            <e-appointment-collection>
                <e-appointment id="open" text="Open Appointment" />
                <e-appointment id="delete" text="Delete Appointment" />
            </e-appointment-collection>
            <e-cells-collection>
                <e-cells id="new" text="New Appointment" />
                <e-cells id="recurrence" text="New recuring Appointment" />
                <e-cells id="today" text="Today" />
                <e-cells id="settings" text="Settings" />
                <e-cells id="gotodate" text="Go to Date" />
                <e-cells id="view" text="view" parent-id="settings" />
                <e-cells id="timemode" text="Time Mode" parent-id="settings" />
                <e-cells id="view_Day" text="Day" parent-id="view" />
                <e-cells id="view_Week" text="Week" parent-id="view" />
                <e-cells id="view_Workweek" text="Workweek" parent-id="view" />
                <e-cells id="view_Month" text="Month" parent-id="view" />
                <e-cells id="timemode_Hour12" text="12 Hour" parent-id="timemode" />
                <e-cells id="timemode_Hour24" text="24 Hour" parent-id="timemode" />
                <e-cells id="workhours" text="Work Hours" parent-id="settings" />
            </e-cells-collection>
        </e-menu-items>
    </e-context-menu-settings>
    <e-appointment-settings datasource="Appoint" id="Id" subject='"Subject"' start-time='"StartTime"' end-time='"EndTime"' description='"Description"' all-day='"AllDay"' recurrence='"Recurrence"' recurrence-rule='"RecurrenceRule"'>
    </e-appointment-settings>
</ej-schedule>
NOTE
In agenda view, only the appointment menu items shows up in the context menu options. For default menu items, the id must be defined with the same value as mentioned in the above code example – as we have processed the menus based on this id within our source.
Custom Menu Options
Apart from the default available options, it is also possible to add custom menu options to the context-menu of both the appointment and cell collection.
The following code example depicts how to add the custom menu items to the appointment and cell collection of the context menu settings.
@using MyProject.Models; // Here MyProject defines your project name to access the model class
@{
    <!-- Datasource for Appointments -->
    List<ScheduleFields> Appoint = new List<ScheduleFields>();
    Appoint.Add(new ScheduleFields { Id = "1", Subject = "Meeting", StartTime = new DateTime(2015, 11, 10, 10, 00, 00), EndTime = new DateTime(2015, 11, 10, 11, 00, 00), Description = "", AllDay = false, Recurrence = false, RecurrenceRule = "" });
}

<ej-schedule id="Schedule1" width="100%" height="525px" current-date="new DateTime(2015, 11, 8)">
    <e-context-menu-settings enable="true">
        <e-menu-items>
            <e-appointment-collection>
                <e-appointment id="open" text="Open Appointment" />
                <e-appointment id="delete" text="Delete Appointment" />
                <e-appointment id="option1" text="User Option 1" />
            </e-appointment-collection>
            <e-cells-collection>
                <e-cells id="customoption" text="User Option" />
            </e-cells-collection>
        </e-menu-items>
    </e-context-menu-settings>
    <e-appointment-settings datasource="Appoint" id="Id" subject='"Subject"' start-time='"StartTime"' end-time='"EndTime"' description='"Description"' all-day='"AllDay"' recurrence='"Recurrence"' recurrence-rule='"RecurrenceRule"'>
    </e-appointment-settings>
</ej-schedule>
NOTE
The Id given for the custom menu items must be unique in both the appointment and cell collection.
Handling Menu Actions
To define specific actions for a click made on the custom menu items, the client-side event MenuItemClick can be used as depicted in the below code example.
@using MyProject.Models; // Here MyProject defines your project name to access the model class
@{
    <!-- Datasource for Appointments -->
    List<ScheduleFields> Appoint = new List<ScheduleFields>();
    Appoint.Add(new ScheduleFields { Id = "1", Subject = "Meeting", StartTime = new DateTime(2015, 11, 10, 10, 00, 00), EndTime = new DateTime(2015, 11, 10, 11, 00, 00), Description = "", AllDay = false, Recurrence = false, RecurrenceRule = "" });
}

<ej-schedule id="Schedule1" width="100%" height="525px" current-date="new DateTime(2015, 11, 8)" menu-item-click="onMenuItemClick">
    <e-context-menu-settings enable="true">
        <e-menu-items>
            <e-appointment-collection>
                <e-appointment id="open" text="Open Appointment" />
                <e-appointment id="delete" text="Delete Appointment" />
                <e-appointment id="option1" text="User Option 1" />
            </e-appointment-collection>
            <e-cells-collection>
                <e-cells id="customoption" text="User Option" />
            </e-cells-collection>
        </e-menu-items>
    </e-context-menu-settings>
    <e-appointment-settings datasource="Appoint" id="Id" subject='"Subject"' start-time='"StartTime"' end-time='"EndTime"' description='"Description"' all-day='"AllDay"' recurrence='"Recurrence"' recurrence-rule='"RecurrenceRule"'>
    </e-appointment-settings>
</ej-schedule>function onMenuItemClick(args) {
//args.events contains information of the clicked menu item.
if (args.events.ID == "option1")
alert("Custom menu clicked");
}Also, it is possible to predict the target on which the right click is made, either on the cells or appointments with the use of the event BeforeContextMenuOpen. The below code example shows how to block the display of context menu when right clicked on the cells by setting args.cancel as true.
@using MyProject.Models; // Here MyProject defines your project name to access the model class
@{
    <!-- Datasource for Appointments -->
    List<ScheduleFields> Appoint = new List<ScheduleFields>();
    Appoint.Add(new ScheduleFields { Id = "1", Subject = "Meeting", StartTime = new DateTime(2015, 11, 10, 10, 00, 00), EndTime = new DateTime(2015, 11, 10, 11, 00, 00), Description = "", AllDay = false, Recurrence = false, RecurrenceRule = "" });
}

<ej-schedule id="Schedule1" width="100%" height="525px" current-date="new DateTime(2015, 11, 8)" before-context-menu-open="beforeContextMenuOpen">
    <e-context-menu-settings enable="true">
        <e-menu-items>
            <e-appointment-collection>
                <e-appointment id="open" text="Open Appointment" />
                <e-appointment id="delete" text="Delete Appointment" />
                <e-appointment id="option1" text="User Option 1" />
            </e-appointment-collection>
        </e-menu-items>
    </e-context-menu-settings>
    <e-appointment-settings datasource="Appoint" id="Id" subject='"Subject"' start-time='"StartTime"' end-time='"EndTime"' description='"Description"' all-day='"AllDay"' recurrence='"Recurrence"' recurrence-rule='"RecurrenceRule"'>
    </e-appointment-settings>
</ej-schedule>function beforeContextMenuOpen(args) {
//args.events.target – target information to depict either cell/appointment
if ($(args.events.target).hasClass("e-workcells") || $(args.events.target).hasClass("e-monthcells"))
args.cancel = true;
}Adding Categorize Option
To include the default categorize options within the context menu, it is necessary to enable the CategorizeSettings property as shown in the below code example.
@using MyProject.Models; // Here MyProject defines your project name to access the model class
@{
    <!-- Datasource for Appointments -->
    List<ScheduleFields> Appoint = new List<ScheduleFields>();
    Appoint.Add(new ScheduleFields { Id = "1", Subject = "Meeting", StartTime = new DateTime(2015, 11, 10, 10, 00, 00), EndTime = new DateTime(2015, 11, 10, 11, 00, 00), Description = "", AllDay = false, Recurrence = false, RecurrenceRule = "", Categorize = "1" });
}

<ej-schedule id="Schedule1" width="100%" height="525px" current-date="new DateTime(2015, 11, 8)">
    <e-context-menu-settings enable="true">
        <e-menu-items>
            <e-appointment-collection>
                <e-appointment id="open" text="Open Appointment" />
                <e-appointment id="delete" text="Delete Appointment" />
                <e-appointment id="categorize" text="Categorize" />
            </e-appointment-collection>
        </e-menu-items>
    </e-context-menu-settings>
    <e-categorize-settings enable="true"></e-categorize-settings>
    <e-appointment-settings datasource="Appoint" id="Id" subject='"Subject"' start-time='"StartTime"' end-time='"EndTime"' description='"Description"' all-day='"AllDay"' recurrence='"Recurrence"' recurrence-rule='"RecurrenceRule"' categorize='"Categorize"'>
    </e-appointment-settings>
</ej-schedule>
NOTE
The Categorize option must be added to the Appointment collections simply with an id “categorize”, which displays on right clicking the appointments.