Template Support
24 Apr 20174 minutes to read
ListBox widget provides the template support, when binding the data for the ListBox. For this behavior, set the common syntax /element in template property. You can add any HTML mark-up element inside the ListBox using this property.
The following steps explains you the behavior of template support with ListBox.
-
Add the below code in your view page to render the ListBox
NOTE
Images for this sample are available in ‘installed location/images/Employee’
// Add the following code in View page to configure ListBox widget
<div class="control frame">
<div class="ctrllabel">
Select an expert :
</div>
<ej-list-box id="selectExperts" datasource="ViewBag.datasource" template="<img class='eimg' src='../images/Employee/${eimg}.png' alt='employee' height='50px' width='50px'/><div class='ename'> ${text} </div><div class='desig'> ${desig} </div><div class='cont'> ${country} </div>"></ej-list-box>
</div>
}// Add the following code to add list items in the controller page
public partial class ListBoxController : Controller
{
public class EmployeeSpecialists
{
public string text { get; set; }
public string eimg { get; set; }
public string desig { get; set; }
public string country { get; set; }
}
// GET: /Template/
List<EmployeeSpecialists> empl = new List<EmployeeSpecialists>();
public ActionResult Template()
{
empl.Add(new EmployeeSpecialists { text = "Erik Linden", eimg = "3", desig = "Representative", country = "England" });
empl.Add(new EmployeeSpecialists { text = "John Linden", eimg = "6", desig = "Representative", country = "Norway" });
empl.Add(new EmployeeSpecialists { text = "Louis", eimg = "7", desig = "Representative", country = "Australia" });
empl.Add(new EmployeeSpecialists { text = "Lawrence", eimg = "8", desig = "Representative", country = "India" });
ViewBag.datasource = empl;
return View();
}
}- Customize the template in CSS.
<style>

		.eimg
		{

			margin: 0;

			padding: 3px 10px 3px 3px;

			border: 0 none;

			width: 60px;

			height: 60px;

			float: left;

		}


		.ename
		{

			font-weight: bold;

			padding: 6px 3px 1px 3px;

		}


		.desig, .cont
		{

			font-size: smaller;

			padding: 3px 3px -1px 0px;

		}


		#selectexperts li
		{

			width: 200px;

			height: 70px;

			padding: 5px;

		}
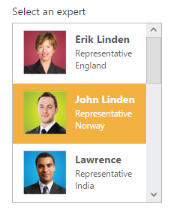
</style>- Output of the above steps.