How can I help you?
Getting Started
This section helps to get started of the Tile component for AngularJS.
Adding dependencies
The following steps guide you to add a Tile component.
-
Create an HTML file and add required scripts and CSS files for rendering Essential JavaScript component as given in the Getting Started.
-
In addition to it for AngularJS implementation, refer the “angular.min.js” and “ej.widgets.angular.min.js” files.
<html ng-app="TileApp">
        <head>
        <title>Simple Tile</title>
        <!-- Add Scripts and CSS for rendering Essential JS components -->

            <script src="http://cdn.syncfusion.com/js/assets/external/angular.min.js"></script>
            <script src="[http://cdn.syncfusion.com/32.2.3/js/common/ej.widget.angular.min.js"></script>
        </head>
        <body ng-controller="TileCtrl">
                <!-- Add Tile component Here -->
                <div id="tile" ej-tile />
        </body>
        </html>
Component Initialization
-
Initialize the ng-app and ng-controller for the application. For adding Tile component, you have to use ej-tile directive to corresponding element.
-
Now initialize the component using angular module in script section
angular.module('TileApp', ['ejangular']).controller('TileCtrl', function ($scope) {});Configuring properties
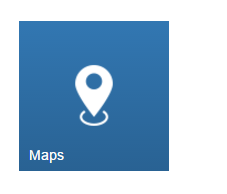
Declare the tile properties with prefix “e- “, refer the following code,
<div id="tile" ej-tile e-tilesize="medium" e-imageurl='http://js.syncfusion.com/ug/web/content/tile/map.png' e-text="Map">
   </div>
Get the following output from the above mentioned code
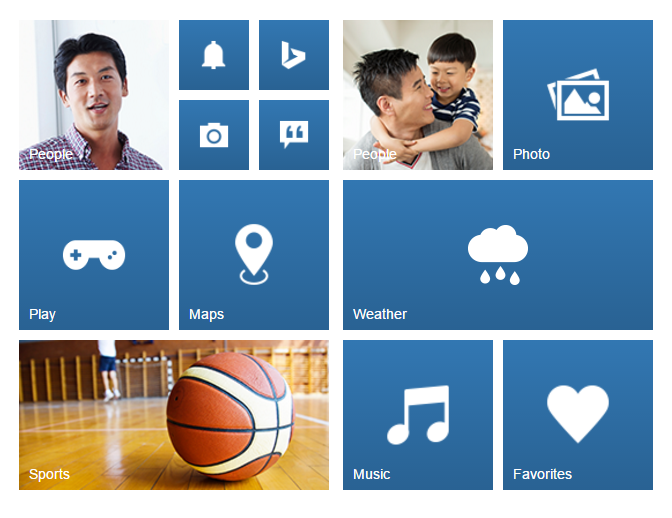
You can easily design a home page using tile component for easy navigation. Therefore, you require many different sizes of tiles aligned in a grid-like manner. The tiles will be aligned automatically to define the necessary tile elements inside the wrapper element, that contains a column class. You can define all columns elements under the wrapper element with the tile group class to make ‘n’ number of tiles as a grouped tile. Add the below mentioned code to the corresponding view page.
<div class="e-tile-group" id="groupTile">
        <div class="e-tile-column">
            <div id="tile1" ej-tile e-imageposition="fill" e-caption-text="People" e-tilesize="medium" e-imageurl='http://js.syncfusion.com/ug/web/content/tile/people_1.png' e-text="People">
            </div>
            <div class="e-tile-small-col-2">
                <div id="tile2" ej-tile e-imageposition="center" e-tilesize="small" e-imageurl='http://js.syncfusion.com/ug/web/content/tile/alerts.png'>
                </div>
                <div id="tile3" ej-tile e-imageposition="center" e-tilesize="small" e-imageurl='http://js.syncfusion.com/ug/web/content/tile/bing.png'>
                </div>
                <div id="tile4" ej-tile e-tilesize="small" e-imageurl='http://js.syncfusion.com/ug/web/content/tile/camera.png'>
                </div>
                <div id="tile5" ej-tile e-tilesize="small" e-imageposition="center" e-imageurl='http://js.syncfusion.com/ug/web/content/tile/messages.png'>
                </div>
            </div>
            <div id="tile6" ej-tile e-tilesize="medium" e-imageposition="center" e-imageurl='http://js.syncfusion.com/ug/web/content/tile/games.png' e-text="Play">
            </div>
            <div id="tile7" ej-tile e-tilesize="medium" e-imageurl='http://js.syncfusion.com/ug/web/content/tile/map.png' e-text="Maps">
            </div>
            <div id="tile8" ej-tile e-tilesize="wide" e-imageurl='http://js.syncfusion.com/ug/web/content/tile/sports.png' e-text="Sports" e-imageposition="fill">
            </div>
        </div>
        <div class="e-tile-column">
            <div id="tile9" ej-tile e-tilesize="medium" e-imageposition="fill" e-imageurl='http://js.syncfusion.com/ug/web/content/tile/people_2.png' e-text="People">
            </div>
            <div id="tile10" ej-tile e-tilesize="medium" e-imageposition="center" e-imageurl='http://js.syncfusion.com/ug/web/content/tile/pictures.png' e-text="Photo">
            </div>
            <div id="tile11" ej-tile e-tilesize="wide" e-imageposition="center" e-imageurl='http://js.syncfusion.com/ug/web/content/tile/weather.png' e-text="Weather">
            </div>
            <div id="tile12" ej-tile e-tilesize="medium" e-imageposition="center" e-imageurl='http://js.syncfusion.com/ug/web/content/tile/music.png' e-text="Music">
            </div>
            <div id="tile13" ej-tile e-tilesize="medium" e-imageposition="center" e-imageurl='http://js.syncfusion.com/ug/web/content/tile/favs.png' e-text="Favorites">
            </div>
        </div>
    </div>
Run the above code to get the following output.
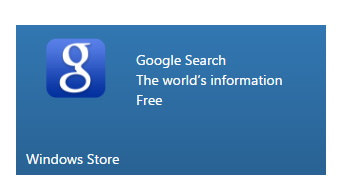
Template support with Tile Widget
To customize the Tile images with template feature by using imageTemplateId property of Tile component. Add the below mentioned code to the corresponding view page.
<div class="e-tile-group" id="groupTile">
    <div class="e-tile-column">
        <div id="tile1" ej-tile e-tilesize="wide" e-text="Windows Store" e-imagetemplateid="imageTemplate" e-imageposition="fill">
        </div>
    </div>
    <div id="imageTemplate">
        <div id="appimage">
        </div>
        <div class="tileMargin">
            <span class="caption">Google Search</span><br />
            <span class="description">The world’s information</span><br />
            <span class="sub">Free</span>
        </div>
    </div>
  </div>
Add the following styles to customize the tile images with template support.
<style>
        #appimage {
            background-image: url("http://js.syncfusion.com/UG/mobile/content/google.png");
            background-position: center center;
            background-repeat: no-repeat;
            background-size: 50% auto;
            display: table-cell;
            width: 45%;
        }

        .tileMargin {
            display: table-cell;
            padding-top: 25px;
        }

        .e-tile-template {
            display: table;
            height: 100%;
            width: 100%;
        }
    </style>
Run the above code to get the following output.
NOTE
All the Syncfusion component’s properties for AngularJS defined using e- prefix followed by the property name.You can find the complete API list from the API reference