How can I help you?
Getting Started
Splitter component consists of movable split bar(s) that divides a container’s display area into two or more resizable and collapsible panels.
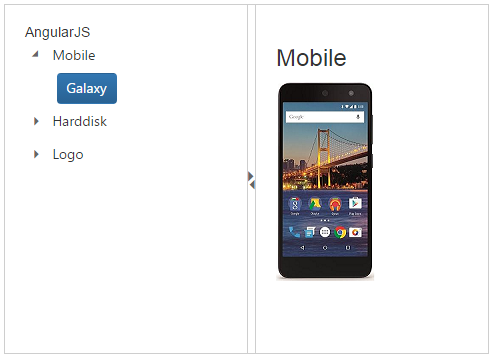
From the following guidelines, you can create a Splitter, add Tree view in the Splitter and set actions to view the image. It is used to split the document or image and Expand or Collapse in the Splitter. The following screenshot demonstrates the functionality of Splitter component.

Adding a dependency
The following steps guide you to add a Splitter component.
-
Create an HTML file and add required scripts and CSS files for rendering Essential JavaScript component as given in the Getting Started.
-
In addition to it for AngularJS implementation, refer the “angular.min.js” and “ej.widgets.angular.min.js” files.
<html ng-app="splitterApp">
    <head>
    <title>Simple Splitter</title>
    <!-- Add Scripts and CSS for rendering Essential JS components -->

        <script src="http://cdn.syncfusion.com/js/assets/external/angular.min.js"></script>
        <script src="[http://cdn.syncfusion.com/32.2.3/js/common/ej.widget.angular.min.js"></script>
    </head>
    <body ng-controller="SplitterCtrl">
            <!-- Add Splitter component Here -->
            <div id="outterSpliter" ej-splitter/>
    </body>
    </html>
Component initialization
-
Initialize the ng-app and ng-controller for the application. For adding Splitter component, you have to use ej-splitter directive to corresponding element.
-
Now initialize the control using angular module in script section
angular.module(splitterApp, ['ejangular']).controller(SplitterCtrl, function ($scope) {});Configuring properties
Declare the splitter properties with prefix “e- “, refer the following code,
<div id="outterSpliter" class="ang-splitter" ej-splitter e-height ="100%" e-width="485" e-properties="proper" e-enableautoresize="true"></div>Note: All the Syncfusion widget’s properties are defined using e- prefix followed by the property name. You can find the complete API list from the API reference
Configure Splitter Panes
Add <div> element to create Splitter. Save the images in the corresponding location.
<div class="content-container-fluid">
            <div class="row">
                <div class="cols-sample-area" style="height:400px; margin:0 auto;">
                    <div id="outterSpliter" class="ang-splitter" ej-splitter e-height ="100%" e-width="485" e-properties="proper"
                        e-enableautoresize="true">
                        <div>
                            <div class="cont">
                                <h3 class="h3">AngularJS</h3>
                            </div>
                        </div>
                        <div>
                            <div class="cont">
                                <div class="_content">
                                    Select any product from the tree to show the description.
                                </div>
                                <div class=" galaxy spe">
                                    <h3>Mobile</h3>
                                    <img src="galaxy.jpg" />
                                </div>
                                <div class=" harddisk spe">
                                    <h3>Harddisk</h3>
                                    <img src="harddisk.jpg" />
                                </div>
                                <div class="logo spe">
                                    <h3>Logo</h3>
                                    <img src="logo.jpg" />
                                </div>
                            </div>
                        </div>
                    </div>
                </div>
            </div>
        </div>
    </div>
Add the following styles to show the Splitter control in horizontal order.
.cont{
                    padding: 20px;
                    min-width: 50px;
                }
        #outterSpliter{
                margin:0 auto;
                }
        .cont #treeView_Container {
                        margin-bottom: 0;
                        border: none;
                }

        .h3 {
                    font-size: 14px;
                    margin: 0;
                }

        .spe {
                    display: none;
                }
Configure Tree View
For adding Treeview component, you have to use ej-treeview directive to corresponding element.
Add the following code example in HTML file to configure Tree View.
<ul id="treeView" class="visibleHide" ej-treeview e-nodeSelect="treeClicked">
        <li> Mobile
                <ul>
                    <li id=" Galaxy " class="_child">Galaxy</li>
                </ul>
        </li>
        <li>Harddisk
                <ul>
                    <li id="Harddisk" class="_child">Segate  </li>
                </ul>
        </li>
        <li>Logo
                <ul>
                    <li id="Logo" class="_child">Amazon</li>
                </ul>
        </li>
    </ul>
Set Actions
Add the following code example in the view page to set the action to view the image.
splitterApp.controller('SplitterCtrl', function ($scope) {
            $scope.proper = [{ paneSize: "50%" }, {}]
        })


    function treeClicked(sender, args) {
                    if (sender.currentElement.hasClass('_child')) {
                        var content = $('.' + sender.currentElement[0].id).html();
                        $('._content').html(content);
                    }
                }
The following screenshot is the output for the above code.