Getting Started
28 Jun 201710 minutes to read
This section helps you to understand the getting started of the Dialog component with the step-by-step instructions.
Create a Dialog
28 Jun 201710 minutes to read
Adding dependencies
The following steps guide you to add a Dialog component.
- Create an HTML file and add required scripts and CSS files for rendering Essential JavaScript component as given in the Getting Started.
- In addition to it for angular implementation, refer the “angular.min.js” and “ej.widgets.angular.min.js” files.
Add the below codes in corresponding tags.
<html ng-app="syncApp">
<head>
<title>Simple Dialog</title>
<!-- Add Scripts and CSS for rendering Essential JS components -->
<link href="css/default-theme/ej.widgets.all.min.css" rel="stylesheet" />
<script src="scripts/jquery-1.11.3.min.js"></script>
<script src="scripts/angular.min.js"></script>
<script src="scripts/ej.web.all.min.js"></script>
<script src="scripts/ej.widget.angular.min.js"></script>
</head>
<body>
<div ng-controller="DialogCtrl">
<div id="dialog" ej-dialog >
</div>
</div>
</body>
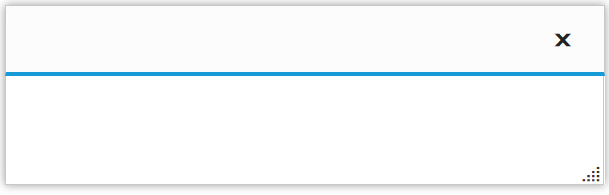
</html>Component initialization
- Initialize the ng-app and ng-controller for the application. For adding Dialog component, you have to use ej-dialog directive to corresponding element.
- Now initialize the control using angular module in script section
Add the following in the script section.
angular.module('syncApp', ['ejangular'])
             .controller('DialogCtrl', function ($scope) {
                                               });
Run the above code and you will get output like this.
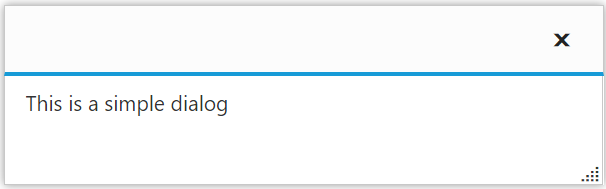
Add dialog content
Add the below code to render dialog Component with content
<html ng-app="syncApp">
        <head>
     <title>Simple Dialog with content</title>
       <!-- Add Scripts and CSS for rendering Essential JS components -->

      <link href="css/default-theme/ej.widgets.all.min.css" rel="stylesheet" />
     <script src="scripts/jquery-1.11.3.min.js"></script>
     <script src="scripts/angular.min.js"></script>
     <script src="scripts/ej.web.all.min.js"></script>
        <script src="scripts/ej.widget.angular.min.js"></script>

        </head>
        <body>
           <div ng-controller="DialogCtrl">
                  <div id="dialog" ej-dialog >
                      <!--dialog content-->
                      <p>This is a simple dialog</p>
                        </div>
        </div>

        </body>
        </html>
Add the following in the script section.
angular.module('syncApp', ['ejangular'])
             .controller('DialogCtrl', function ($scope) {
                                               });
Run the above code and your output will be,
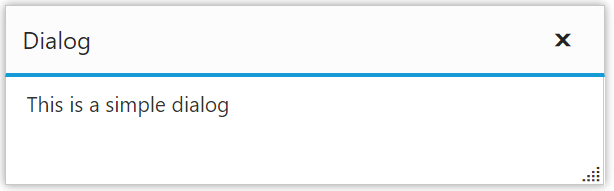
Set the title
You can set dialog component title as follows.
<html ng-app="syncApp">
        <head>
        <title>Simple Dialog with content</title>
        <!-- Add Scripts and CSS for rendering Essential JS components -->

        <link href="css/default-theme/ej.widgets.all.min.css" rel="stylesheet" />
      <script src="scripts/jquery-1.11.3.min.js"></script>
     <script src="scripts/angular.min.js"></script>
     <script src="scripts/ej.web.all.min.js"></script>
     <script src="scripts/ej.widget.angular.min.js"></script>
        </head>
        <body>
        <div ng-controller="DialogCtrl">
                  <div id="dialog" ej-dialog e-title="Dialog" >
                      <!--dialog content-->
                      <p>This is a simple dialog</p>
                        </div>
          </div>
        </body>
</html>angular.module('syncApp', ['ejangular'])
.controller('DialogCtrl', function ($scope) {
});Run the above code and your output will be,
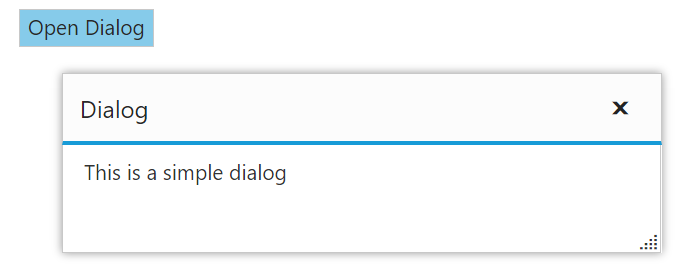
Open Dialog dynamically
In most cases, the Dialog components are needed only in dynamic actions like showing some messages on clicking a button, to provide alert, etc. So the Dialog component provides “open” and “close” methods to open/close the dialogs dynamically.
The Dialog Component can be hidden on initialize using e-showOnInit=”true” property which should be set to false.
Use the below code in the body tag. The dialog will be opened on clicking the Button component.
<html ng-app="syncApp">
        <head>
        <title>Simple Dialog with content</title>
        <!-- Add Scripts and CSS for rendering Essential JS components -->

        <link href="css/default-theme/ej.widgets.all.min.css" rel="stylesheet" />
        <script src="scripts/jquery-1.11.3.min.js"></script>
         <script src="scripts/angular.min.js"></script>
        <script src="scripts/ej.web.all.min.js"></script>
      <script src="scripts/ej.widget.angular.min.js"></script>
        </head>
        <body>

        <div class="cols-sample-area" style="height:400px;position:relative; overflow:hidden">
                    <button id="btnOpen" ej-button e-click="openDialog">Open Dialog</button>
                    <div id="dialog" ej-dialog e-title="Dialog" e-close="closeDialog" e-containment="containment" e-showOnInit="true">
                        <!--dialog content-->
                        <p>This is a simple dialog</p>
                    </div>
                </div>
        </body>
        </html>
Add the following in the script section
angular.module('syncApp', ['ejangular'])
             .controller('DialogCtrl', function ($scope) {
                 $scope.openDialog = function (args) {
                     $("#btnOpen").hide();
                     $("#dialog").ejDialog("open");
                 }
                 $scope.closeDialog = function (args) {
                     $("#btnOpen").show();
                 }
             });
Your output will be,