How can I help you?
Getting Started
This section explains briefly about how to create a WaitingPopup in your application with JavaScript.
Essential JavaScript WaitingPopup provides support to display a WaitingPopup within your webpage. From the following guidelines, you can learn how to create a WaitingPopup in a real-time login page authentication scenario.
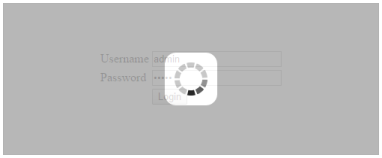
The following screenshot illustrates the functionality of a WaitingPopup with login page scenario.

You can give the Username and Password in the login page. When you click the Login button, you get the WaitingPopup. After loading, the alert box pops up with the message “Signed in successfully”.
Create Username and Password
Essential JavaScript WaitingPopup widget basically renders built-in features like blocking the other actions until the page is loaded. You can easily create the WaitingPopup widget by using simple <div> element as follows.
Create an HTML file and add the following template to the HTML file.
<!DOCTYPE html>
<html>
   <head>
    <link href="//cdn.syncfusion.com/32.2.3/js/web/flat-azure/ej.web.all.min.css" rel="stylesheet" />
    <script src="node_modules/core-js/client/shim.min.js"></script>
    <script src="node_modules/zone.js/dist/zone.js"></script>
    <script src="node_modules/reflect-metadata/Reflect.js"></script>
    <script src="node_modules/systemjs/dist/system.src.js"></script>
    <script src="https://code.jquery.com/jquery-3.0.0.min.js"></script>
    <script src="http://cdn.syncfusion.com/32.2.3/js/web/ej.web.all.min.js" type="text/javascript"></script>
    <script src ="http://cdn.syncfusion.com/32.2.3/js/common/ej.angular2.min.js"></script>
    <script src="systemjs.config.js"></script>
  </head>
  <body>
   <ej-app>Loading...</ej-app>
  </body>
</html>
Add an element to render a WaitingPopup.
<div id="targetElement">
        <table class="loginTable">
            <tr>
                <td>Username</td>
                <td>
                    <input type="text" /></td>
            </tr>
            <tr>
                <td>Password</td>
                <td>
                    <input type="password" /></td>
            </tr>
            <tr>
                <td></td>
                <td>
                    <button id="button51" (click)="success($event)">login</button></td>
            </tr>
        </table>
        <ej-waitingpopup id="popup" ></ej-waitingpopup>
</div>
Apply the following styles to show the WaitingPopup.
<style type="text/css" class="cssStyles">
#targetElement {
width: 500px;
height: 200px;
margin: 50px;
border: 1px solid #dbdcdb;
}
.loginTable {
margin: 60px auto;
}
#popup_WaitingPopup .e-image {
display: block;
height: 70px;
}
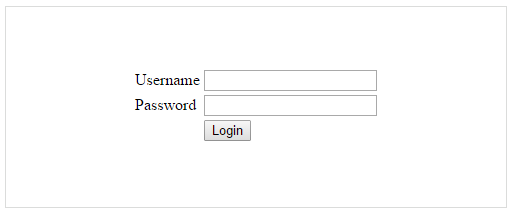
</style>The following screenshot displays a User login.
Add WaitingPopup Widget
Initialize the WaitingPopup in script
To render the ejWaitingPopup using angular directive, we need to inject the ej angular directive with modules shown as below,
In a real-time login page scenario, when you click the Login button, the WaitingPopup is displayed.
import {Component} from '@angular/core';

    @Component({
        selector: 'sd-home',
        templateUrl: 'app/components/waitingpopup/waitingpopup.component.html' // path for uploadbox component
        })
        export class WaitingPopupComponent {
            constructor() {
                }
            success(event){
		      var obj = jQuery("#popup").data("ejWaitingPopup");
              obj.setModel({showOnInit: true,target: "#targetElement"});
		    setTimeout(function() {
			 var obj = jQuery("#popup").data("ejWaitingPopup");
			 alert("Signed in successfully");
			 obj.hide();
		     }, 400);
	      }

       }
The following screenshot shows the output of the above code example.