Getting Started with Angular Splitter
17 Apr 20236 minutes to read
This section helps to get started of the Splitter component in an Angular application.
Create a Splitter
The following steps guide you to add a Splitter component.
To get start with how to use the Splitter component within Angular-2 platform, refer the basic requisites and the configurations needs to be done on the system from here.
Create a simple Splitter by adding ej-splitter attribute for initializing an empty Splitter component on the application.
<ej-splitter id="outterSpliter" class="ang-splitter" height ="100%" width="485" [properties]="proper" [isResponsive]="true">
    </ej-splitter>
Note: You can find the Splitter properties from the API reference _document__
Configure Splitter Panes
To configure properties for Splitter component, define properties in the component’s constructor file.
export class AppComponent {
        proper:Array<{paneSize:string}>;
        true:Boolean;
        constructor() {
        this.proper = [{ paneSize: "50%" }, {paneSize:"50%"}];
        this.true=true;
        }
    }
Now assign the defined variables to paneSize properties. Add required properties to the component.
<ej-splitter id="outterSpliter" class="ang-splitter" height ="100%" width="485" [properties]="proper" [isResponsive]="true">
    </ej-splitter>
Configure the Splitter panes with images. Save the images in the corresponding location.
<div class="cols-sample-area" style="height:400px; margin:0 auto;">
<ej-splitter id="outterSpliter" class="ang-splitter" height ="100%" width="485" [properties]="proper" [isResponsive]="true">
<div>
<div class="cont">
<h3 class="h3">AngularJS</h3>
</div>
</div>
<div class="cont">
<div class="_content">
Select any product from the tree to show the description.
</div>
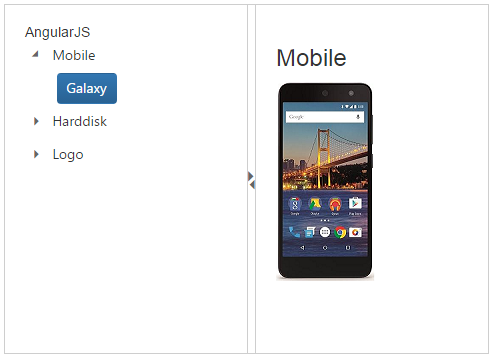
<div class="mobile spe" style="display:none">
<h3>Mobile</h3>
<img src="app/content/images/Splitter/mobile.jpeg" />
</div>
<div class="harddisk spe" style="display:none">
<h3>Harddisk</h3>
<img src="app/content/images/Splitter/harddisk.jpg" />
</div>
<div class="logo spe" style="display:none">
<h3>Logo</h3>
<img src="app/content/images/Splitter/logo.png" />
</div>
</div>
</ej-splitter>
</div>Configure Tree View
For adding Treeview component, you have to use ej-treeview directive to corresponding element. You need to use nodeSelect event handler to perform any action while selection the node in Tree view.
Add the following code example in HTML file to configure Tree View.
<ej-treeview  class="visibleHide" (nodeSelect)= "treeClicked($event)"  [fields]= "fields" >
    </ej-treeview>
To configure “li” contents for Splitter component, define “li” contents in an object array and fields in the component’s constructor file.
export class AppComponent {
        localData:Array<{}>;
        fields:Object;
        constructor() {
        this.localData=[
        { id: 1, name: "Mobile", hasChild: true, expanded: false },
        { id: "mobile", pid:1,name: "Galaxy"},
        { id: 3, name: "Harddisk", hasChild: true, expanded: false },
        { id: "harddisk", pid:3,name: "Segate"},
        { id: 5, name: "Logo", hasChild: true, expanded: false },
        { id: "logo", pid:5,name: "Amazon"},
        ];
        this.fields = { id: "id", parentId: "pid", text: "name", hasChild: "hasChild", dataSource: this.localData, expanded: "expanded" };
        }
        }
    }
Set Actions
Add the nodeSelect event in component constructor’s file to set the action to view the images for “li” content of the Tree view.
export class AppComponent {
        treeClicked(sender){
        if (sender.currentElement.hasClass('e-item last')) {
                    var content = $('.' + sender.currentElement[0].id).html();
                    $('._content').html(content);
        }
        }
    }