Getting Started
17 Dec 20186 minutes to read
This section helps you to understand the getting started of the Navigation Drawer component with the step-by-step instructions.
Create Navigation Drawer Component
The following steps guide you to add a Navigation Drawer component.
1) To get start with how to use the Navigation Drawer component within Angular-2 platform, refer the basic requisites and the configurations needs to be done on the system from here.
2) Create a Navigation Drawer by adding ej-navigationdrawer attribute for initializing a Navigation Drawer component on the application.
3) To add the navigation drawer list item by using data-ej-text property and access the List View component properties by enabling the enableListView property.
<div ej-navigationdrawer id="navpane" targetId="butdrawer" height="400"type="overlay" direction="left" [enableListView]="enableListView" [listViewSettings]="liveSet" position="normal">
        <ul>
            <li data-ej-text="Home"></li>
            <li data-ej-text="People"></li>
            <li data-ej-text="Profile"></li>
            <li data-ej-text="Photos"></li>
            <li data-ej-text="Communities"></li>
            <li data-ej-text="Location"></li>
        </ul>
 </div>
Create the target element as follows to display the list items by clicking target icon.
<div id="navdraw">
       <div id="container">
          <div id="butdrawer" class="drawerIcon e-icon">
          </div>
       </div>
   </div>
To set the target icon image and with the correct position as using the below mentioned styles.
<style>

       .e-header {
            padding-top: 8px;
            padding-left: 0px;
        }

        .drawerIcon {
            background-position: center center;
            background-repeat: no-repeat;
            height: 32px;
            width: 32px;
            background-size: 100% 100%;
			padding-right: 10px;
        }

        .drawerIcon:before {
            content: "\e76b";
            font-size: 28px;
			height: 26px;
        }

    </style>
Add the following code in the component’s constructor file for accessing List View component properties.
export class AppComponent {
    liveSet: any;
    el: boolean;

    constructor() {
        this.enableListView = true;
        this.liveSet = { width: 300, selectedItemIndex: 0, mouseUp: "headChange" };
    }
}
Get the following output from the above-mentioned code

You can open the list items by clicking on target element using the targetId property.

To set the images for list items of the Navigation Drawer by using the [data-ej-imageurl] property as follows.
<div ej-navigationdrawer id="navpane" targetId="butdrawer" height="400"type="overlay" direction="left" [enableListView]="el" [listViewSettings]="liveSet" position="normal">
        <ul>
            <li data-ej-imageurl="http://js.syncfusion.com/demos/web/content/images/navigationdrawer/home.png" data-ej-text="Home"></li>
            <li data-ej-imageurl="http://js.syncfusion.com/demos/web/content/images/navigationdrawer/profile.png" data-ej-text="Profile"></li>
            <li data-ej-imageurl="http://js.syncfusion.com/demos/web/content/images/navigationdrawer/photo.png" data-ej-text="Photos"></li>
        </ul>
    </div>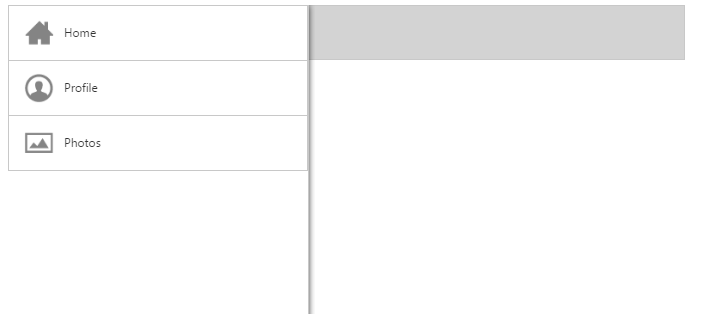
Customize Direction
By using direction property, to change the list view open direction. The possible directions are Right, Left and the Left is default value. Refer to the below mentioned code.
<div ej-navigationdrawer id="navpane" targetId="butdrawer" height="400" type="overlay" direction="right" [enableListView]="el" contentId="navdrawer_container" [listViewSettings]="liveSet" position="normal">
        <ul>
            <li data-ej-imageurl="http://js.syncfusion.com/demos/web/content/images/navigationdrawer/home.png" data-ej-text="Home" data-ej-href="#home"
                id="navigationHome"></li>
            <li data-ej-imageurl="http://js.syncfusion.com/demos/web/content/images/navigationdrawer/profile.png" data-ej-text="Profile" data-ej-href="#profile"
                id="navigationProfile"></li>
            <li data-ej-imageurl="http://js.syncfusion.com/demos/web/content/images/navigationdrawer/photo.png" data-ej-text="Photos" data-ej-href="#photos"
                id="navigationPhotos"></li>

        </ul>
    </div>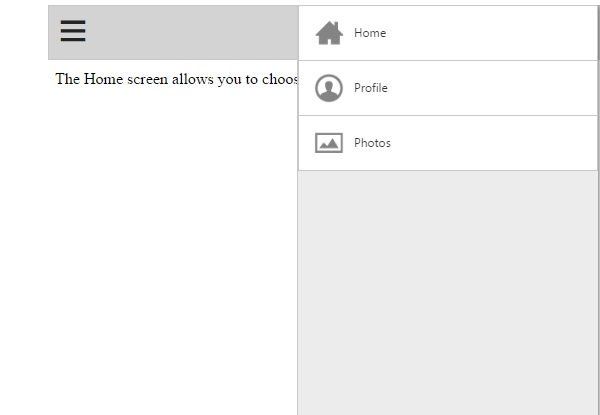
NOTE
You can find the complete API list for all Syncfusion controls from the API reference