How can I help you?
Getting Started
The Angular ListView control allows you to select an item from a list-like interface and provides the infrastructure to display a set of data items in different layouts or views. Lists display data, data navigation, result lists, and data entry.
This section explains briefly about how to create a web ListView in your application with Angular by step-by-step instructions
Create an ListView widget in Angular
Create a new HTML file and include the below code:
<!DOCTYPE html>
<html>
   <head>
    <link href="//cdn.syncfusion.com/32.2.3/js/web/flat-azure/ej.web.all.min.css" rel="stylesheet" />
    <script src="node_modules/core-js/client/shim.min.js"></script>
    <script src="node_modules/zone.js/dist/zone.js"></script>
    <script src="node_modules/reflect-metadata/Reflect.js"></script>
    <script src="node_modules/systemjs/dist/system.src.js"></script>
    <script src="https://code.jquery.com/jquery-3.1.1.min.js"></script>
    <script src="http://cdn.syncfusion.com/js/assets/external/jsrender.min.js" type="text/javascript"></script>
    <script src="https://ajax.aspnetcdn.com/ajax/jquery.validate/1.14.0/jquery.validate.min.js">
    </script>
        <script src="http://cdn.syncfusion.com/32.2.3/js/web/ej.web.all.min.js" type="text/javascript"></script>
    <script src ="http://cdn.syncfusion.com/32.2.3/js/common/ej.angular2.min.js"></script>

    <script src="systemjs.config.js"></script>
  </head>
  <body>
   <ej-app>Loading...</ej-app>
  </body>
Create input element and add in the body tag as below.
<div class="container" style="padding-top:100px">
        <div class="row">
            <div class="ctrllabel" style="padding-bottom: 12px"><b>Select a Music</b></div>
            <ej-listview [datasource]="listdata" [fieldsettings]="fieldsdata" width="300"></ej-listview>
        </div>
    </div>
To render the Angular ListBox use the below code.
import {Component,NgModule} from '@angular/core';
import {FormsModule} from '@angular/forms';
import {BrowserModule} from '@angular/platform-browser';

@Component({
  selector: 'sd-home',
  templateUrl: 'app/components/listview/listview.component.html',
})
export class ListViewComponent {
    listdata:array;
    fieldsdata:object;

    constructor() {
         this.listdata =
            [{ "Texts": "Discover Music" },
            { "Texts": "Sales and Events" },
            { "Texts": "Categories" },
            { "Texts": "MP3 Albums" },
            { "Texts": "More in Music" }];
        this.fieldsdata = { "text": "Texts" };
    }
}
Run the above code to render the following output.

Model binding
The Essential Angular ListView supports the data binding feature. When a widget’s model attribute is bound to ngModel variable, it will be reflected the changes.
The below table depicts the properties of Listview widget that supports model binding:
| control | Supported properties |
| ejListview | selectedItemIndex checkedIndices dataSource |
Add in the ngModel value as below.
<div class="container" style="padding-top:100px">
<div class="row">
<div class="ctrllabel" style="padding-bottom: 12px"><b>Select a Music</b></div>
<ej-listview [dataSource]="listdata" [fieldSettings]="fieldsdata" width=300 showHeader="true" headerTitle="MusicList" persistSelection="true" [selectedItemIndex]="selected" ></ej-listview>
               <br/>
<div id="binding">
                  <input type="text" id="listValue" class="input ejinputtext" [(ngModel)]="selected" />
             </div>
        </div>
</div>import {Component,NgModule} from '@angular/core';
import {FormsModule} from '@angular/forms';
import {BrowserModule} from '@angular/platform-browser';
@Component({
selector: 'ej-app',
templateUrl: 'app/app.component.html',
})
export class AppComponent {
listdata:array;
fieldsdata:object;
constructor() {
this.listdata =
[{ "Texts": "Discover Music" },
{ "Texts": "Sales and Events" },
{ "Texts": "Categories" },
{ "Texts": "MP3 Albums" },
{ "Texts": "More in Music" }];
this.fieldsdata = { "text": "Texts" };
}
}Run the above code to render the following output.

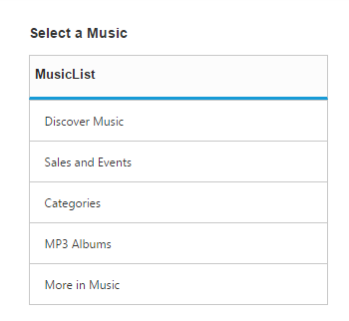
Add Header
We can add a header for ListView. Refer to the following script.
<div class="container" style="padding-top:100px">
        <div class="row">
            <div class="ctrllabel" style="padding-bottom: 12px"><b>Select a Music</b></div>
            <ej-listview [datasource]="listdata" [fieldsettings]="fieldsdata" width="300px" showheader="true" headertitle="MusicList"></ej-listview>
        </div>
    </div>
Run the above code to render the following output.