Getting started with Angular Quick Start - SystemJS
15 Oct 201810 minutes to read
Below steps depicts how to configure Syncfusion Angular components for local development.
Synopsis
- Clone Angular QuickStart
- Adding Syncfusion Angular package
- SystemJS configuration
- Import Syncfusion Angular package
- Adding style
- Adding Grid component
- Run the Application
Clone Angular QuickStart
The easiest way to start Syncfusion Angular is to use QuickStart of Angular. Clone the Angular quick-start with below commands.
git clone https://github.com/angular/quickstart.git quick-startOr Download the QuickStart seed and unzip it into your project folder. Run below commands to run the application.
cd quick-start
npm install
npm start
NOTE
To know more Angular QuickStart refer here.
Adding Syncfusion Angular package
Essential JavaScript provides support for Angular Framework through wrappers. Each Syncfusion JavaScript widgets are created as Angular components with built in support for data binding to make complex property definition easier.
Follow the below steps to install Syncfusion Angular package and its dependencies.
- Syncfusion Angular components are published as ej-angular2 NPM package. Install package with below command.
npm install ej-angular2 --save- Syncfusion Angular components requires, Syncfusion JavaScript widget source files. These files are available in NPM package syncfusion-javascript. Run below command to install package.
npm install syncfusion-javascript --save- For accessing
ejobject in quick-start application, install typings jquery and ej.web.all package. i.e. Accessingej.TextAlign.Leftfrom typing fileej.web.all. Install these packages with below commands.
npm install --save-dev @types/jquery
npm install --save-dev @types/ej.web.all
NOTE
To overcome the issue
node_modules/@types/jquery/index.d.ts(7325,30): error TS1005: ',' expectedinstall typescript package version2.3.4.
npm install [email protected] –-save-dev
SystemJS configuration
Syncfusion Angular components supports module loading. Since packages such as syncfusion-javascript, jquery, jquery-validation, jsrender are needed to be mapped in the systemjs.config.js file to notify the SystemJS loader about loading required modules for our Syncfusion Angular components.
Copy the below code into src/systemjs.config.js file.
/**
 * System configuration for Angular samples
 * Adjust as necessary for your application needs.
 */
(function (global) {
  System.config({
    paths: {
      // paths serve as alias
      'npm:': 'node_modules/'
    },
    // map tells the System loader where to look for things
    map: {
      // our app is within the app folder
      'app': 'app',

      // angular bundles
      '@angular/core': 'npm:@angular/core/bundles/core.umd.js',
      '@angular/common': 'npm:@angular/common/bundles/common.umd.js',
      '@angular/compiler': 'npm:@angular/compiler/bundles/compiler.umd.js',
      '@angular/platform-browser': 'npm:@angular/platform-browser/bundles/platform-browser.umd.js',
      '@angular/platform-browser-dynamic': 'npm:@angular/platform-browser-dynamic/bundles/platform-browser-dynamic.umd.js',
      '@angular/http': 'npm:@angular/http/bundles/http.umd.js',
      '@angular/router': 'npm:@angular/router/bundles/router.umd.js',
      '@angular/forms': 'npm:@angular/forms/bundles/forms.umd.js',

      // other libraries
      'rxjs':                      'npm:rxjs',
      'angular-in-memory-web-api': 'npm:angular-in-memory-web-api/bundles/in-memory-web-api.umd.js',

      //syncfusion bundles
      'jquery': 'npm:jquery/dist/jquery.min.js',
      'jsrender': 'npm:jsrender/jsrender.min.js',
      'jquery-validation': 'npm:jquery-validation/dist/jquery.validate.min.js',
      'syncfusion-javascript': 'npm:syncfusion-javascript',
      'ej-angular2': 'npm:ej-angular2'
    },
    // packages tells the System loader how to load when no filename and/or no extension
    packages: {
      app: {
        defaultExtension: 'js',
        meta: {
          './*.js': {
            loader: 'systemjs-angular-loader.js'
          }
        }
      },
      rxjs: {
        defaultExtension: 'js'
      },
      'ej-angular2': {
        main: './src/index.js'
      },
      'syncfusion-javascript': {
        defaultExtension: 'js'
      }
    }
  });
})(this);
Import Syncfusion Angular package
The EJAngular2Module from ej-angular2 package will import all Syncfusion Angular components into your application. So import it in app.module.ts file as like below.
import { NgModule }      from '@angular/core';
import { BrowserModule } from '@angular/platform-browser';

import { AppComponent }  from './app.component';

import { EJAngular2Module } from 'ej-angular2';

@NgModule({
  imports:      [ BrowserModule, EJAngular2Module.forRoot() ],
  declarations: [ AppComponent ],
  bootstrap:    [ AppComponent ]
})
export class AppModule { }
Adding style
Import theme file ej.web.all.min.css, of Syncfusion JavaScript widget from node_modules/syncfusion-javascript/Content/ej/web folder location. Add below code at top of the src/styles.css file.
@import url("./../node_modules/syncfusion-javascript/Content/ej/web/material/ej.web.all.min.css");
. . . .
. . . .
Adding Grid component
Now we can render any Angular component. Here, We rendered the ejGrid Angular component. Create app.component.html file in src/app/ location and copy the below code in it.
<h1>Hello </h1>
<ej-grid [allowPaging]="true"  [dataSource]="gridData" [allowPaging]="true" [pageSettings.pageSize]="5">
<e-columns>
    <e-column field="OrderID" headerText="Order ID" width="75" textAlign="right"></e-column>
    <e-column field="CustomerID" headerText="Customer ID" width="80"></e-column>
    <e-column field="EmployeeID" headerText="Employee ID" width="75" textAlign="right"></e-column>
    <e-column field="Freight" width="75" format="{0:C}" textAlign="right"></e-column>
    <e-column field="OrderDate" headerText="Order Date" width="80" format="{0:MM/dd/yyyy}" textAlign="right"></e-column>
</e-columns>
</ej-grid>
Modify the app.component.ts file to render grid component.
import { Component } from '@angular/core';

@Component({
  selector: 'my-app',
  templateUrl: './app.component.html',
})
export class AppComponent {
  name = 'Angular';
  public gridData: any;
  constructor() {
    this.gridData = [{
      OrderID: 10248, CustomerID: 'VINET', EmployeeID: 5,
      OrderDate: new Date(8364186e5), Freight: 32.38
    },
    {
      OrderID: 10249, CustomerID: 'TOMSP', EmployeeID: 6,
      OrderDate: new Date(836505e6), Freight: 11.61
    },
    {
      OrderID: 10250, CustomerID: 'HANAR', EmployeeID: 4,
      OrderDate: new Date(8367642e5), Freight: 65.83
    },
    {
      OrderID: 10251, CustomerID: 'VICTE', EmployeeID: 3,
      OrderDate: new Date(8367642e5), Freight: 41.34
    },
    {
      OrderID: 10252, CustomerID: 'SUPRD', EmployeeID: 4,
      OrderDate: new Date(8368506e5), Freight: 51.3
    },
    {
      OrderID: 10251, CustomerID: 'BERGS', EmployeeID: 8,
      OrderDate: new Date(840006e6), Freight: 8.98
    },
    {
      OrderID: 10251, CustomerID: 'BLONP', EmployeeID: 2,
      OrderDate: new Date(838278e6), Freight: 55.28
    },
    {
      OrderID: 10251, CustomerID: 'BONAP', EmployeeID: 7,
      OrderDate: new Date(8738748e5), Freight: 113.15
    },
    {
      OrderID: 10251, CustomerID: 'BOTTM', EmployeeID: 4,
      OrderDate: new Date(8921916e5), Freight: 74.44
    },
    {
      OrderID: 10251, CustomerID: 'CACTU', EmployeeID: 3,
      OrderDate: new Date(88416e7), Freight: 19.76
    }];
  }
}
Run the Application
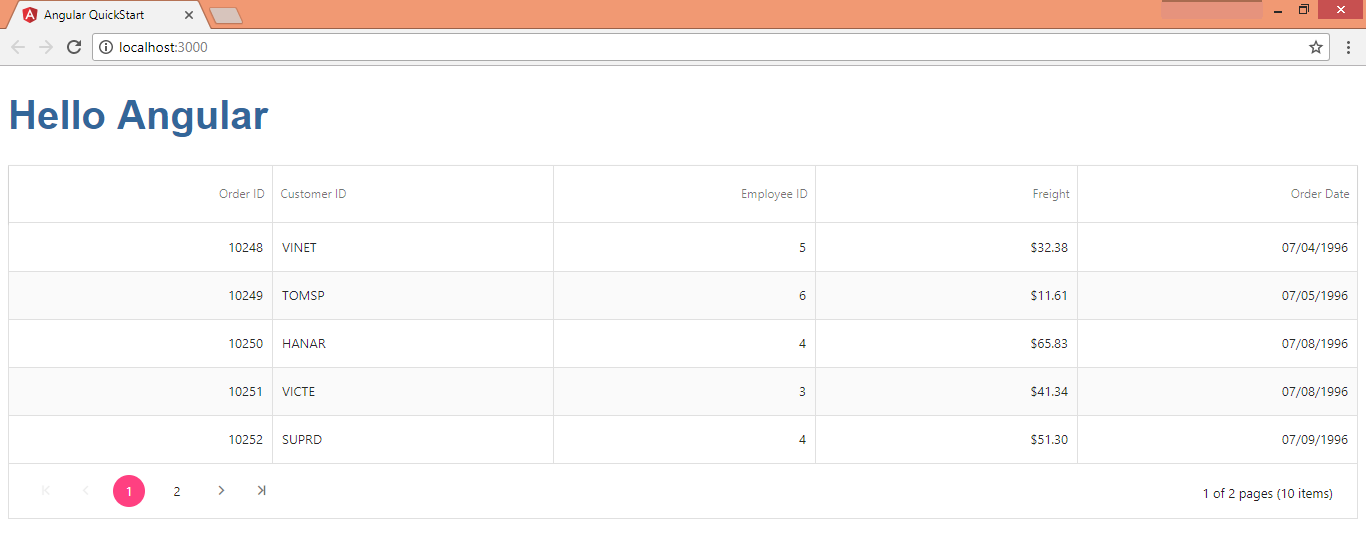
Run the command npm start to view the output of the application. Output will appear as follows.
