How To
18 Dec 201716 minutes to read
Cross-origin resource sharing support for FileExplorer
Cross-origin request
The FileExplorer can browse and manage files on remote servers, which is located in other domains. If a server is located on a different domain, on a different port or using different protocol (HTTP / HTTPS) such requests are considered to be “cross-origin requests”. These type of requests are prohibited by IE9 and its earlier browsers.
Enabling cross-origin request in IE8 and IE9
By default, Internet Explorer 9 and earlier prohibits cross-origin requests for Internet Zone, also it ignores Access-Control-Allow headers. To enable cross-origin in IE8 and IE9, we have specified two type of options. As per the requirements, you can use any option that is mentioned below.
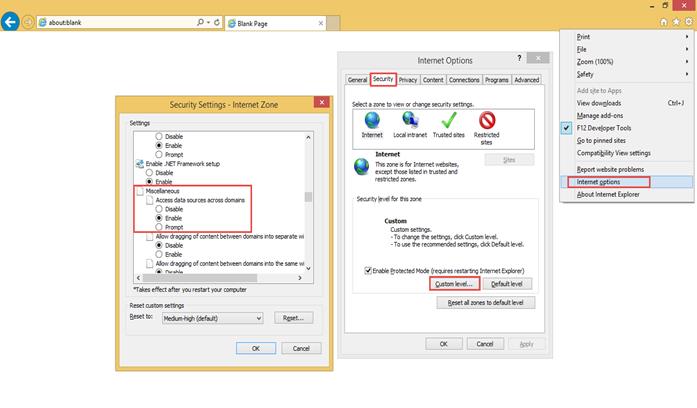
Option 1: Enabling cross-origin in IE through browser settings
To enable cross-origin access using settings of IE browser, go to Tools->Internet Options->Security tab, click on “Custom Level” button. Find the Miscellaneous and select “Enable” option, which is available under “Access data sources across domains” settings.
If your server is located in Intranet Zone, In IE Browser, confirmation dialog will be popped during first cross-domain request as “This page is accessing information that is not under its control. This poses a security risk. Do you want to continue?”
To suppress this warning, you need to specify the “Access data sources across domains” setting to “allow”.
Option 2: Using JSONP for cross-origin request
Using JSONP data type, you can perform cross origin-request. To enable cross-origin request, in your FileExplorer, you have to specify ajaxDataType as “JSONP”. And we have provided “doJSONPAction” method to handle “JSONP” type AJAX request on server side. Please refer below code snippet to specify ajaxDataType as “JSONP”.
<ej-fileexplorer id="fileExplorer" path= "http://js.syncfusion.com/demos/ejServices/Content/FileBrowser/"
    ajaxAction="http://js.syncfusion.com/demos/ejServices/api/FileExplorer/FileOperations" ajaxDataType="jsonp" style="display:block">
</ej-fileexplorer>
If we specify “ajaxDataType” as “JSONP”, data will be received in string format while calling “doJSONPAction” method of Web API Controller, here you need to deserialize the received “json” data into FileExplorerParams object. After performing corresponding operations, you have to specify the response data in serialized format with wrapped callback function. Please refer below code snippet to handle “JSONP” operations on server.
[HttpGet]
            [ActionName("doJSONPAction")]
            public object doJSONPAction(string callback, string json)
            {
                object Data = null;
                var serializer = new JavaScriptSerializer();
                FileExplorerParams args = (FileExplorerParams)serializer.Deserialize(json, typeof(FileExplorerParams));
                try
                {
                    switch (args.ActionType)
                    {
                        case "Read":
                            Data = FileExplorerOperations.ReadData(args.Path, args.ExtensionsAllow);
                            break;
                        case "Search":
                            Data = FileExplorerOperations.Search(args.Path, args.ExtensionsAllow, args.SearchString, args.CaseSensitive);
                            break;
                        case "CreateFolder":
                            Data = FileExplorerOperations.NewFolder(args.Path, args.Name);
                            break;
                        case "Paste":
                            Data = FileExplorerOperations.Paste(args.LocationFrom, args.LocationTo, args.Names, args.Action, args.CommonFiles);
                            break;
                        case "Remove":
                            Data = FileExplorerOperations.Remove(args.Names, args.Path);
                            break;
                        case "Rename":
                            Data = FileExplorerOperations.Rename(args.Path, args.Name, args.NewName, args.CommonFiles);
                            break;
                        case "GetDetails":
                            Data = FileExplorerOperations.GetDetails(args.Path, args.Names);
                            break;
                    }
                    HttpContext.Current.Response.Write(string.Format("{0}({1});", callback, serializer.Serialize(Data)));
                    return "";
                }
                catch (Exception e)
                {
                    FileExplorerResponse Response = new FileExplorerResponse();
                    Response.error = e.GetType().FullName + ", " + e.Message;
                    HttpContext.Current.Response.Write(string.Format("{0}({1});", callback, serializer.Serialize(Response)));
                    return "";
                }
            }
            [HttpPost]
            [ActionName("doJSONPAction")]
            public void doJSONPAction()
            {
                if (HttpContext.Current.Request.Files.Count > 0)
                    FileExplorerOperations.Upload(HttpContext.Current.Request.Files, HttpContext.Current.Request.QueryString.GetValues("Path")[0]);
            }
            [HttpGet]
            [ActionName("doJSONPAction")]
            public void doJSONPAction(string ActionType, string Path, string SelectedItems)
            {
                if (ActionType == "Download")
                FileExplorerOperations.Download(Path, HttpContext.Current.Request.QueryString.GetValues("Names"));
            else if (ActionType == "GetImage")
                FileExplorerOperations.GetImage(Path);
            }
In IE8 and IE9 Browser, These options helps to render our FileExplorer control with cross-origin resource support.
Service for FileExplorer
Generally web based file explorer needs a service for handling the file related operations in server end. In same way, our “FileExplorer” control uses server side functionalities for handling the file operations in flexible way, that means you can implement this server side functions in any languages (like C#, VB, Java, PHP, etc.) and can customize it as per your requirement.
By default, we have provided these server side AJAX handling functionalities in “C#” for managing physical filesystem and you can check it with “FileExplorerOperations” file, which is available at following Web API service application.
Web API service: http://www.syncfusion.com/downloads/support/directtrac/general/ze/FileExplorer_WebAPI1406113770.zip
Note: In this Web API application, we have provided “FileOperationController” file, which contains “doJSONAction” action method. When you make AJAX request, “doJSONAction” method will be called with AJAX request parameters then it calls the corresponding built-in file handling methods (Read, Search, Download, Upload, Remove, Rename etc.) that are available in our “FileExplorerOperations” class based on the “ActionType” parameter value.
Note: First run the provided Web API service, then you will get an URL like ”http://localhost:51460/“ (Here port number may change). As per port number, replace the specified URL in “path” and “ajaxAction” of “FileExplorer”.
Here we have created the file handling service using Web API application (.NET). If you want to use any other languages or platform for implementing this file handling service, you can achieve this. Please refer following table, this may be helpful to you to create your own service for FileExplorer.
Create a Web API service for FileExplorer using “Syncfusion.EJ” assembly
Please refer following steps to create a Web API service for FileExplorer using “Syncfusion.EJ” assembly.
Step 1: Create a new ASP.NET Web API project using Visual Studio.
Reference link
Step 2: Add “Syncfusion.EJ” assembly reference, which is available at following location of your system.
(Installed location)\Syncfusion\Essential Studio\{15.1.0.33}\Assemblies
For example, If you have installed the Essential Studio package within C:\Program Files(x86), then navigate to the below location,
C:\Program Files (x86)\Syncfusion\Essential Studio\{15.1.0.33}\Assemblies\4.5
This assembly contain built-in file handling methods such as (Read, Search, Download, Upload, Remove, Rename etc.) and it will be available in “FileExplorerOperations” class.
Step 3: Add “FileExplorerController.cs” file in the controller part of Web API project.
This file, contains action handler methods. Based on the request parameters, it helps to call the built-in file handling methods of Syncfusion.EJ assembly.
Step 4: Add following content in the “WebApiApplication” class of “Global.asax.cs” file.
protected void Application_Start()
    {
        RouteTable.Routes.MapHttpRoute(
        name: "Action",
        routeTemplate: "api/{controller}/{action}/{id}",
        defaults: new { id = System.Web.Http.RouteParameter.Optional }
        );
    }
    protected void Application_BeginRequest(object sender, EventArgs e)
    {
        if (Request.Headers.AllKeys.Contains("Origin") && Request.HttpMethod == "OPTIONS")
        {
            Response.StatusCode = 200;
            Response.End();
        }
    }
Step 5: In “Web.config” add following code under <system.webServer> tag
<httpProtocol>
      <customHeaders>
        <add name="Access-Control-Allow-Headers" value="accept, maxdataserviceversion, origin, x-requested-with, dataserviceversion,content-type" />
        <add name="Access-Control-Allow-Origin" value="*" />
        <add name="Access-Control-Max-Age" value="1728000" />
      </customHeaders>
    </httpProtocol>
Step 6: Add “FileBrowser” directory and it contains a files that is viewed by FileExplorer.
Now the Web API service for FileExplorer component is created. After running that service, you will get a base URL like “http://localhost:64218/”. (Port number may vary)
After that, you can use this service for your FileExplorer component as shown in below code block.
<ej-fileexplorer id="fileExplorer" path= "http://localhost:64218/FileBrowser/"
    ajaxAction="http://localhost:64218/api/FileExplorer/FileOperations" style="display:block">
</ej-fileexplorer>
Parameter list for AJAX request and response of FileExplorer
By default, we send following parameters in AJAX request. Using this details, you can perform the file handling operations of FileExplorer. After performing the file operations, you have to return the response data in proper format. This response data and request parameters are explained in following table. By referring to below table, you can create your custom functions to perform server side operations of “FileExplorer”.
|
Operation
|
Default Request Parameter |
Response data
|
Action Performed/ Details
|
|
Read |
String ActionType,
String Path, String ExtensionsAllow, IEnumerable |