Getting Started
20 Sep 20188 minutes to read
The AngularJS directives are usually included within the ej.widget.angular.min.js file and all these directives are usually packed together in a common module known as ejangular. For basic details on how to configure Syncfusion widgets in AngularJS framework, refer here.
To get start with the Schedule control in AngularJS framework, the following list of external dependencies are mandatory,
The external AngularJS script file angular.min.js can also be accessed from the following installed location -
- (installed location)\Syncfusion\Essential Studio\28.1.33\JavaScript\assets\external
An another mandatory script is ej.widget.angular.min.js, which can be accessed from the specified location -
- (installed location)\Syncfusion\Essential Studio\28.1.33\JavaScript\assets\scripts\common
The other required internal dependencies of Scheduler are tabulated below,
|
File |
Description/Usage |
|---|---|
|
ej.core.min.js |
Must be referred always first before using all the JS controls. |
|
ej.data.min.js |
Used to handle data operation and should be used while binding data to JS controls. |
|
ej.globalize.min.js |
Must be referred to localize any of the JS control's text and content. |
|
ej.schedule.min.js |
Schedule core script file which includes schedule related scripts files such as ej.schedule.render.js, ej.schedule.resources.js and ej.schedule.horizontal.js |
|
ej.scroller.js ej.touch.js ej.draggable.js ej.navigationdrawerbase.js ej.listviewbase.js ej.listview.js ej.recurrenceeditor.js ej.dropdownlist.js ej.radiobutton.js ej.dialog.js ej.button.js ej.autocomplete.js ej.datepicker.js ej.timepicker.js ej.checkbox.js ej.editor.js ej.menu.js ej.navigationdrawer.js ej.tooltip.js |
These files are referred for proper working of the sub-controls used within Scheduler. |
NOTE
Scheduler uses one or more sub-controls, therefore refer the
ej.web.all.min.js(which encapsulates all theejcontrols and frameworks in a single file) in the application instead of referring all the above specified internal dependencies.
To get the real appearance of the Scheduler, the dependent CSS file ej.web.all.min.css (which includes styles of all the widgets) should also needs to be referred.
Script/CSS Reference
Create a new HTML file and include the below initial code.
<!DOCTYPE html>
<html lang="en" xmlns="http://www.w3.org/1999/xhtml">
    <head>
        <meta charset="utf-8" />
        <title> </title>
    </head>
    <body>
    </body>
</html>
Refer the CSS file from the specific theme folder to your HTML file within the head section as shown below. Refer the built-in available themes from here.
<head>
    <meta charset="utf-8" />
    <title>Getting Started - Schedule</title>
    <link href="http://cdn.syncfusion.com/28.1.33/js/web/flat-azure/ej.web.all.min.css" rel="stylesheet" />
</head>
Add links to the CDN Script files with other required external dependencies.
<head>
    <meta charset="utf-8" />
    <title>Getting Started - Schedule</title>
    <link href="http://cdn.syncfusion.com/28.1.33/js/web/flat-azure/ej.web.all.min.css" rel="stylesheet" />
    <script src="http://cdn.syncfusion.com/js/assets/external/jquery-3.0.0.min.js"></script>
    <script src="http://cdn.syncfusion.com/js/assets/external/jsrender.min.js"></script>
    <script src="http://cdn.syncfusion.com/js/assets/external/angular.min.js"></script>
	<script src="http://cdn.syncfusion.com/28.1.33/js/web/ej.web.all.min.js"></script>
	<script src="http://cdn.syncfusion.com/28.1.33/js/common/ej.widget.angular.min.js"></script>
</head>
NOTE
Uncompressed version of the script files are also available, which is used for development or debugging purpose and can be generated from the custom script here.
Control Initialization
Create the Schedule control using ej-schedule directive and define all its other properties prefixed with e- as shown in the below code -
<html xmlns="http://www.w3.org/1999/xhtml" ng-app="ScheduleApp">

<body>
	<div ng-controller="ScheduleCtrl">
		<ej-schedule id="Schedule1" e-width="100%" e-height="525px" e-currentview="currentView" e-currentdate="setDate">
	    </ej-schedule>
	</div>
</body>

</html>
In the above code example, currentView and setDate are the scope variables defined, in order to enable the two-way binding. Therefore, refer the below code example to know how to enable the model binding.
<html xmlns="http://www.w3.org/1999/xhtml" ng-app="ScheduleApp">
<head> <!-- Dependency file references --> </head>
<body>
	<div ng-controller="ScheduleCtrl">
		<ej-schedule id="Schedule1" e-width="100%" e-height="525px" e-currentview="currentView" e-currentdate="setDate">
	    </ej-schedule>
	</div>
    <script>
	angular.module('ScheduleApp', ['ejangular']).controller('ScheduleCtrl', function ($scope) {
		$scope.setDate = new Date(2016, 4, 5);
		$scope.currentView = "week";
	});
</script>
</body>

</html>
The Scheduler properties that supports two-way binding are as follows -
| Properties | Usage |
|---|---|
| currentView | sets the specific view on the Scheduler |
| currentDate | sets the specific date on the Scheduler |
| fields.dataSource | Sets the Scheduler dataSource |
Binding Appointment Data
Set the Scheduler dataSource with a set of local JSON data by passing it through the scope variable appointments -
<html xmlns="http://www.w3.org/1999/xhtml" ng-app="ScheduleApp">
<head> <!-- Dependency file references --> </head>
<body>
	<div ng-controller="ScheduleCtrl">
		<ej-schedule id="Schedule1" e-width="100%" e-height="525px" e-currentview="currentView" e-currentdate="setDate"
            e-appointmentsettings-datasource="appointments"
			e-appointmentsettings-id="Id"
			e-appointmentsettings-subject="Subject"
			e-appointmentsettings-starttime="StartTime"
			e-appointmentsettings-endtime="EndTime"
			e-appointmentsettings-description="Description"
			e-appointmentsettings-allday="AllDay"
			e-appointmentsettings-recurrence="Recurrence"
			e-appointmentsettings-recurrencerule="RecurrenceRule">
	    </ej-schedule>
	</div>
<script>
    var dManager = [{
        Id: 1,
        Subject: "Bering Sea Gold",
        StartTime: new Date(2016, 4, 5, 5, 30),
        EndTime: new Date(2016, 4, 5, 7, 30),
        Description:"",
        AllDay: false,
        Recurrence: false
    }];
	angular.module('ScheduleApp', ['ejangular']).controller('ScheduleCtrl', function ($scope) {
        $scope.appointments = dManager;
		$scope.setDate = new Date(2016, 4, 5);
		$scope.currentView = "week";
	});
</script>
</body>

</html>
NOTE
Other than the local JSON data, Scheduler
dataSourcecan also be set with remote data services which is accessed through the help ofejDataManagerinstances.
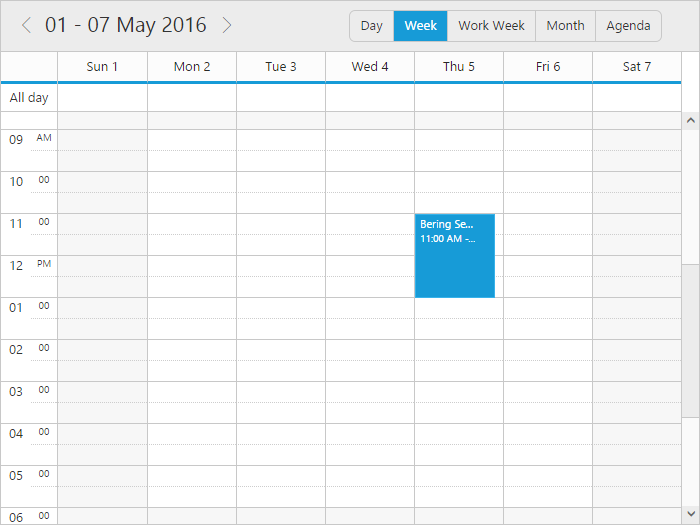
The Scheduler displays as shown in the below image -
Mapper Fields
It is mandatory to map the appointment fields with the appropriate column names from the dataSource. For example, if the local appointment data is defined with specific column names as below -
<script>
    var dManager = [{
        AppId: 1,
        AppSubject: "Bering Sea Gold",
        AppStartTime: new Date(2016, 4, 5, 5, 30),
        AppEndTime: new Date(2016, 4, 5, 7, 30),
        AppDescription:"",
        AllDay: false,
        Recurrence: false
    }];
</script>
Those above specified field names of appointment data must be mapped accurately with the Scheduler appointmentsettings fields as shown below -
<div ng-controller="ScheduleCtrl">
		<ej-schedule id="Schedule1" e-width="100%" e-height="525px" e-currentview="currentView" e-currentdate="setDate"
            e-appointmentsettings-datasource="appointments"
			e-appointmentsettings-id="AppId"
			e-appointmentsettings-subject="AppSubject"
			e-appointmentsettings-starttime="AppStartTime"
			e-appointmentsettings-endtime="AppEndTime"
			e-appointmentsettings-description="AppDescription"
			e-appointmentsettings-allday="AllDay"
			e-appointmentsettings-recurrence="Recurrence"
			e-appointmentsettings-recurrencerule="RecurrenceRule">
	    </ej-schedule>
	</div>