Getting Started with WPF Olap Client
14 Aug 202311 minutes to read
Important
Starting with v16.2.0.x, if you refer to Syncfusion assemblies from trial setup or from the NuGet feed, include a license key in your projects. Refer to this link to learn about registering Syncfusion license key in your WPF application to use the components.
This section covers the information required to create a simple OLAP client bound to the OLAP data source.
Through Visual Studio
Open the Visual Studio IDE and navigate to File > New > Project > WPF application (inside Visual C# templates) to create a new WPF application.
After creating the WPF application, go to View menu and select Toolbox option. Now, the toolbox will appear inside the Visual Studio IDE. From the Visual Studio Toolbox, drag the OLAP client under the Syncfusion BI WPF tag. It will automatically add the required assemblies to the application.
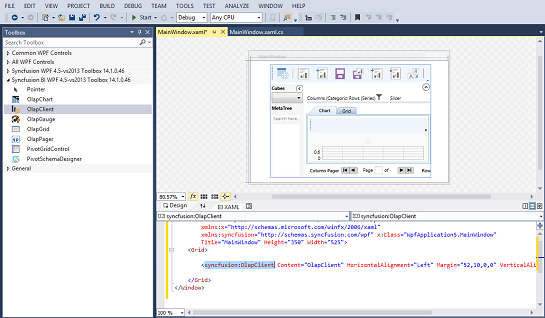
Add a Name to the OLAP client component for accessing it through code-behind as shown in the following code sample.
<Window
    xmlns="http://schemas.microsoft.com/winfx/2006/xaml/presentation"
    xmlns:x="http://schemas.microsoft.com/winfx/2006/xaml"
    xmlns:syncfusion="http://schemas.syncfusion.com/wpf" x:Class="WpfApplication5.MainWindow"
    Title="MainWindow" Height="350" Width="525">
    <Grid>
        <syncfusion:OlapClient Name="olapClient1" HorizontalAlignment="Stretch" VerticalAlignment="Stretch" Height="600" Width="700"/>
    </Grid>
</Window>
Include the following namespace in the code-behind for using OlapDataManger in the application. The OlapDataManager class contains the connection details, current report, cube name, cube schema, and pivot engine for rendering the OLAP client control.
- Syncfusion.Olap.Manager
using Syncfusion.Olap.Manager;

namespace WpfApplication
{
    public partial class MainWindow : SampleWindow
    {
        public MainWindow()
        {
            InitializeComponent();
            string connectionString = "Enter a valid connection string";
            //Connection string is passed to the OlapDataManager as an argument.
            OlapDataManager olapDataManager = new OlapDataManager(connectionString);
            // OlapClient gets information from the OlapDataManager.
            this.olapClient1.OlapDataManager = olapDataManager;
            this.olapClient1.DataBind();
        }
    }
}
Imports Syncfusion.Olap.Manager
Namespace WpfApplication
Partial Public Class MainWindow
Inherits SampleWindow
Public Sub New()
InitializeComponent()
Dim connectionString as String = "Enter a valid connection string"
'Connection string is passed to the OlapDataManager as an argument.
Dim olapDataManager As OlapDataManager = New OlapDataManager(connectionString)
'OlapClient gets information from the OlapDataManager.
Me.olapClient1.OlapDataManager = olapDataManager
Me.olapClient1.DataBind()
End Sub
End Class
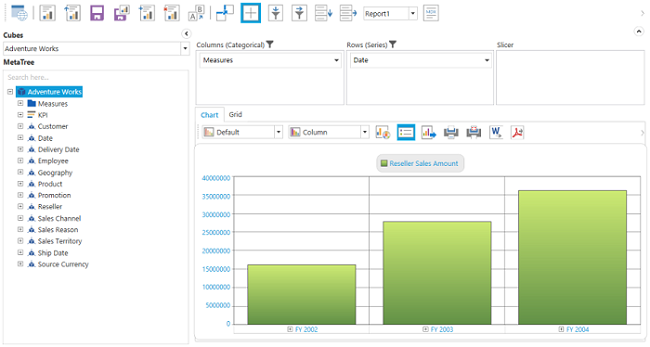
End NamespaceRun the application. The following output will be generated.

Through expression blend
Open Blend for Visual Studio and navigate to File > New project > WPF > WPF application to create a new WPF application.
Select the Project tab available in the left-corner of the Blend IDE, right-click the References and select Add Reference. Now, browse and add the following Syncfusion assemblies to the project.
- Syncfusion.Grid.Wpf
- Syncfusion.Olap.Base
- Syncfusion.Chart.Wpf
- Syncfusion.OlapChart.Wpf
- Syncfusion.OlapGrid.Wpf
- Syncfusion.OlapGridCommon.Wpf
- Syncfusion.OlapClient.Wpf
- Syncfusion.OlapShared.Wpf
- Syncfusion.OlapTools.Wpf
NOTE
You can also get the assemblies by browsing to the default assembly location {System Drive}:\Program Files (x86)\Syncfusion\Essential Studio\<version number>\precompiledassemblies\<version number>\<framework version>\
On adding the above assemblies, the OLAP client control will be added under the Assets tab automatically. Now, choose the Assets tab and drag the OLAP client to the designer.
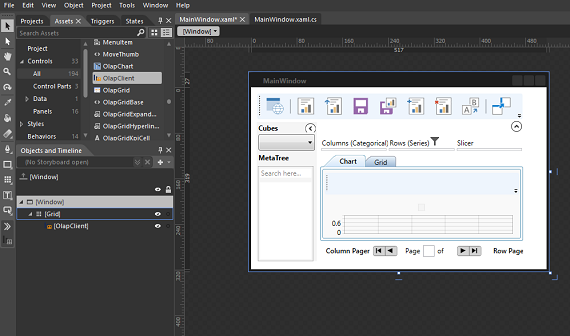
Add a Name to the OLAP client component for accessing it through code-behind as shown in the following code sample.
<Window
    x:Class="WpfApplication.MainWindow"
    xmlns="http://schemas.microsoft.com/winfx/2006/xaml/presentation"
    xmlns:x="http://schemas.microsoft.com/winfx/2006/xaml"
    xmlns:syncfusion="clr-namespace:Syncfusion.Windows.Client.Olap;assembly=Syncfusion.OlapClient.WPF"
    Width="900" Height="630" >
    <Grid>
        <syncfusion:OlapClient Name="olapClient1" HorizontalAlignment="Stretch" VerticalAlignment="Stretch"/>
    </Grid>
</Window>
Include the following namespace in the code-behind for using OlapDataManger in the application.
- Syncfusion.Olap.Manager
using Syncfusion.Olap.Manager;

namespace WpfApplication
{
    public partial class MainWindow : SampleWindow
    {
        public MainWindow()
        {
            InitializeComponent();
            String connectionString = "Enter a valid connection string";
            //Connection string is passed to the OlapDataManager as an argument.
            OlapDataManager olapDataManager = new OlapDataManager(connectionString);
            // The OlapClient gets the information from the OlapDataManager.
            this.olapClient1.OlapDataManager = olapDataManager;
            this.olapClient1.DataBind();
        }
    }
}
Imports Syncfusion.Olap.Manager
Namespace WpfApplication
Partial Public Class MainWindow
Inherits SampleWindow
Public Sub New()
InitializeComponent()
Dim connectionString as String = "Enter a valid connection string"
'Connection string is passed to the OlapDataManager as an argument.
Dim olapDataManager As OlapDataManager = New OlapDataManager(connectionString)
'The OlapClient gets the information from the OlapDataManager.
Me.olapClient1.OlapDataManager = olapDataManager
Me.olapClient1.DataBind()
End Sub
End Class
End NamespaceRun the application. The following output will be generated.
Through code-behind
Open the Visual Studio IDE and go to File > New > Project > WPF application (inside Visual C# Templates) to create a new WPF application.
To add the dependency assemblies within the application, right-click the References and select Add Reference. Then, add the following Syncfusion assemblies manually to the project from the installed location.
- Syncfusion.Chart.WPF
- Syncfusion.Shared.WPF
- Syncfusion.Olap.Base
- Syncfusion.OlapChart.WPF
- Syncfusion.OlapChartConverter.WPF
- Syncfusion.OlapClient.WPF
- Syncfusion.OlapGrid.WPF
- Syncfusion.OlapGridCommon.WPF
- Syncfusion.OlapGridConverter.WPF
- Syncfusion.OlapSampleUtils
- Syncfusion.OlapShared.WPF
- Syncfusion.OlapTools.WPF
- Syncfusion.Tools.WPF
NOTE
You can also get the assemblies by browsing to the default assembly location {System Drive}:\Program Files (x86)\Syncfusion\Essential Studio\<version number>\precompiledassemblies\<version number>\<{framework version>\
Include the following namespaces in code-behind for using OLAP client and OlapDataManger in the application.
- Syncfusion.Olap.Manager
- Syncfusion.Windows.Client.Olap
using Syncfusion.Windows.Client.Olap;
using Syncfusion.Olap.Manager;

namespace WpfApplication
{
    public partial class MainWindow : SampleWindow
    {
        public MainWindow()
        {
            //OlapClient instantiation.
            OlapClient olapClient1 = new OlapClient();
            String connectionString = "Enter a valid connection string";
            //Connection string is passed to the OlapDataManager as an argument.
            OlapDataManager olapDataManager = new OlapDataManager(connectionString);
            // OlapClient gets information from the OlapDataManager.
            olapClient1.OlapDataManager = olapDataManager;
            olapClient1.DataBind();
            //OlapClient added to the Main Window Grid region.
            grid.Children.Add(olapClient1);
        }
    }
}
Imports Syncfusion.Olap.Manager
Imports Syncfusion.Windows.Client.Olap;
Namespace WpfApplication
Partial Public Class MainWindow
Inherits SampleWindow
Public Sub New()
InitializeComponent()
'OlapClient instantiation.
Dim olapClient1 As OlapClient = New OlapClient()
Dim connectionString as String = "Enter a valid connection string"
'Connection string is passed to the OlapDataManager as an argument.
Dim olapDataManager As OlapDataManager = New OlapDataManager (connectionString)
'OlapClient gets information from the OlapDataManager.
olapClient1.OlapDataManager = olapDataManager
olapClient1.DataBind()
'OlapClient added to the Main Window Grid region.
grid.Children.Add(olapClient1)
End Sub
End Class
End NamespaceRun the application. The following output will be generated.
