Getting Started with WPF Multi Column Dropdown (SfMultiColumnDropDown)
18 Oct 202215 minutes to read
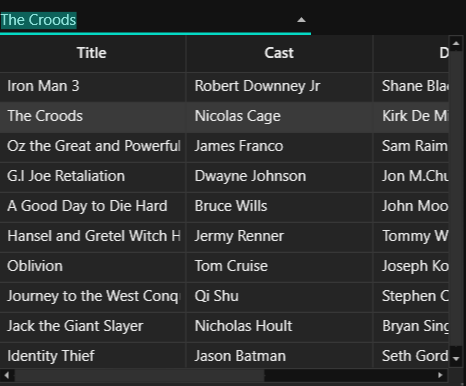
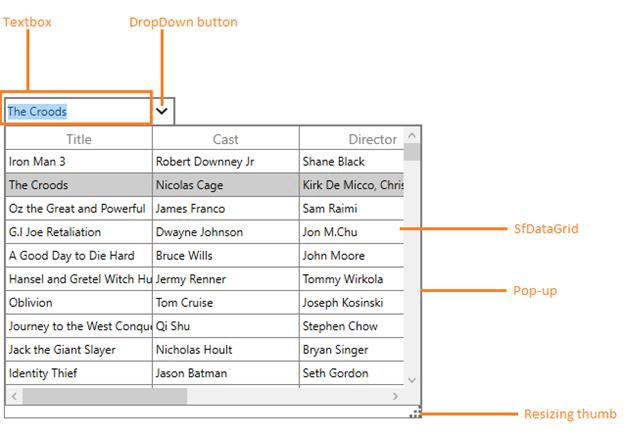
SfMultiColumnDropDownControl displays multiple columns in dropdown by embedding SfDataGrid control for rich look up selection.
Features,
* Auto complete support
* Support to customize the columns to be displayed
* Filter the data based on typed text
* Ability to customize popup width, height and resize at runtime
* Editor can be Read-only
You can refer here to know more about SfDataGrid.
Assembly deployment
The following list of assemblies needs to be added as reference to use SfMultiColumnDropDownControl control in any application,
| Required assemblies | Description |
|---|---|
| Syncfusion.Data.WPF | Syncfusion.Data.WPF assembly contains fundamental and base classes for CollectionViewAdv which is responsible for data processing operations handled in SfDataGrid. |
| Syncfusion.SfGrid.WPF | Syncfusion.SfGrid.WPF assembly contains classes that handles all UI operations of SfMultiColumnDropDownControl, DropDownGrid. SfMultiColumnDropDownControl control present in Syncfusion.UI.Xaml.Grid namespace. This namespace also added in http://schemas.syncfusion.com/wpf Syncfusion WPF schema. |
Creating simple application with SfMultiColumnDropDownControl
In this walk through, you will create WPF application that contains SfMultiColumnDropDownControl.
- Creating project
- Adding control via Designer
- Adding control manually in XAML
- Adding control manually in C#
- Creating Data Model for application
- Binding to Data
- Defining DisplayMember and ValueMember
- Defining Columns
- Auto complete and filtering
Creating the project
Create new WPF Project in Visual Studio to display SfMultiColumnDropDownControl with data objects.
Adding control via Designer
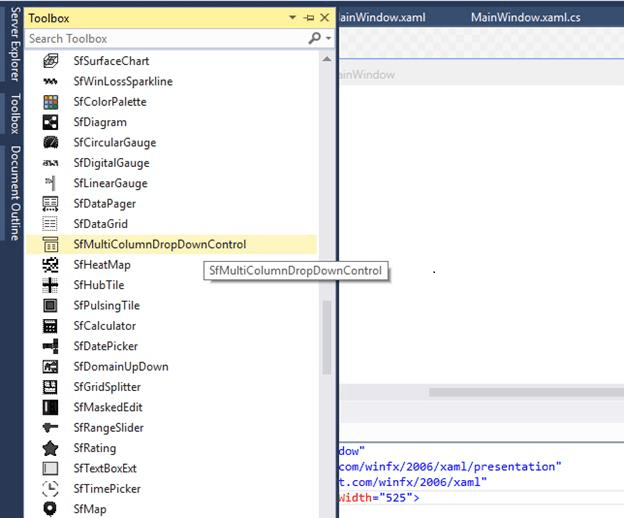
SfMultiColumnDropDownControl can be added to the application by dragging it from Toolbox and dropping it in Designer view. The required assembly references will be added automatically.
Adding control manually in XAML
In order to add control manually in XAML, do the below steps,
- Add the below required assembly references to the project,
- Syncfusion.Data.WPF
- Syncfusion.SfGrid.WPF
- Import Syncfusion WPF schema http://schemas.syncfusion.com/wpf or SfMultiColumnDropDownControl namespace Syncfusion.UI.Xaml.Grid in XAML page.
-
Declare
SfMultiColumnDropDownControlin XAML page.<Window xmlns=”http://schemas.microsoft.com/winfx/2006/xaml/presentation” xmlns:x=”http://schemas.microsoft.com/winfx/2006/xaml” xmlns:syncfusion=”http://schemas.syncfusion.com/wpf” x:Class=”WpfApplication1.MainWindow” Title=”MainWindow” Height=”350” Width=”525”> <Grid> <syncfusion:SfMultiColumnDropDownControl x:Name=”sfmultiColumn”/> </Grid> </Window>
Adding control manually in C#
In order to add the control manually in C#, do the below steps,
- Add the below required assembly references to the project,
- Syncfusion.Data.WPF
- Syncfusion.SfGrid.WPF
- Import SfMultiColumnDropDownControl namespace Syncfusion.UI.Xaml.Grid.
-
Create
SfMultiColumnDropDownControlinstance and add it to the Page.using Syncfusion.UI.Xaml.Grid; namespace WpfApplication1 { public partial class MainWindow : Window { public MainWindow() { InitializeComponent(); SfMultiColumnDropDownControl sfMultiColumn = new SfMultiColumnDropDownControl(); Root_Grid.Children.Add(sfMultiColumn); } } }
Creating Data Model for sample application
Before binding ItemsSource to the control, you must create data model for Application.
-
Create data object class named
OrderInfoand declare properties as shown below,public class OrderInfo { int orderID; string customerId; string country; string customerName; string shippingCity; public int OrderID { get { return orderID; } set { orderID = value; } } public string CustomerID { get { return customerId; } set { customerId = value; } } public string CustomerName { get { return customerName; } set { customerName = value;} } public string Country { get { return country; } set { country = value; } } public string ShipCity { get { return shippingCity; } set { shippingCity = value; } } public OrderInfo(int orderId, string customerName, string country, string customerId,string shipCity) { this.OrderID = orderId; this.CustomerName = customerName; this.Country = country; this.CustomerID = customerId; this.ShipCity = shipCity; } } -
Create a
ViewModelclass withOrdersproperty and Orders property is initialized with several data objects in constructor.public class ViewModel { private ObservableCollection<OrderInfo> _orders; public ObservableCollection<OrderInfo> Orders { get { return _orders; } set { _orders = value; } } public ViewModel() { _orders = new ObservableCollection<OrderInfo>(); this.GenerateOrders(); } private void GenerateOrders() { _orders.Add(new OrderInfo(1001, “Maria Anders”, “Germany”, “ALFKI”, “Berlin”)); _orders.Add(new OrderInfo(1002, “Ana Trujilo”, “Mexico”, “ANATR”, “Mexico D.F.”)); _orders.Add(new OrderInfo(1003, “Antonio Moreno”, “Mexico”, “ANTON”, “Mexico D.F.”)); _orders.Add(new OrderInfo(1004, “Thomas Hardy”, “UK”, “AROUT”, “London”)); _orders.Add(new OrderInfo(1005, “Christina Berglund”, “Sweden”, “BERGS”, “Lula”)); _orders.Add(new OrderInfo(1006, “Hanna Moos”, “Germany”, “BLAUS”, “Mannheim”)); _orders.Add(new OrderInfo(1007, “Frederique Citeaux”, “France”, “BLONP”, “Strasbourg”)); _orders.Add(new OrderInfo(1008, “Martin Sommer”, “Spain”, “BOLID”, “Madrid”)); _orders.Add(new OrderInfo(1009, “Laurence Lebihan”, “France”, “BONAP”, “Marseille”)); _orders.Add(new OrderInfo(1010, “Elizabeth Lincoln”, “Canada”, “BOTTM”, “Tsawassen”)); } }
Binding to Data
You can populate the drop down list for SfMultiColumnDropDownControl by setting ItemsSource property.
Bind the collection created in previous step to ItemsSource property by setting ViewModel as DataContext.
<Window
        xmlns=”http://schemas.microsoft.com/winfx/2006/xaml/presentation”
        xmlns:x=”http://schemas.microsoft.com/winfx/2006/xaml”
        xmlns:syncfusion=”http://schemas.syncfusion.com/wpf”
        x:Class=”WpfApplication1.MainWindow”
        xmlns:local=”clr-namespace:WpfApplication1”
        Title=”MainWindow” Height=”350” Width=”525”>
    <Window.DataContext>
        <local:ViewModel/>
    </Window.DataContext>
    <Grid x:Name=”Root_Grid”>
        <syncfusion:SfMultiColumnDropDownControl x:Name=”sfMultiColumn”
                                                 ItemsSource=”{Binding Orders}”
                                                 DisplayMember=”OrderID”
                                                 Width=”175”
                                                 Height=”30”
                                                 SelectedIndex=”2”/>
    </Grid>
</Window>
ViewModel viewModel = new ViewModel();
sfMultiColumn.ItemsSource = viewModel.Orders;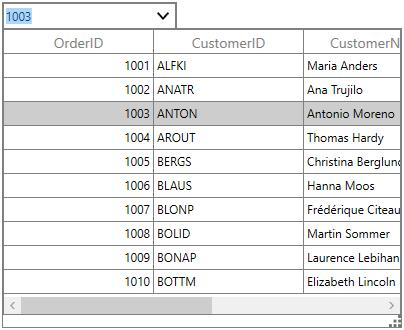
Defining DisplayMember and ValueMember
DisplayMember denotes the path to a value on the data object for visual presentation of the selected object in editor and ValueMember denotes the path to a value on the data object for SelectedValue.
Refer here to know more about the DisplayMember and ValueMember.
Defining Columns
By default, the SfMultiColumnDropDownControl generates the columns automatically based on ItemsSource property. You can prevent the automatic column generation by settingAutoGenerateColumns property to false. When AutoGenerateColumns property is false, you have to define the columns to be displayed as below,
<syncfusion:SfMultiColumnDropDownControl x:Name=”sfMultiColumn”
                                         Width=”175”
                                         Height=”30”
                                         SelectedIndex=”0”
                                         AutoGenerateColumns=”false”
                                         DisplayMember=”OrderID”
                                         ItemsSource=”{Binding Orders}”>
    <syncfusion:SfMultiColumnDropDownControl.Columns>
        <syncfusion:GridTextColumn MappingName=”OrderID” />
        <syncfusion:GridTextColumn MappingName=”CustomerID” />
        <syncfusion:GridTextColumn MappingName=”Country” />
    </syncfusion:SfMultiColumnDropDownControl.Columns>
</syncfusion:SfMultiColumnDropDownControl>
SfMultiColumnDropDownControl sfMultiColumn = new SfMultiColumnDropDownControl();
sfMultiColumn.AutoGenerateColumns = false;
sfMultiColumn.Columns.Add(new GridTextColumn() { MappingName = “OrderID” });
sfMultiColumn.Columns.Add(new GridTextColumn() { MappingName = “CustomerID” });
sfMultiColumn.Columns.Add(new GridTextColumn() { MappingName = “Country” });Editing and filtering
SfMultiColumnDropDownControl provides support to auto append the text from ItemsSource when end-user edits in the TextBox by setting AllowAutoComplete to true.
Also, it provides support to filter the items displayed in the drop-down based on text in the TextBox by settingAllowIncrementalFiltering ` to true.
Theme
SfMultiColumnDropDownControl supports various built-in themes. Refer to the below links to apply themes for the SfMultiColumnDropDownControl,