Working with Cell or Range Formatting
7 Nov 202324 minutes to read
This section covers the various formatting options in a cell or a range.
Create a Style
The following code shows how to create and apply cell style.
using (ExcelEngine excelEngine = new ExcelEngine())
{
  IApplication application = excelEngine.Excel;
  application.DefaultVersion = ExcelVersion.Excel2013;
  IWorkbook workbook = application.Workbooks.Create(1);
  IWorksheet worksheet = workbook.Worksheets[0];

  //Creating a new style with cell back color, fill pattern and font attribute
  IStyle style = workbook.Styles.Add("NewStyle");
  style.Color = Color.LightGreen;
  style.FillPattern = ExcelPattern.DarkUpwardDiagonal;
  style.Font.Bold = true;
  worksheet.Range["B2"].CellStyle = style;

  //Saving the workbook as stream
  FileStream stream = new FileStream("Style.xlsx", FileMode.Create, FileAccess.ReadWrite);
  workbook.SaveAs(stream);
  stream.Dispose();
}
using (ExcelEngine excelEngine = new ExcelEngine())
{
IApplication application = excelEngine.Excel;
application.DefaultVersion = ExcelVersion.Excel2013;
IWorkbook workbook = application.Workbooks.Create(1);
IWorksheet worksheet = workbook.Worksheets[0];
//Creating a new style with cell back color, fill pattern and font attribute
IStyle style = workbook.Styles.Add("NewStyle");
style.Color = Color.LightGreen;
style.FillPattern = ExcelPattern.DarkUpwardDiagonal;
style.Font.Bold = true;
worksheet.Range["B2"].CellStyle = style;
workbook.SaveAs("Style.xlsx");
}Using excelEngine As ExcelEngine = New ExcelEngine()
Dim application As IApplication = excelEngine.Excel
application.DefaultVersion = ExcelVersion.Excel2013
Dim workbook As IWorkbook = application.Workbooks.Create(1)
Dim worksheet As IWorksheet = workbook.Worksheets(0)
'Creating a new style with cell back color, fill pattern and font attribute
Dim style As IStyle = workbook.Styles.Add("NewStyle")
style.Color = Color.LightGreen
style.FillPattern = ExcelPattern.DarkUpwardDiagonal
style.Font.Bold = True
worksheet.Range("B2").CellStyle = style
workbook.SaveAs("Style.xlsx")
End UsingA complete working example to create style in C# is present on this GitHub page.
Set Default Style for row or column
It is the recommended and optimized approach to format entire row or column with same styles instead of formatting each and every cell individually. Use the following code to set default style.
using (ExcelEngine excelEngine = new ExcelEngine())
{
  IApplication application = excelEngine.Excel;
  application.DefaultVersion = ExcelVersion.Excel2013;
  IWorkbook workbook = application.Workbooks.Create(1);
  IWorksheet worksheet = workbook.Worksheets[0];

  //Define new styles to apply in rows and columns
  IStyle rowStyle = workbook.Styles.Add("RowStyle");
  rowStyle.Color = Color.LightGreen;
  IStyle columnStyle = workbook.Styles.Add("ColumnStyle");
  columnStyle.Color = Color.Orange;

  //Set default row style for entire row
  worksheet.SetDefaultRowStyle(1, 2, rowStyle);
  //Set default column style for entire column
  worksheet.SetDefaultColumnStyle(1, 2, columnStyle);

  //Saving the workbook as stream
  FileStream stream = new FileStream("DefaultStyles.xlsx", FileMode.Create, FileAccess.ReadWrite);
  workbook.SaveAs(stream);
  stream.Dispose();
}
using (ExcelEngine excelEngine = new ExcelEngine())
{
IApplication application = excelEngine.Excel;
application.DefaultVersion = ExcelVersion.Excel2013;
IWorkbook workbook = application.Workbooks.Create(1);
IWorksheet worksheet = workbook.Worksheets[0];
//Define new styles to apply in rows and columns
IStyle rowStyle = workbook.Styles.Add("RowStyle");
rowStyle.Color = Color.LightGreen;
IStyle columnStyle = workbook.Styles.Add("ColumnStyle");
columnStyle.Color = Color.Orange;
//Set default row style for entire row
worksheet.SetDefaultRowStyle(1, 2, rowStyle);
//Set default column style for entire column
worksheet.SetDefaultColumnStyle(1, 2, columnStyle);
workbook.SaveAs("DefaultStyles.xlsx");
}Using excelEngine As ExcelEngine = New ExcelEngine()
Dim application As IApplication = excelEngine.Excel
application.DefaultVersion = ExcelVersion.Excel2013
Dim workbook As IWorkbook = application.Workbooks.Create(1)
Dim worksheet As IWorksheet = workbook.Worksheets(0)
'Define new styles to apply in rows and columns
Dim rowStyle As IStyle = workbook.Styles.Add("RowStyle")
rowStyle.Color = Color.LightGreen
Dim columnStyle As IStyle = workbook.Styles.Add("ColumnStyle")
columnStyle.Color = Color.Orange
'Set default row style for entire row
worksheet.SetDefaultRowStyle(1, 2, rowStyle)
'Set default column style for entire column
worksheet.SetDefaultColumnStyle(1, 2, columnStyle)
workbook.SaveAs("DefaultStyles.xlsx")
End UsingA complete working example to apply default style for rows and columns in C# is present on this GitHub page.
NOTE
Applying custom styles will override original styles.
TIPS
To apply styles for whole column instead of applying in each cell, use default styles.
Apply Global Style
The XlsIO adds styles globally that can be applied to one or more cells in a workbook. This is a recommended approach to apply single style in different rows and columns, which improves memory and performance considerably.
To learn more about performance, refer to the Improving Performing section for better performance in XlsIO.
The following code snippet illustrates how to set header style and body style to the cells.
using (ExcelEngine excelEngine = new ExcelEngine())
{
  IApplication application = excelEngine.Excel;
  application.DefaultVersion = ExcelVersion.Excel2013;
  IWorkbook workbook = application.Workbooks.Create(2);
  IWorksheet worksheet = workbook.Worksheets[0];

  //Adding values to a worksheet range
  worksheet.Range["A1"].Text = "CustomerID";
  worksheet.Range["B1"].Text = "CompanyName";
  worksheet.Range["C1"].Text = "ContactName";
  worksheet.Range["A2"].Text = "ALFKI";
  worksheet.Range["A3"].Text = "ANATR";
  worksheet.Range["A4"].Text = "BONAP";
  worksheet.Range["A5"].Text = "BSBEV";
  worksheet.Range["B2"].Text = "Alfred Futterkiste";
  worksheet.Range["B3"].Text = "Ana Trujillo Emparedados y helados";
  worksheet.Range["B4"].Text = "Bon App";
  worksheet.Range["B5"].Text = "B's Beverages";
  worksheet.Range["C2"].Text = "Maria Anders";
  worksheet.Range["C3"].Text = "Ana Trujillo";
  worksheet.Range["C4"].Text = "Laurence Lebihan";
  worksheet.Range["C5"].Text = "Victoria Ashworth";

  //Formatting
  //Global styles should be used when the same style needs to be applied to more than one cell. This usage of a global style reduces memory usage.
  //Add custom colors to the palette
  workbook.SetPaletteColor(8, Color.FromArgb(255, 174, 33));

  //Defining header style
  IStyle headerStyle = workbook.Styles.Add("HeaderStyle");
  headerStyle.BeginUpdate();
  headerStyle.Color = Color.FromArgb(255, 174, 33);
  headerStyle.Font.Bold = true;
  headerStyle.Borders[ExcelBordersIndex.EdgeLeft].LineStyle = ExcelLineStyle.Thin;
  headerStyle.Borders[ExcelBordersIndex.EdgeRight].LineStyle = ExcelLineStyle.Thin;
  headerStyle.Borders[ExcelBordersIndex.EdgeTop].LineStyle = ExcelLineStyle.Thin;
  headerStyle.Borders[ExcelBordersIndex.EdgeBottom].LineStyle = ExcelLineStyle.Thin;
  headerStyle.EndUpdate();

  //Add custom colors to the palette
  workbook.SetPaletteColor(9, Color.FromArgb(239, 243, 247));

  //Defining body style
  IStyle bodyStyle = workbook.Styles.Add("BodyStyle");
  bodyStyle.BeginUpdate();
  bodyStyle.Color = Color.FromArgb(239, 243, 247);
  bodyStyle.Borders[ExcelBordersIndex.EdgeLeft].LineStyle = ExcelLineStyle.Thin;
  bodyStyle.Borders[ExcelBordersIndex.EdgeRight].LineStyle = ExcelLineStyle.Thin;
  bodyStyle.EndUpdate();

  //Apply Header style
  worksheet.Rows[0].CellStyle = headerStyle;
  //Apply Body Style
  worksheet.Range["A2:C5"].CellStyle = bodyStyle;
  //Auto-fit the columns
  worksheet.UsedRange.AutofitColumns();

  //Saving the workbook as stream
  FileStream stream = new FileStream("GlobalStyles.xlsx", FileMode.Create, FileAccess.ReadWrite);
  workbook.SaveAs(stream);
  stream.Dispose();
}
using (ExcelEngine excelEngine = new ExcelEngine())
{
IApplication application = excelEngine.Excel;
application.DefaultVersion = ExcelVersion.Excel2013;
IWorkbook workbook = application.Workbooks.Create(2);
IWorksheet worksheet = workbook.Worksheets[0];
//Adding values to a worksheet range
worksheet.Range["A1"].Text = "CustomerID";
worksheet.Range["B1"].Text = "CompanyName";
worksheet.Range["C1"].Text = "ContactName";
worksheet.Range["A2"].Text = "ALFKI";
worksheet.Range["A3"].Text = "ANATR";
worksheet.Range["A4"].Text = "BONAP";
worksheet.Range["A5"].Text = "BSBEV";
worksheet.Range["B2"].Text = "Alfred Futterkiste";
worksheet.Range["B3"].Text = "Ana Trujillo Emparedados y helados";
worksheet.Range["B4"].Text = "Bon App";
worksheet.Range["B5"].Text = "B's Beverages";
worksheet.Range["C2"].Text = "Maria Anders";
worksheet.Range["C3"].Text = "Ana Trujillo";
worksheet.Range["C4"].Text = "Laurence Lebihan";
worksheet.Range["C5"].Text = "Victoria Ashworth";
//Formatting
//Global styles should be used when the same style needs to be applied to more than one cell. This usage of a global style reduces memory usage.
//Add custom colors to the palette
workbook.SetPaletteColor(8, Color.FromArgb(255, 174, 33));
//Defining header style
IStyle headerStyle = workbook.Styles.Add("HeaderStyle");
headerStyle.BeginUpdate();
headerStyle.Color = Color.FromArgb(255, 174, 33);
headerStyle.Font.Bold = true;
headerStyle.Borders[ExcelBordersIndex.EdgeLeft].LineStyle = ExcelLineStyle.Thin;
headerStyle.Borders[ExcelBordersIndex.EdgeRight].LineStyle = ExcelLineStyle.Thin;
headerStyle.Borders[ExcelBordersIndex.EdgeTop].LineStyle = ExcelLineStyle.Thin;
headerStyle.Borders[ExcelBordersIndex.EdgeBottom].LineStyle = ExcelLineStyle.Thin;
headerStyle.EndUpdate();
//Add custom colors to the palette
workbook.SetPaletteColor(9, Color.FromArgb(239, 243, 247));
//Defining body style
IStyle bodyStyle = workbook.Styles.Add("BodyStyle");
bodyStyle.BeginUpdate();
bodyStyle.Color = Color.FromArgb(239, 243, 247);
bodyStyle.Borders[ExcelBordersIndex.EdgeLeft].LineStyle = ExcelLineStyle.Thin;
bodyStyle.Borders[ExcelBordersIndex.EdgeRight].LineStyle = ExcelLineStyle.Thin;
bodyStyle.EndUpdate();
//Apply Header style
worksheet.Rows[0].CellStyle = headerStyle;
//Apply Body Style
worksheet.Range["A2:C5"].CellStyle = bodyStyle;
//Auto-fit the columns
worksheet.UsedRange.AutofitColumns();
workbook.SaveAs("GlobalStyles.xlsx");
}Using excelEngine As ExcelEngine = New ExcelEngine()
Dim application As IApplication = excelEngine.Excel
application.DefaultVersion = ExcelVersion.Excel2013
Dim workbook As IWorkbook = application.Workbooks.Create(2)
Dim worksheet As IWorksheet = workbook.Worksheets(0)
'Adding values to a worksheet range
worksheet.Range("A1").Text = "CustomerID"
worksheet.Range("B1").Text = "CompanyName"
worksheet.Range("C1").Text = "ContactName"
worksheet.Range("A2").Text = "ALFKI"
worksheet.Range("A3").Text = "ANATR"
worksheet.Range("A4").Text = "BONAP"
worksheet.Range("A5").Text = "BSBEV"
worksheet.Range("B2").Text = "Alfred Futterkiste"
worksheet.Range("B3").Text = "Ana Trujillo Emparedados y helados"
worksheet.Range("B4").Text = "Bon App"
worksheet.Range("B5").Text = "B's Beverages"
worksheet.Range("C2").Text = "Maria Anders"
worksheet.Range("C3").Text = "Ana Trujillo"
worksheet.Range("C4").Text = "Laurence Lebihan"
worksheet.Range("C5").Text = "Victoria Ashworth"
'Formatting
'Global styles should be used when the same style needs to be applied to more than one cell. This usage of a global style reduces memory usage.
'Add custom colors to the palette
workbook.SetPaletteColor(8, Color.FromArgb(255, 174, 33))
'Defining header style
Dim headerStyle As IStyle = workbook.Styles.Add("HeaderStyle")
headerStyle.BeginUpdate()
headerStyle.Color = Color.FromArgb(255, 174, 33)
headerStyle.Font.Bold = True
headerStyle.Borders(ExcelBordersIndex.EdgeLeft).LineStyle = ExcelLineStyle.Thin
headerStyle.Borders(ExcelBordersIndex.EdgeRight).LineStyle = ExcelLineStyle.Thin
headerStyle.Borders(ExcelBordersIndex.EdgeTop).LineStyle = ExcelLineStyle.Thin
headerStyle.Borders(ExcelBordersIndex.EdgeBottom).LineStyle = ExcelLineStyle.Thin
headerStyle.EndUpdate()
'Add custom colors to the palette
workbook.SetPaletteColor(9, Color.FromArgb(239, 243, 247))
'Defining body style
Dim bodyStyle As IStyle = workbook.Styles.Add("BodyStyle")
bodyStyle.BeginUpdate()
bodyStyle.Color = Color.FromArgb(239, 243, 247)
bodyStyle.Borders(ExcelBordersIndex.EdgeLeft).LineStyle = ExcelLineStyle.Thin
bodyStyle.Borders(ExcelBordersIndex.EdgeRight).LineStyle = ExcelLineStyle.Thin
bodyStyle.EndUpdate()
'Apply Header style
worksheet.Rows(0).CellStyle = headerStyle
'Apply Body Style
worksheet.Range("A2:C5").CellStyle = bodyStyle
'Auto-fit the columns
worksheet.UsedRange.AutofitColumns()
workbook.SaveAs("GlobalStyles.xlsx")
End UsingA complete working example to apply global style in C# is present on this GitHub page.

Excel document with Global Styles
Apply Number Formats
Number Formats are codes that helps to control the appearance of cell values especially numbers in an Excel document. Excel recognizes the numbers in various formats like:
- Number
- Currency
- Percentage
- DateTime
- Accounting
- Scientific
- Fraction and
- Text
This number format can be of maximum 4 parts, separated by semicolons. They are:
- Positive Numbers
- Negative Numbers
- Zeros
- Text
Each part is an individual number format. Default format is “General”, it means anything that will fit.
The following table shows various custom formatting codes:
|
Number Code |
Description |
|---|---|
|
General |
General number format. |
|
0 (zero) |
Digit placeholder. This code pads the value with zeros to fill the format. |
|
# |
Digit placeholder. This code does not display extra zeros. |
|
? |
Digit placeholder. This code leaves a space for insignificant zeros but does not display them. |
|
. (period) |
Decimal placeholder. The decimal placeholder determines how many digits are displayed to the left and right of the decimal separator. |
|
% |
Percentage placeholder. Multiplies by 100 and adds the % character. |
|
, (comma) |
Thousands separator. A comma followed by a placeholder (0 or #) scales the number by a thousand. |
|
E+ E- e+ e- |
Scientific notation. |
|
Text Code |
Description |
|
$ - + / ( ) : space |
These characters are displayed in the number. To display any other character, enclose the character in quotation marks or precede it with a backslash. |
|
\character |
This code displays the succeeding character you specify. Note Typing !, ^, &, ', ~, {, }, =, <, or > automatically places a backslash in front of the character. |
|
"text" |
This code displays the text. |
|
* |
This code repeats the next character in the format to fill the column width. Note: Only one asterisk per section of a format is allowed. |
|
_ (underscore) |
This code skips the width of the next character. This code is commonly used as "_)" (without the quotation marks) to leave space for a closing parenthesis in a positive number format when the negative number format includes parentheses. This allows the values to line up at the decimal point. |
|
@ |
Text placeholder. |
|
Date Code |
Description |
|
m |
Month as a number without leading zeros (1-12). |
|
mm |
Month as a number with leading zeros (01-12). |
|
mmm |
Month as an abbreviation (Jan - Dec). |
|
mmmm |
Unabbreviated Month (January - December). |
|
d |
Day without leading zeros (1-31). |
|
dd |
Day with leading zeros (01-31). |
|
ddd |
Week day as an abbreviation (Sun - Sat). |
|
dddd |
Unabbreviated week day (Sunday - Saturday). |
|
yy |
Year as a two-digit number (for example, 96). |
|
yyyy |
Year as a four-digit number (for example, 1996). |
|
Time Code |
Description |
|
h |
Hours as a number without leading zeros (0-23). |
|
hh |
Hours as a number with leading zeros (00-23). |
|
m |
Minutes as a number without leading zeros (0-59). |
|
mm |
Minutes as a number with leading zeros (00-59). |
|
s |
Seconds as a number without leading zeros (0-59). |
|
ss |
Seconds as a number with leading zeros (00-59). |
|
AM/PM am/pm |
Time based on the twelve-hour clock. |
|
Miscellaneous Code |
Description |
|
[BLACK], [BLUE], [CYAN], [GREEN], [MAGENTA], [RED], [WHITE], [YELLOW], [COLOR n] |
These codes display the characters in the specified colors. Note: n is a value from 1 to 56 and refers to the nth color in the color palette. |
|
[Condition value] |
Condition may be <, >, =, >=, <=, <> and value may be any number. Note: A number format may contain up to two conditions. |
XlsIO provides support for reading and writing various built-in and custom number formats in a cell by using the NumberFormat property of IRange interface.
The following code snippet illustrates how to set different number formats in a worksheet range.
using (ExcelEngine excelEngine = new ExcelEngine())
{
  IApplication application = excelEngine.Excel;
  application.DefaultVersion = ExcelVersion.Excel2013;
  IWorkbook workbook = application.Workbooks.Create(1);
  IWorksheet worksheet = workbook.Worksheets[0];

  worksheet.Range["A1"].Text = "DATA";
  worksheet.Range["B1"].Text = "NUMBER FORMAT APPLIED";
  worksheet.Range["C1"].Text = "RESULT";
  IStyle headingStyle = workbook.Styles.Add("HeadingStyle");
  headingStyle.Font.Bold = true;
  headingStyle.HorizontalAlignment = ExcelHAlign.HAlignCenter;
  worksheet.Range["A1:C1"].CellStyle = headingStyle;

  //Applying different number formats
  worksheet.Range["A2"].Text = "1000000.00075";
  worksheet.Range["B2"].Text = "0.00";
  worksheet.Range["C2"].NumberFormat = "0.00";
  worksheet.Range["C2"].Number = 1000000.00075;
  worksheet.Range["A3"].Text = "1000000.500";
  worksheet.Range["B3"].Text = "###,##";
  worksheet.Range["C3"].NumberFormat = "###,##";
  worksheet.Range["C3"].Number = 1000000.500;
  worksheet.Range["A5"].Text = "10000";
  worksheet.Range["B5"].Text = "0.00";
  worksheet.Range["C5"].NumberFormat = "0.00";
  worksheet.Range["C5"].Number = 10000;
  worksheet.Range["A6"].Text = "-500";
  worksheet.Range["B6"].Text = "[Blue]#,##0";
  worksheet.Range["C6"].NumberFormat = "[Blue]#,##0";
  worksheet.Range["C6"].Number = -500;
  worksheet.Range["A7"].Text = "0.000000000000000000001234567890";
  worksheet.Range["B7"].Text = "0.000000000000000000000000000000";
  worksheet.Range["C7"].NumberFormat = "0.000000000000000000000000000000";
  worksheet.Range["C7"].Number = 0.000000000000000000001234567890;
  worksheet.Range["A9"].Text = "1.20";
  worksheet.Range["B9"].Text = "0.00E+00";
  worksheet.Range["C9"].NumberFormat = "0.00E+00";
  worksheet.Range["C9"].Number = 1.20;

  //Applying percentage format
  worksheet.Range["A10"].Text = "1.20";
  worksheet.Range["B10"].Text = "0.00%";
  worksheet.Range["C10"].NumberFormat = "0.00%";
  worksheet.Range["C10"].Number = 1.20;

  //Applying date format
  worksheet.Range["A11"].Text = new DateTime(2005, 12, 25).ToString();
  worksheet.Range["B11"].Text = "m/d/yyyy";
  worksheet.Range["C11"].NumberFormat = "m/d/yyyy";
  worksheet.Range["C11"].DateTime = new DateTime(2005, 12, 25);

  //Applying currency format
  worksheet.Range["A12"].Text = "1.20";
  worksheet.Range["B12"].Text = "$#,##0.00";
  worksheet.Range["C12"].NumberFormat = "$#,##0.00";
  worksheet.Range["C12"].Number = 1.20;

  //Applying accounting format
  worksheet.Range["A12"].Text = "234";
  worksheet.Range["B12"].Text = "_($* #,##0_)";
  worksheet.Range["C12"].NumberFormat = "_($* #,##0_)";
  worksheet.Range["C12"].Number = 234;

  //Fit column width to data
  worksheet.UsedRange.AutofitColumns();

  //Saving the workbook as stream
  FileStream stream = new FileStream("NumberFormats.xlsx", FileMode.Create, FileAccess.ReadWrite);
  workbook.SaveAs(stream);
  stream.Dispose();
}
using (ExcelEngine excelEngine = new ExcelEngine())
{
IApplication application = excelEngine.Excel;
application.DefaultVersion = ExcelVersion.Excel2013;
IWorkbook workbook = application.Workbooks.Create(1);
IWorksheet worksheet = workbook.Worksheets[0];
worksheet.Range["A1"].Text = "DATA";
worksheet.Range["B1"].Text = "NUMBER FORMAT APPLIED";
worksheet.Range["C1"].Text = "RESULT";
IStyle headingStyle = workbook.Styles.Add("HeadingStyle");
headingStyle.Font.Bold = true;
headingStyle.HorizontalAlignment = ExcelHAlign.HAlignCenter;
worksheet.Range["A1:C1"].CellStyle = headingStyle;
//Applying different number formats
worksheet.Range["A2"].Text = "1000000.00075";
worksheet.Range["B2"].Text = "0.00";
worksheet.Range["C2"].NumberFormat = "0.00";
worksheet.Range["C2"].Number = 1000000.00075;
worksheet.Range["A3"].Text = "1000000.500";
worksheet.Range["B3"].Text = "###,##";
worksheet.Range["C3"].NumberFormat = "###,##";
worksheet.Range["C3"].Number = 1000000.500;
worksheet.Range["A5"].Text = "10000";
worksheet.Range["B5"].Text = "0.00";
worksheet.Range["C5"].NumberFormat = "0.00";
worksheet.Range["C5"].Number = 10000;
worksheet.Range["A6"].Text = "-500";
worksheet.Range["B6"].Text = "[Blue]#,##0";
worksheet.Range["C6"].NumberFormat = "[Blue]#,##0";
worksheet.Range["C6"].Number = -500;
worksheet.Range["A7"].Text = "0.000000000000000000001234567890";
worksheet.Range["B7"].Text = "0.000000000000000000000000000000";
worksheet.Range["C7"].NumberFormat = "0.000000000000000000000000000000";
worksheet.Range["C7"].Number = 0.000000000000000000001234567890;
worksheet.Range["A9"].Text = "1.20";
worksheet.Range["B9"].Text = "0.00E+00";
worksheet.Range["C9"].NumberFormat = "0.00E+00";
worksheet.Range["C9"].Number = 1.20;
//Applying percentage format
worksheet.Range["A10"].Text = "1.20";
worksheet.Range["B10"].Text = "0.00%";
worksheet.Range["C10"].NumberFormat = "0.00%";
worksheet.Range["C10"].Number = 1.20;
//Applying date format
worksheet.Range["A11"].Text = new DateTime(2005, 12, 25).ToString();
worksheet.Range["B11"].Text = "m/d/yyyy";
worksheet.Range["C11"].NumberFormat = "m/d/yyyy";
worksheet.Range["C11"].DateTime = new DateTime(2005, 12, 25);
//Applying currency format
worksheet.Range["A12"].Text = "1.20";
worksheet.Range["B12"].Text = "$#,##0.00";
worksheet.Range["C12"].NumberFormat = "$#,##0.00";
worksheet.Range["C12"].Number = 1.20;
//Applying accounting format
worksheet.Range["A12"].Text = "234";
worksheet.Range["B12"].Text = "_($* #,##0_)";
worksheet.Range["C12"].NumberFormat = "_($* #,##0_)";
worksheet.Range["C12"].Number = 234;
//Fit column width to data
worksheet.UsedRange.AutofitColumns();
workbook.SaveAs("NumberFormats.xlsx");
}Using excelEngine As ExcelEngine = New ExcelEngine()
Dim application As IApplication = excelEngine.Excel
application.DefaultVersion = ExcelVersion.Excel2013
Dim workbook As IWorkbook = application.Workbooks.Create(1)
Dim worksheet As IWorksheet = workbook.Worksheets(0)
worksheet.Range("A1").Text = "DATA"
worksheet.Range("B1").Text = "NUMBER FORMAT APPLIED"
worksheet.Range("C1").Text = "RESULT"
Dim headingStyle As IStyle = workbook.Styles.Add("HeadingStyle")
headingStyle.Font.Bold = True
headingStyle.HorizontalAlignment = ExcelHAlign.HAlignCenter
worksheet.Range("A1:C1").CellStyle = headingStyle
'Applying different number formats
worksheet.Range("A2").Text = "1000000.00075"
worksheet.Range("B2").Text = "0.00"
worksheet.Range("C2").NumberFormat = "0.00"
worksheet.Range("C2").Number = 1000000.00075
worksheet.Range("A3").Text = "1000000.500"
worksheet.Range("B3").Text = "###,##"
worksheet.Range("C3").NumberFormat = "###,##"
worksheet.Range("C3").Number = 1000000.5
worksheet.Range("A5").Text = "10000"
worksheet.Range("B5").Text = "0.00"
worksheet.Range("C5").NumberFormat = "0.00"
worksheet.Range("C5").Number = 10000
worksheet.Range("A6").Text = "-500"
worksheet.Range("B6").Text = "[Blue]#,##0"
worksheet.Range("C6").NumberFormat = "[Blue]#,##0"
worksheet.Range("C6").Number = -500
worksheet.Range("A7").Text = "0.000000000000000000001234567890"
worksheet.Range("B7").Text = "0.000000000000000000000000000000"
worksheet.Range("C7").NumberFormat = "0.000000000000000000000000000000"
worksheet.Range("C7").Number = 1.23456789E-21
worksheet.Range("A9").Text = "1.20"
worksheet.Range("B9").Text = "0.00E+00"
worksheet.Range("C9").NumberFormat = "0.00E+00"
worksheet.Range("C9").Number = 1.2
'Applying percentage format
worksheet.Range("A10").Text = "1.20"
worksheet.Range("B10").Text = "0.00%"
worksheet.Range("C10").NumberFormat = "0.00%"
worksheet.Range("C10").Number = 1.2
'Applying date format
worksheet.Range("A11").Text = New DateTime(2005, 12, 25).ToString()
worksheet.Range("B11").Text = "m/d/yyyy"
worksheet.Range("C11").NumberFormat = "m/d/yyyy"
worksheet.Range("C11").DateTime = New DateTime(2005, 12, 25)
'Applying currency format
worksheet.Range("A12").Text = "1.20"
worksheet.Range("B12").Text = "$#,##0.00"
worksheet.Range("C12").NumberFormat = "$#,##0.00"
worksheet.Range("C12").Number = 1.2
'Applying accounting format
worksheet.Range("A12").Text = "234"
worksheet.Range("B12").Text = "_($* #,##0_)"
worksheet.Range("C12").NumberFormat = "_($* #,##0_)"
worksheet.Range("C12").Number = 234
'Fit column width to data
worksheet.UsedRange.AutofitColumns()
workbook.SaveAs("NumberFormats.xlsx")
End UsingThe screenshot of the previous code is shown as follows:
A complete working example to apply number formats in C# is present on this GitHub page.

Access number format applied results at runtime
Cell values can be accessed as Text, Number, DateTime and Formula of IRange interface. In addition to this, there is an another property DisplayText in IRange, which returns a resultant value of a cell with its number format applied.
The following code example illustrates how to display the text of a cell.
using (ExcelEngine excelEngine = new ExcelEngine())
{
  IApplication application = excelEngine.Excel;
  application.DefaultVersion = ExcelVersion.Excel2013;
  IWorkbook workbook = application.Workbooks.Create(1);
  IWorksheet worksheet = workbook.Worksheets[0];

  //Set value to the cell
  worksheet.Range["C4"].Number = 1.20;

  //Set value to a cell
  worksheet.Range["B4"].Text = "$#,##0.00";

  //Get display text of the cell
  string text = worksheet.Range["B4"].DisplayText;

  //Saving the workbook as stream
  FileStream stream = new FileStream("Output.xlsx", FileMode.Create, FileAccess.ReadWrite);
  workbook.SaveAs(stream);
  stream.Dispose();
}
using (ExcelEngine excelEngine = new ExcelEngine())
{
IApplication application = excelEngine.Excel;
application.DefaultVersion = ExcelVersion.Excel2013;
IWorkbook workbook = application.Workbooks.Create(1);
IWorksheet worksheet = workbook.Worksheets[0];
//Set value to the cell
worksheet.Range["C4"].Number = 1.20;
//Set value to a cell
worksheet.Range["B4"].Text = "$#,##0.00";
//Get display text of the cell
string text = worksheet.Range["B4"].DisplayText;
workbook.SaveAs("Output.xlsx");
}Using excelEngine As ExcelEngine = New ExcelEngine()
Dim application As IApplication = excelEngine.Excel
application.DefaultVersion = ExcelVersion.Excel2013
Dim workbook As IWorkbook = application.Workbooks.Create(1)
Dim worksheet As IWorksheet = workbook.Worksheets(0)
'Set value to the cell
worksheet.Range("C4").Number = 1.2
'Set value to a cell
worksheet.Range("B4").Text = "$#,##0.00"
'Get display text of the cell
Dim text As String = worksheet.Range("B4").DisplayText
workbook.SaveAs("Output.xlsx")
End UsingYou can set DetectDateTimeInValue property of IWorkbook as false with Value2 property, if you are sure that the given value is not of DateTime data type which improves time performance.
workbook.DetectDateTimeInValue = false;workbook.DetectDateTimeInValue = false;workbook.DetectDateTimeInValue = FalseHide Cell Content by setting Number Format
Essential XlsIO supports hiding rows or columns in a worksheet along with hiding specific range. You can also hide a particular cell content by setting a specific number format to that cell.
Refer to the following complete code snippets.
using (ExcelEngine excelEngine = new ExcelEngine())
{
  IApplication application = excelEngine.Excel;
  application.DefaultVersion = ExcelVersion.Excel2016;
  IWorkbook workbook = application.Workbooks.Create(1);
  IWorksheet worksheet = workbook.Worksheets[0];

  //Assign values to a range of cells in the worksheet
  worksheet.Range["A1:A10"].Text = "Hide Cell Content";

  //Apply number format for the cell to hide its content
  worksheet.Range["A5"].NumberFormat = ";;;";

  //Saving the workbook as stream
  FileStream stream = new FileStream("Output.xlsx", FileMode.Create, FileAccess.ReadWrite);
  workbook.SaveAs(stream);
  stream.Dispose();
}
using (ExcelEngine excelEngine = new ExcelEngine())
{
IApplication application = excelEngine.Excel;
application.DefaultVersion = ExcelVersion.Excel2013;
IWorkbook workbook = application.Workbooks.Create(1);
IWorksheet worksheet = workbook.Worksheets[0];
//Assign values to a range of cells in the worksheet
worksheet.Range["A1:A10"].Text = "Hide Cell Content";
//Apply number format for the cell to hide its content
worksheet.Range["A5"].NumberFormat = ";;;";
workbook.SaveAs("Output.xlsx");
}Using excelEngine As ExcelEngine = New ExcelEngine()
Dim application As IApplication = excelEngine.Excel
application.DefaultVersion = ExcelVersion.Excel2013
Dim workbook As IWorkbook = application.Workbooks.Create(1)
Dim worksheet As IWorksheet = workbook.Worksheets(0)
'Assign values to a range of cells in the worksheet
worksheet.Range("A1:A10").Text = "Hide Cell Content"
'Apply number format for the cell to hide its content
worksheet.Range("A5").NumberFormat = ";;;"
workbook.SaveAs("Output.xlsx")
End UsingA complete working example to hide cell content by applying number format in C# is present on this GitHub page.
Apply Cell Text Alignment
The XlsIO supports the following alignment options:
- Horizontal Alignment
- Vertical Alignment
- Indentation
- Orientation
- Text Direction
Horizontal Alignment
This code snippet aligns the cell content horizontally.
//Text Alignment Setting (Horizontal Alignment)
worksheet.Range["A2"].CellStyle.HorizontalAlignment = ExcelHAlign.HAlignCenter;
//Text Alignment Setting (Horizontal Alignment)
worksheet.Range["A2"].CellStyle.HorizontalAlignment = ExcelHAlign.HAlignCenter;'Text Alignment Setting (Horizontal Alignment)
worksheet.Range("A2").CellStyle.HorizontalAlignment = ExcelHAlign.HAlignCenterVertical Alignment
This code snippet aligns the cell content vertically.
//Text Alignment Setting (Vertical Alignment)
worksheet.Range["B2"].CellStyle.VerticalAlignment = ExcelVAlign.VAlignBottom;//Text Alignment Setting (Vertical Alignment)
worksheet.Range["B2"].CellStyle.VerticalAlignment = ExcelVAlign.VAlignBottom;'Text Alignment Setting (Vertical Alignment)
worksheet.Range("B2").CellStyle.VerticalAlignment = ExcelVAlign.VAlignBottomIndentation
This allows to set the cell content either to move it closer to the cell border or to move it farther away from cell border.
//Text Indent Setting
worksheet.Range["C6"].CellStyle.IndentLevel = 6;//Text Indent Setting
worksheet.Range["C6"].CellStyle.IndentLevel = 6;'Text Indent Setting
worksheet.Range("C6").CellStyle.IndentLevel = 6Orientation
This helps to rotate the cell text diagonally or vertically. The text orientation can be set by using the Rotation property as shown as follows.
//Text Orientation Settings
worksheet.Range["C2"].CellStyle.Rotation = 60;//Text Orientation Settings
worksheet.Range["C2"].CellStyle.Rotation = 60;'Text Orientation Settings
worksheet.Range("C2").CellStyle.Rotation = 60Text Direction
You can specify the text direction by using the ReadingOrder property as shown as follows.
//Text Direction Setting
worksheet.Range["D2"].CellStyle.ReadingOrder = ExcelReadingOrderType.LeftToRight;//Text Direction Setting
worksheet.Range["D2"].CellStyle.ReadingOrder = ExcelReadingOrderType.LeftToRight;'Text Direction Setting
worksheet.Range("D2").CellStyle.ReadingOrder = ExcelReadingOrderType.LeftToRightThe following is the complete code snippet illustrating the previous options.
using (ExcelEngine excelEngine = new ExcelEngine())
{
IApplication application = excelEngine.Excel;
application.DefaultVersion = ExcelVersion.Excel2013;
IWorkbook workbook = application.Workbooks.Create(1);
IWorksheet worksheet = workbook.Worksheets[0];
worksheet.Range["A2"].Text = "HAlignCenter";
worksheet.Range["A4"].Text = "HAlignFill";
worksheet.Range["A6"].Text = "HAlignRight";
worksheet.Range["A8"].Text = "HAlignCenterAcrossSelection";
worksheet.Range["B2"].Text = "VAlignCenter";
worksheet.Range["B4"].Text = "VAlignFill";
worksheet.Range["B6"].Text = "VAlignTop";
worksheet.Range["B8"].Text = "VAlignCenterAcrossSelection";
worksheet.Range["C2"].Text = "Text Rotation to 60 degree";
worksheet.Range["C4"].Text = "Text Rotation to 90 degree";
worksheet.Range["C6"].Text = "Indent level is 6";
worksheet.Range["D2"].Text = "Text Direction(LeftToRight)";
worksheet.Range["D3"].Text = "Text Direction(RightToLeft)";
worksheet.Range["D4"].Text = "Text Direction(Context)";
//Text Alignment Setting (Horizontal Alignment)
worksheet.Range["A2"].CellStyle.HorizontalAlignment = ExcelHAlign.HAlignCenter;
worksheet.Range["A4"].CellStyle.HorizontalAlignment = ExcelHAlign.HAlignFill;
worksheet.Range["A6"].CellStyle.HorizontalAlignment = ExcelHAlign.HAlignRight;
worksheet.Range["A8"].CellStyle.HorizontalAlignment = ExcelHAlign.HAlignCenterAcrossSelection;
//Text Alignment Setting (Vertical Alignment)
worksheet.Range["B2"].CellStyle.VerticalAlignment = ExcelVAlign.VAlignBottom;
worksheet.Range["B4"].CellStyle.VerticalAlignment = ExcelVAlign.VAlignCenter;
worksheet.Range["B6"].CellStyle.VerticalAlignment = ExcelVAlign.VAlignTop;
worksheet.Range["B8"].CellStyle.VerticalAlignment = ExcelVAlign.VAlignDistributed;
//Text Orientation Settings
worksheet.Range["C2"].CellStyle.Rotation = 60;
worksheet.Range["C4"].CellStyle.Rotation = 90;
//Text Indent Setting
worksheet.Range["C6"].CellStyle.IndentLevel = 6;
//Text Direction Setting
worksheet.Range["D2"].CellStyle.ReadingOrder = ExcelReadingOrderType.LeftToRight;
worksheet.Range["D3"].CellStyle.ReadingOrder = ExcelReadingOrderType.RightToLeft;
worksheet.Range["D4"].CellStyle.ReadingOrder = ExcelReadingOrderType.Context;
worksheet.UsedRange.AutofitColumns();
worksheet.UsedRange.AutofitRows();
//Saving the workbook as stream
FileStream stream = new FileStream("Book1.xlsx", FileMode.Create, FileAccess.ReadWrite);
workbook.SaveAs(stream);
stream.Dispose();
}using (ExcelEngine excelEngine = new ExcelEngine())
{
IApplication application = excelEngine.Excel;
application.DefaultVersion = ExcelVersion.Excel2013;
IWorkbook workbook = application.Workbooks.Create(1);
IWorksheet worksheet = workbook.Worksheets[0];
worksheet.Range["A2"].Text = "HAlignCenter";
worksheet.Range["A4"].Text = "HAlignFill";
worksheet.Range["A6"].Text = "HAlignRight";
worksheet.Range["A8"].Text = "HAlignCenterAcrossSelection";
worksheet.Range["B2"].Text = "VAlignCenter";
worksheet.Range["B4"].Text = "VAlignFill";
worksheet.Range["B6"].Text = "VAlignTop";
worksheet.Range["B8"].Text = "VAlignCenterAcrossSelection";
worksheet.Range["C2"].Text = "Text Rotation to 60 degree";
worksheet.Range["C4"].Text = "Text Rotation to 90 degree";
worksheet.Range["C6"].Text = "Indent level is 6";
worksheet.Range["D2"].Text = "Text Direction(LeftToRight)";
worksheet.Range["D3"].Text = "Text Direction(RightToLeft)";
worksheet.Range["D4"].Text = "Text Direction(Context)";
//Text Alignment Setting (Horizontal Alignment)
worksheet.Range["A2"].CellStyle.HorizontalAlignment = ExcelHAlign.HAlignCenter;
worksheet.Range["A4"].CellStyle.HorizontalAlignment = ExcelHAlign.HAlignFill;
worksheet.Range["A6"].CellStyle.HorizontalAlignment = ExcelHAlign.HAlignRight;
worksheet.Range["A8"].CellStyle.HorizontalAlignment = ExcelHAlign.HAlignCenterAcrossSelection;
//Text Alignment Setting (Vertical Alignment)
worksheet.Range["B2"].CellStyle.VerticalAlignment = ExcelVAlign.VAlignBottom;
worksheet.Range["B4"].CellStyle.VerticalAlignment = ExcelVAlign.VAlignCenter;
worksheet.Range["B6"].CellStyle.VerticalAlignment = ExcelVAlign.VAlignTop;
worksheet.Range["B8"].CellStyle.VerticalAlignment = ExcelVAlign.VAlignDistributed;
//Text Orientation Settings
worksheet.Range["C2"].CellStyle.Rotation = 60;
worksheet.Range["C4"].CellStyle.Rotation = 90;
//Text Indent Setting
worksheet.Range["C6"].CellStyle.IndentLevel = 6;
//Text Direction Setting
worksheet.Range["D2"].CellStyle.ReadingOrder = ExcelReadingOrderType.LeftToRight;
worksheet.Range["D3"].CellStyle.ReadingOrder = ExcelReadingOrderType.RightToLeft;
worksheet.Range["D4"].CellStyle.ReadingOrder = ExcelReadingOrderType.Context;
worksheet.UsedRange.AutofitColumns();
worksheet.UsedRange.AutofitRows();
workbook.SaveAs("Book1.xlsx");
}Using excelEngine As ExcelEngine = New ExcelEngine()
Dim application As IApplication = excelEngine.Excel
application.DefaultVersion = ExcelVersion.Excel2013
Dim workbook As IWorkbook = application.Workbooks.Create(1)
Dim worksheet As IWorksheet = workbook.Worksheets(0)
worksheet.Range("A2").Text = "HAlignCenter"
worksheet.Range("A4").Text = "HAlignFill"
worksheet.Range("A6").Text = "HAlignRight"
worksheet.Range("A8").Text = "HAlignCenterAcrossSelection"
worksheet.Range("B2").Text = "VAlignCenter"
worksheet.Range("B4").Text = "VAlignFill"
worksheet.Range("B6").Text = "VAlignTop"
worksheet.Range("B8").Text = "VAlignCenterAcrossSelection"
worksheet.Range("C2").Text = "Text Rotation to 60 degree"
worksheet.Range("C4").Text = "Text Rotation to 90 degree"
worksheet.Range("C6").Text = "Indent level is 6"
worksheet.Range("D2").Text = "Text Direction(LeftToRight)"
worksheet.Range("D3").Text = "Text Direction(RightToLeft)"
worksheet.Range("D4").Text = "Text Direction(Context)"
'Text Alignment Setting (Horizontal Alignment)
worksheet.Range("A2").CellStyle.HorizontalAlignment = ExcelHAlign.HAlignCenter
worksheet.Range("A4").CellStyle.HorizontalAlignment = ExcelHAlign.HAlignFill
worksheet.Range("A6").CellStyle.HorizontalAlignment = ExcelHAlign.HAlignRight
worksheet.Range("A8").CellStyle.HorizontalAlignment = ExcelHAlign.HAlignCenterAcrossSelection
'Text Alignment Setting (Vertical Alignment)
worksheet.Range("B2").CellStyle.VerticalAlignment = ExcelVAlign.VAlignBottom
worksheet.Range("B4").CellStyle.VerticalAlignment = ExcelVAlign.VAlignCenter
worksheet.Range("B6").CellStyle.VerticalAlignment = ExcelVAlign.VAlignTop
worksheet.Range("B8").CellStyle.VerticalAlignment = ExcelVAlign.VAlignDistributed
'Text Orientation Settings
worksheet.Range("C2").CellStyle.Rotation = 60
worksheet.Range("C4").CellStyle.Rotation = 90
'Text Indent Setting
worksheet.Range("C6").CellStyle.IndentLevel = 6
'Text Direction Setting
worksheet.Range("D2").CellStyle.ReadingOrder = ExcelReadingOrderType.LeftToRight
worksheet.Range("D3").CellStyle.ReadingOrder = ExcelReadingOrderType.RightToLeft
worksheet.Range("D4").CellStyle.ReadingOrder = ExcelReadingOrderType.Context
worksheet.UsedRange.AutofitColumns()
worksheet.UsedRange.AutofitRows()
workbook.SaveAs("Book1.xlsx")
End UsingA complete working example to apply cell text alignment in C# is present on this GitHub page.
The following screenshot is the output of previous code:

Merging and Un-Merging Cells
The cells can be merged using the Merge method in IRange as shown as follows.
//Merging Cells from A16 to C16
worksheet.Range["A16:C16"].Merge();
//Merging Cells from A16 to C16
worksheet.Range["A16:C16"].Merge();'Merging Cells from A16 to C16
worksheet.Range("A16:C16").Merge()Merged cells can be unmerged using the UnMerge method in IRange as shown below.
//Un-Merging merged cells from A16 to C16
worksheet.Range["A16:C16"].UnMerge();
//Un-Merging merged cells from A16 to C16
worksheet.Range["A16:C16"].UnMerge();'Un-Merging merged cells from A16 to C16
worksheet.Range("A16:C16").UnMerge()The below code shows merging and unmerging worksheet cells.
using (ExcelEngine excelEngine = new ExcelEngine())
{
  IApplication application = excelEngine.Excel;
  application.DefaultVersion = ExcelVersion.Excel2013;
  IWorkbook workbook = application.Workbooks.Create(1);
  IWorksheet worksheet = workbook.Worksheets[0];

  //Merging cells
  worksheet.Range["A16:C16"].Merge();
  //Un-Merging merged cells
  worksheet.Range["A16:C16"].UnMerge();

  //Saving the workbook as stream
  FileStream stream = new FileStream("MergingUnMerging.xlsx", FileMode.Create, FileAccess.ReadWrite);
  workbook.SaveAs(stream);
  stream.Dispose();
}
using (ExcelEngine excelEngine = new ExcelEngine())
{
IApplication application = excelEngine.Excel;
application.DefaultVersion = ExcelVersion.Excel2013;
IWorkbook workbook = application.Workbooks.Create(1);
IWorksheet worksheet = workbook.Worksheets[0];
//Merging cells
worksheet.Range["A16:C16"].Merge();
//Un-Merging merged cells
worksheet.Range["A16:C16"].UnMerge();
workbook.SaveAs("MergingUnMerging.xlsx");
}Using excelEngine As ExcelEngine = New ExcelEngine()
Dim application As IApplication = excelEngine.Excel
application.DefaultVersion = ExcelVersion.Excel2013
Dim workbook As IWorkbook = application.Workbooks.Create()
Dim worksheet As IWorksheet = workbook.Worksheets(0)
'Merging cells
worksheet.Range("A16:C16").Merge()
'Un-Merging merged cells
worksheet.Range("A16:C16").UnMerge()
workbook.SaveAs("MergingUnMerging.xlsx")
End UsingA complete working example to merge and unmerge cells in C# is present on this GitHub page.
Apply Wrap Text
If a cell content is too wide to fit a column and do not want to split over into adjacent cells, you can use the WrapText property. This will set the content within the cell border. The following code snippet illustrates this behavior.
NOTE
Applying wrap-text will not auto-fit the rows by default. It is recommended to [auto-fit](#_AutoFit_Rows_or “”) manually.
using (ExcelEngine excelEngine = new ExcelEngine())
{
  IApplication application = excelEngine.Excel;
  application.DefaultVersion = ExcelVersion.Excel2013;
  IWorkbook workbook = application.Workbooks.Create(1);
  IWorksheet worksheet = workbook.Worksheets[0];

  worksheet.Range["A2"].Text = "First Sentence is wrapped";
  worksheet.Range["B2"].Text = "Second Sentence is wrapped";
  worksheet.Range["C2"].Text = "Third Sentence is wrapped";

  //Applying Wrap-text
  worksheet.Range["A2:C2"].WrapText = true;

  //Saving the workbook as stream
  FileStream stream = new FileStream("WrapText.xlsx", FileMode.Create, FileAccess.ReadWrite);
  workbook.SaveAs(stream);
  stream.Dispose();
}
using (ExcelEngine excelEngine = new ExcelEngine())
{
IApplication application = excelEngine.Excel;
application.DefaultVersion = ExcelVersion.Excel2013;
IWorkbook workbook = application.Workbooks.Create(1);
IWorksheet worksheet = workbook.Worksheets[0];
worksheet.Range["A2"].Text = "First Sentence is wrapped";
worksheet.Range["B2"].Text = "Second Sentence is wrapped";
worksheet.Range["C2"].Text = "Third Sentence is wrapped";
//Applying Wrap-text
worksheet.Range["A2:C2"].WrapText = true;
workbook.SaveAs("WrapText.xlsx");
}Using excelEngine As ExcelEngine = New ExcelEngine()
Dim application As IApplication = excelEngine.Excel
application.DefaultVersion = ExcelVersion.Excel2013
Dim workbook As IWorkbook = application.Workbooks.Create(1)
Dim worksheet As IWorksheet = workbook.Worksheets(0)
worksheet.Range("A2").Text = "First Sentence is wrapped"
worksheet.Range("B2").Text = "Second Sentence is wrapped"
worksheet.Range("C2").Text = "Third Sentence is wrapped"
'Applying wrap-text
worksheet.Range("A2:C2").WrapText = True
workbook.SaveAs("WrapText.xlsx")
End UsingA complete working example to apply wrap text in C# is present on this GitHub page.
Unwrap Text
Similarly, the wrapped text can be unwrapped by disabling the WrapText property. The following code explains this.
worksheet.Range["A2:C2"].WrapText = false;worksheet.Range["A2:C2"].WrapText = false;worksheet.Range("A2:C2").WrapText = FalseAuto-Fit Rows or Columns
Cell dimensions can be auto-sized to its content dynamically to make its content visible.
The following code shows how to auto-size row height and column width to its cell content.
using (ExcelEngine excelEngine = new ExcelEngine())
{
  IApplication application = excelEngine.Excel;
  application.DefaultVersion = ExcelVersion.Excel2013;
  IWorkbook workbook = application.Workbooks.Create(1);
  IWorksheet worksheet = workbook.Worksheets[0];

  //Auto-fit rows
  worksheet.Range["A2"].Text = "Fit the content to row";
  worksheet.Range["A2"].WrapText = true;
  worksheet.Range["A2"].AutofitRows();

  //Auto-fit columns
  worksheet.Range["B4"].Text = "Fit the content to column";
  worksheet.Range["B4"].AutofitColumns();

  //Saving the workbook as stream
  FileStream stream = new FileStream("AutoFit.xlsx", FileMode.Create, FileAccess.ReadWrite);
  workbook.SaveAs(stream);
  stream.Dispose();
}
using (ExcelEngine excelEngine = new ExcelEngine())
{
IApplication application = excelEngine.Excel;
application.DefaultVersion = ExcelVersion.Excel2013;
IWorkbook workbook = application.Workbooks.Create(1);
IWorksheet worksheet = workbook.Worksheets[0];
//Auto-fit rows
worksheet.Range["A2"].Text = "Fit the content to row";
worksheet.Range["A2"].WrapText = true;
worksheet.Range["A2"].AutofitRows();
//Auto-fit columns
worksheet.Range["B4"].Text = "Fit the content to column";
worksheet.Range["B4"].AutofitColumns();
workbook.SaveAs("AutoFit.xlsx");
}Using excelEngine As ExcelEngine = New ExcelEngine()
Dim application As IApplication = excelEngine.Excel
application.DefaultVersion = ExcelVersion.Excel2013
Dim workbook As IWorkbook = application.Workbooks.Create(1)
Dim worksheet As IWorksheet = workbook.Worksheets(0)
'Auto-fit rows
worksheet.Range("A2").Text = "Fit the content to row"
worksheet.Range("A2").WrapText = True
worksheet.Range("A2").AutofitRows()
'Auto-fit columns
worksheet.Range("B4").Text = "Fit the content to column"
worksheet.Range("B4").AutofitColumns()
workbook.SaveAs("AutoFit.xlsx")
End UsingA complete working example to autofit rows and columns in C# is present on this GitHub page.
Apply Font Settings
The appearance of a text can be controlled by font settings of a cell. These settings can be done by using the Font property in CellStyle. Refer to the following code.
using (ExcelEngine excelEngine = new ExcelEngine())
{
IApplication application = excelEngine.Excel;
application.DefaultVersion = ExcelVersion.Excel2013;
IWorkbook workbook = application.Workbooks.Create(1);
IWorksheet worksheet = workbook.Worksheets[0];
//Adding text for a range
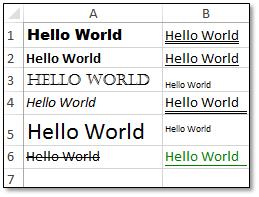
worksheet.Range["A1:B6"].Text = "Hello World";
//Setting Font Type
worksheet.Range["A1"].CellStyle.Font.FontName = "Arial Black";
worksheet.Range["A3"].CellStyle.Font.FontName = "Castellar";
//Setting Font Styles
worksheet.Range["A2"].CellStyle.Font.Bold = true;
worksheet.Range["A4"].CellStyle.Font.Italic = true;
//Setting Font Size
worksheet.Range["A5"].CellStyle.Font.Size = 18;
//Setting Font Effects
worksheet.Range["A6"].CellStyle.Font.Strikethrough = true;
worksheet.Range["B3"].CellStyle.Font.Subscript = true;
worksheet.Range["B5"].CellStyle.Font.Superscript = true;
//Setting UnderLine Types
worksheet.Range["B1"].CellStyle.Font.Underline = ExcelUnderline.Double;
worksheet.Range["B2"].CellStyle.Font.Underline = ExcelUnderline.Single;
worksheet.Range["B4"].CellStyle.Font.Underline = ExcelUnderline.DoubleAccounting;
worksheet.Range["B6"].CellStyle.Font.Underline = ExcelUnderline.SingleAccounting;
//Setting Font Color
worksheet.Range["B6"].CellStyle.Font.Color = ExcelKnownColors.Green;
worksheet.UsedRange.AutofitColumns();
worksheet.UsedRange.AutofitRows();
//Saving the workbook as stream
FileStream stream = new FileStream("FontSettings.xlsx", FileMode.Create, FileAccess.ReadWrite);
workbook.SaveAs(stream);
stream.Dispose();
}using (ExcelEngine excelEngine = new ExcelEngine())
{
IApplication application = excelEngine.Excel;
application.DefaultVersion = ExcelVersion.Excel2013;
IWorkbook workbook = application.Workbooks.Create(1);
IWorksheet worksheet = workbook.Worksheets[0];
//Adding text for a range
worksheet.Range["A1:B6"].Text = "Hello World";
//Setting Font Type
worksheet.Range["A1"].CellStyle.Font.FontName = "Arial Black";
worksheet.Range["A3"].CellStyle.Font.FontName = "Castellar";
//Setting Font Styles
worksheet.Range["A2"].CellStyle.Font.Bold = true;
worksheet.Range["A4"].CellStyle.Font.Italic = true;
//Setting Font Size
worksheet.Range["A5"].CellStyle.Font.Size = 18;
//Setting Font Effects
worksheet.Range["A6"].CellStyle.Font.Strikethrough = true;
worksheet.Range["B3"].CellStyle.Font.Subscript = true;
worksheet.Range["B5"].CellStyle.Font.Superscript = true;
//Setting UnderLine Types
worksheet.Range["B1"].CellStyle.Font.Underline = ExcelUnderline.Double;
worksheet.Range["B2"].CellStyle.Font.Underline = ExcelUnderline.Single;
worksheet.Range["B4"].CellStyle.Font.Underline = ExcelUnderline.DoubleAccounting;
worksheet.Range["B6"].CellStyle.Font.Underline = ExcelUnderline.SingleAccounting;
//Setting Font Color
worksheet.Range["B6"].CellStyle.Font.Color = ExcelKnownColors.Green;
worksheet.UsedRange.AutofitColumns();
worksheet.UsedRange.AutofitRows();
workbook.SaveAs("FontSettings.xlsx");
}Using excelEngine As ExcelEngine = New ExcelEngine()
Dim application As IApplication = excelEngine.Excel
application.DefaultVersion = ExcelVersion.Excel2013
Dim workbook As IWorkbook = application.Workbooks.Create(1)
Dim worksheet As IWorksheet = workbook.Worksheets(0)
'Adding text for a range
worksheet.Range("A1:B6").Text = "Hello World"
'Setting Font Type
worksheet.Range("A1").CellStyle.Font.FontName = "Arial Black"
worksheet.Range("A3").CellStyle.Font.FontName = "Castellar"
'Setting Font Styles
worksheet.Range("A2").CellStyle.Font.Bold = True
worksheet.Range("A4").CellStyle.Font.Italic = True
'Setting Font Size
worksheet.Range("A5").CellStyle.Font.Size = 18
'Setting Font Effects
worksheet.Range("A6").CellStyle.Font.Strikethrough = True
worksheet.Range("B3").CellStyle.Font.Subscript = True
worksheet.Range("B5").CellStyle.Font.Superscript = True
'Setting UnderLine Types
worksheet.Range("B1").CellStyle.Font.Underline = ExcelUnderline.Double
worksheet.Range("B2").CellStyle.Font.Underline = ExcelUnderline.Single
worksheet.Range("B4").CellStyle.Font.Underline = ExcelUnderline.DoubleAccounting
worksheet.Range("B6").CellStyle.Font.Underline = ExcelUnderline.SingleAccounting
'Setting Font Color
worksheet.Range("B6").CellStyle.Font.Color = ExcelKnownColors.Green
worksheet.UsedRange.AutofitColumns()
worksheet.UsedRange.AutofitRows()
workbook.SaveAs("FontSettings.xlsx")
End UsingA complete working example to apply different font settings in C# is present on this GitHub page.
The output of the previous code is shown as follows.
Apply Color Settings
Colors give enhancement to cell values to highlight the data. These color settings in a cell are differentiated as BackColor, ForeColor, and PatternColor.
Back Color settings
Back color of a cell can be set using the ColorIndex property of CellStyle as shown as follows.
//Apply cell back color
worksheet.Range["A1"].CellStyle.ColorIndex = ExcelKnownColors.Aqua;
//Apply cell back color
worksheet.Range["A1"].CellStyle.ColorIndex = ExcelKnownColors.Aqua;'Apply cell back color
worksheet.Range("A1").CellStyle.ColorIndex = ExcelKnownColors.AquaFore Color Settings
Fore color of a cell can be set using the PatternColorIndex property of CellStyle as shown as follows.
//Apply cell fore color
worksheet.Range["A2"].CellStyle.PatternColorIndex = ExcelKnownColors.Green;
//Apply cell fore color
worksheet.Range["A2"].CellStyle.PatternColorIndex = ExcelKnownColors.Green;'Apply cell fore color
worksheet.Range("A2").CellStyle.PatternColorIndex = ExcelKnownColors.GreenPattern Settings
Excel provides various pattern styles for highlighting the cells. These patterns can be applied using the FillPattern property of CellStyle as shown as follows.
//Apply cell pattern
worksheet.Range["A2"].CellStyle.FillPattern = ExcelPattern.Angle;
//Apply cell pattern
worksheet.Range["A2"].CellStyle.FillPattern = ExcelPattern.Angle;'Apply cell pattern
worksheet.Range("A2").CellStyle.FillPattern = ExcelPattern.AngleA complete working example to apply different color settings in C# is present on this GitHub page.
Apply Border Settings
The XlsIO applies cell borders and format it through IBorderApplying HTML String interface as shown as follows.
using (ExcelEngine excelEngine = new ExcelEngine())
{
IApplication application = excelEngine.Excel;
application.DefaultVersion = ExcelVersion.Excel2013;
IWorkbook workbook = application.Workbooks.Create(1);
IWorksheet worksheet = workbook.Worksheets[0];
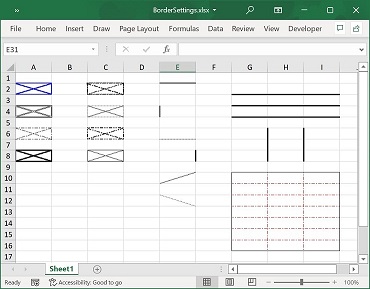
//Apply borders
worksheet.Range["A2"].CellStyle.Borders.LineStyle = ExcelLineStyle.Medium;
worksheet.Range["A4"].CellStyle.Borders.LineStyle = ExcelLineStyle.Double;
worksheet.Range["A6"].CellStyle.Borders.LineStyle = ExcelLineStyle.Dash_dot;
worksheet.Range["A8"].CellStyle.Borders.LineStyle = ExcelLineStyle.Thick;
worksheet.Range["C2"].CellStyle.Borders.LineStyle = ExcelLineStyle.Slanted_dash_dot;
worksheet.Range["C4"].CellStyle.Borders.LineStyle = ExcelLineStyle.Hair;
worksheet.Range["C6"].CellStyle.Borders.LineStyle = ExcelLineStyle.Medium_dash_dot_dot;
worksheet.Range["C8"].CellStyle.Borders.LineStyle = ExcelLineStyle.Thin;
//Apply Border using Border Index
//Top Border
worksheet.Range["E2"].CellStyle.Borders[ExcelBordersIndex.EdgeTop].LineStyle = ExcelLineStyle.Medium;
//Left Border
worksheet.Range["E4"].CellStyle.Borders[ExcelBordersIndex.EdgeLeft].LineStyle = ExcelLineStyle.Double;
//Bottom Border
worksheet.Range["E6"].CellStyle.Borders[ExcelBordersIndex.EdgeBottom].LineStyle = ExcelLineStyle.Dashed;
//Right Border
worksheet.Range["E8"].CellStyle.Borders[ExcelBordersIndex.EdgeRight].LineStyle = ExcelLineStyle.Thick;
//DiagonalUp Border
worksheet.Range["E10"].CellStyle.Borders[ExcelBordersIndex.DiagonalUp].LineStyle = ExcelLineStyle.Thin;
//DiagonalDown Border
worksheet.Range["E12"].CellStyle.Borders[ExcelBordersIndex.DiagonalDown].LineStyle = ExcelLineStyle.Dotted;
//Inside Horizontal Border
worksheet.Range["G2:I5"].CellStyle.Borders[ExcelBordersIndex.InsideHorizontal].LineStyle = ExcelLineStyle.Thick;
//Inside Vertical Border
worksheet.Range["G6:I8"].CellStyle.Borders[ExcelBordersIndex.InsideVertical].LineStyle = ExcelLineStyle.Thick;
//Apply border color
worksheet.Range["A2"].CellStyle.Borders.Color = ExcelKnownColors.Blue;
//Setting the Border as Range
worksheet.Range["G10:I16"].BorderAround();
worksheet.Range["G10:I16"].BorderInside(ExcelLineStyle.Dash_dot, ExcelKnownColors.Red);
//Saving the workbook as stream
FileStream stream = new FileStream("BorderSettings.xlsx", FileMode.Create, FileAccess.ReadWrite);
workbook.SaveAs(stream);
stream.Dispose();
}using (ExcelEngine excelEngine = new ExcelEngine())
{
IApplication application = excelEngine.Excel;
application.DefaultVersion = ExcelVersion.Excel2013;
IWorkbook workbook = application.Workbooks.Create(1);
IWorksheet worksheet = workbook.Worksheets[0];
//Apply borders
worksheet.Range["A2"].CellStyle.Borders.LineStyle = ExcelLineStyle.Medium;
worksheet.Range["A4"].CellStyle.Borders.LineStyle = ExcelLineStyle.Double;
worksheet.Range["A6"].CellStyle.Borders.LineStyle = ExcelLineStyle.Dash_dot;
worksheet.Range["A8"].CellStyle.Borders.LineStyle = ExcelLineStyle.Thick;
worksheet.Range["C2"].CellStyle.Borders.LineStyle = ExcelLineStyle.Slanted_dash_dot;
worksheet.Range["C4"].CellStyle.Borders.LineStyle = ExcelLineStyle.Hair;
worksheet.Range["C6"].CellStyle.Borders.LineStyle = ExcelLineStyle.Medium_dash_dot_dot;
worksheet.Range["C8"].CellStyle.Borders.LineStyle = ExcelLineStyle.Thin;
//Apply Border using Border Index
//Top Border
worksheet.Range["E2"].CellStyle.Borders[ExcelBordersIndex.EdgeTop].LineStyle = ExcelLineStyle.Medium;
//Left Border
worksheet.Range["E4"].CellStyle.Borders[ExcelBordersIndex.EdgeLeft].LineStyle = ExcelLineStyle.Double;
//Bottom Border
worksheet.Range["E6"].CellStyle.Borders[ExcelBordersIndex.EdgeBottom].LineStyle = ExcelLineStyle.Dashed;
//Right Border
worksheet.Range["E8"].CellStyle.Borders[ExcelBordersIndex.EdgeRight].LineStyle = ExcelLineStyle.Thick;
//DiagonalUp Border
worksheet.Range["E10"].CellStyle.Borders[ExcelBordersIndex.DiagonalUp].LineStyle = ExcelLineStyle.Thin;
//DiagonalDown Border
worksheet.Range["E12"].CellStyle.Borders[ExcelBordersIndex.DiagonalDown].LineStyle = ExcelLineStyle.Dotted;
//Inside Horizontal Border
worksheet.Range["G2:I5"].CellStyle.Borders[ExcelBordersIndex.InsideHorizontal].LineStyle = ExcelLineStyle.Thick;
//Inside Vertical Border
worksheet.Range["G6:I8"].CellStyle.Borders[ExcelBordersIndex.InsideVertical].LineStyle = ExcelLineStyle.Thick;
//Apply border color
worksheet.Range["A2"].CellStyle.Borders.Color = ExcelKnownColors.Blue;
//Setting the Border as Range
worksheet.Range["G10:I16"].BorderAround();
worksheet.Range["G10:I16"].BorderInside(ExcelLineStyle.Dash_dot, ExcelKnownColors.Red);
workbook.SaveAs("BorderSettings.xlsx");
}Using excelEngine As ExcelEngine = New ExcelEngine()
Dim application As IApplication = excelEngine.Excel
application.DefaultVersion = ExcelVersion.Excel2013
Dim workbook As IWorkbook = application.Workbooks.Create(1)
Dim worksheet As IWorksheet = workbook.Worksheets(0)
'Apply borders
worksheet.Range("A2").CellStyle.Borders.LineStyle = ExcelLineStyle.Medium
worksheet.Range("A4").CellStyle.Borders.LineStyle = ExcelLineStyle.Double
worksheet.Range("A6").CellStyle.Borders.LineStyle = ExcelLineStyle.Dash_dot
worksheet.Range("A8").CellStyle.Borders.LineStyle = ExcelLineStyle.Thick
worksheet.Range("C2").CellStyle.Borders.LineStyle = ExcelLineStyle.Slanted_dash_dot
worksheet.Range("C4").CellStyle.Borders.LineStyle = ExcelLineStyle.Hair
worksheet.Range("C6").CellStyle.Borders.LineStyle = ExcelLineStyle.Medium_dash_dot_dot
worksheet.Range("C8").CellStyle.Borders.LineStyle = ExcelLineStyle.Thin
'Apply Border using Border Index
'Top Border
worksheet.Range("E2").CellStyle.Borders(ExcelBordersIndex.EdgeTop).LineStyle = ExcelLineStyle.Medium
'Left Border
worksheet.Range("E4").CellStyle.Borders(ExcelBordersIndex.EdgeLeft).LineStyle = ExcelLineStyle.Double
'Bottom Border
worksheet.Range("E6").CellStyle.Borders(ExcelBordersIndex.EdgeBottom).LineStyle = ExcelLineStyle.Dashed
'Right Border
worksheet.Range("E8").CellStyle.Borders(ExcelBordersIndex.EdgeRight).LineStyle = ExcelLineStyle.Thick
'DiagonalUp Border
worksheet.Range("E10").CellStyle.Borders(ExcelBordersIndex.DiagonalUp).LineStyle = ExcelLineStyle.Thin
'DiagonalDown Border
worksheet.Range("E12").CellStyle.Borders(ExcelBordersIndex.DiagonalDown).LineStyle = ExcelLineStyle.Dotted
'Inside Horizontal Border
worksheet.Range("G2:I5").CellStyle.Borders(ExcelBordersIndex.InsideHorizontal).LineStyle = ExcelLineStyle.Thick
'Inside Vertical Border
worksheet.Range("G6:I8").CellStyle.Borders(ExcelBordersIndex.InsideVertical).LineStyle = ExcelLineStyle.Thick
'Apply border color
worksheet.Range("A2").CellStyle.Borders.Color = ExcelKnownColors.Blue
'Setting the Border as Range
worksheet.Range("G10:I16").BorderAround()
worksheet.Range("G10:I16").BorderInside(ExcelLineStyle.Dash_dot, ExcelKnownColors.Red)
workbook.SaveAs("BorderSettings.xlsx")
End UsingA complete working example to apply different border settings in C# is present on this GitHub page.
The output of the previous code is shown in the following screenshot:
HTML String Formatting
HTML string generates a string of characters with different formatting styles using different HTML tags for each character. This makes it easy to manipulate the text or value in the worksheet range as each character is independent and doesn’t depend on hierarchical tag structure.
XlsIO supports adding HTML Rich-Text to a range of cells in worksheet.
Applying HTML String
The following code snippet illustrates how to read and write HTML Rich-Text using HtmlString property of IRange.
using (ExcelEngine excelEngine = new ExcelEngine())
{
  IApplication application = excelEngine.Excel;
  application.DefaultVersion = ExcelVersion.Excel2013;
  IWorkbook workbook = application.Workbooks.Create(3);
  IWorksheet worksheet = workbook.Worksheets[0];

  //Add HTML string
  worksheet.Range["A1"].HtmlString = "<font style=\"color:red;font-family:Magneto;font-size:12px; \">Welcome Syncfusion</font>";

  //Assign HTML string as text to different range
  worksheet.Range["A2"].Text = worksheet.Range["A1"].HtmlString;

  //Saving the workbook as stream
  FileStream stream = new FileStream("BorderSettings.xlsx", FileMode.Create, FileAccess.ReadWrite);
  workbook.SaveAs(stream);
  stream.Dispose();
}
using (ExcelEngine excelEngine = new ExcelEngine())
{
IApplication application = excelEngine.Excel;
application.DefaultVersion = ExcelVersion.Excel2013;
IWorkbook workbook = application.Workbooks.Create(3);
IWorksheet worksheet = workbook.Worksheets[0];
//Add HTML string
worksheet.Range["A1"].HtmlString = "<font style=\"color:red;font-family:Magneto;font-size:12px; \">Welcome Syncfusion</font>";
//Assign HTML string as text to different range
worksheet.Range["A2"].Text = worksheet.Range["A1"].HtmlString;
workbook.SaveAs("Output.xlsx");
}Using excelEngine As ExcelEngine = New ExcelEngine()
Dim application As IApplication = excelEngine.Excel
application.DefaultVersion = ExcelVersion.Excel2013
Dim workbook As IWorkbook = application.Workbooks.Create(3)
Dim worksheet As IWorksheet = workbook.Worksheets(0)
'Add HTML string
worksheet.Range("A1").HtmlString = "<font style=""color:red;font-family:Magneto;font-size:12px; "">Welcome Syncfusion</font>"
'Assign HTML string as text to different range
worksheet.Range("A2").Text = worksheet.Range("A1").HtmlString
workbook.SaveAs("Output.xlsx")
End UsingA complete working example to apply HTML string formatting in C# is present on this GitHub page.
Supported Tags
The following are the list of tags supported in addition to HTML string.
- <p></p> - Defines a paragraph
- <font></font> - Defines font, color and size of text
- <h1….h6></h1…h6> - Defines HTML headings
- <a href></a> - Defines a hyperlink
- <i></i> - Defines italic text
- <u></u> - Underlines the text
- <b></b> - Defines bold text
- <sub></sub> - Defines subscript
- <sup></sup> - Defines superscript
- <br></br> - Inserts link break
- <strike></strike> - Strikes out the text
- <strong></strong> - Defines important text
These mentioned tags do support the following style attributes.
- Color
- Font-family
- Text-decoration
- Font-size
- Size
- Face
Rich-Text Formatting
You can format each character in a cell with different font styles. XlsIO reads and writes rich-text by using the IRichTextString interface.
NOTE
Currently XlsIO cannot process and write RTF codes to cells.
using (ExcelEngine excelEngine = new ExcelEngine())
{
IApplication application = excelEngine.Excel;
application.DefaultVersion = ExcelVersion.Excel2013;
IWorkbook workbook = application.Workbooks.Create(1);
IWorksheet worksheet = workbook.Worksheets[0];
//Add Text
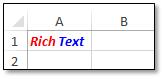
IRange range = worksheet.Range["A1"];
range.Text = "RichText";
IRichTextString richText = range.RichText;
//Formatting first 4 characters.
IFont redFont = workbook.CreateFont();
redFont.Bold = true;
redFont.Italic = true;
redFont.RGBColor = Color.Red;
richText.SetFont(0, 3, redFont);
//Formatting last 4 characters.
IFont blueFont = workbook.CreateFont();
blueFont.Bold = true;
blueFont.Italic = true;
blueFont.RGBColor = Color.Blue;
richText.SetFont(4, 7, blueFont);
//Saving the workbook as stream
FileStream stream = new FileStream("RichText.xlsx", FileMode.Create, FileAccess.ReadWrite);
workbook.SaveAs(stream);
stream.Dispose();
}using (ExcelEngine excelEngine = new ExcelEngine())
{
IApplication application = excelEngine.Excel;
application.DefaultVersion = ExcelVersion.Excel2013;
IWorkbook workbook = application.Workbooks.Create(1);
IWorksheet worksheet = workbook.Worksheets[0];
//Add Text
IRange range = worksheet.Range["A1"];
range.Text = "RichText";
IRichTextString richText = range.RichText;
//Formatting first 4 characters
IFont redFont = workbook.CreateFont();
redFont.Bold = true;
redFont.Italic = true;
redFont.RGBColor = Color.Red;
richText.SetFont(0, 3, redFont);
//Formatting last 4 characters
IFont blueFont = workbook.CreateFont();
blueFont.Bold = true;
blueFont.Italic = true;
blueFont.RGBColor = Color.Blue;
richText.SetFont(4, 7, blueFont);
workbook.SaveAs("RichText.xlsx");
}Using excelEngine As ExcelEngine = New ExcelEngine()
Dim application As IApplication = excelEngine.Excel
application.DefaultVersion = ExcelVersion.Excel2013
Dim workbook As IWorkbook = application.Workbooks.Create(1)
Dim worksheet As IWorksheet = workbook.Worksheets(0)
'Add Text
Dim range As IRange = worksheet.Range("A1")
range.Text = "RichText"
Dim richText As IRichTextString = range.RichText
'Formatting first 4 characters
Dim redFont As IFont = workbook.CreateFont()
redFont.Bold = True
redFont.Italic = True
redFont.RGBColor = Color.Red
richText.SetFont(0, 3, redFont)
'Formatting last 4 characters
Dim blueFont As IFont = workbook.CreateFont()
blueFont.Bold = True
blueFont.Italic = True
blueFont.RGBColor = Color.Blue
richText.SetFont(4, 7, blueFont)
workbook.SaveAs("RichText.xlsx")
End UsingA complete working example to apply rich text formatting in C# is present on this GitHub page.
The output of the previous code is shown as follows: