Convert PowerPoint to PDF in Console application
28 Jul 202611 minutes to read
Syncfusion® PowerPoint is a .NET PowerPoint library used to create, read, edit and convert PowerPoint presentation programmatically without Microsoft PowerPoint or interop dependencies. Using this library, you can convert a PowerPoint to PDF in Console application.
Convert PowerPoint to PDF using .NET Core and Latest
Prerequisites:
- Visual Studio 2022.
- Install .NET 8 SDK or later.
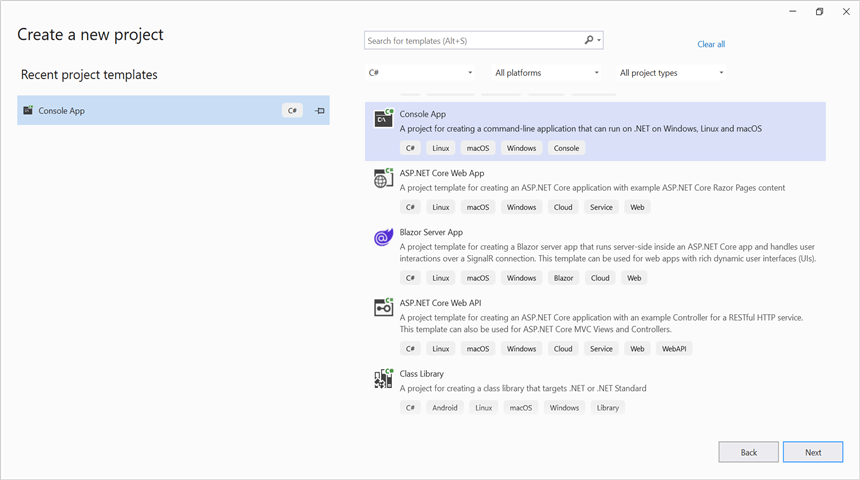
Step 1: Create a new .NET Core console application project.
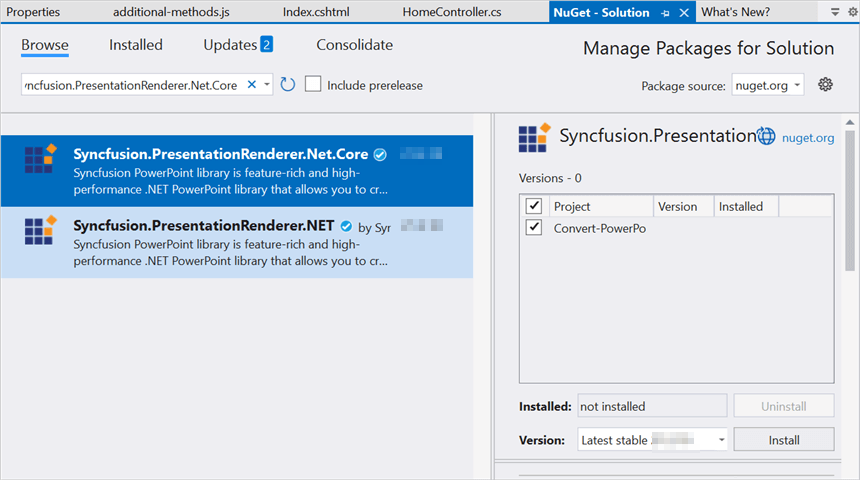
Step 2: Install the Syncfusion.PresentationRenderer.Net.Core NuGet package as a reference to your project from NuGet.org.
- If you’re deploying the application in a Linux environment, refer to the documentation for the required additional NuGet packages.
- Starting with v16.2.0.x, if you reference Syncfusion® assemblies from trial setup or from the NuGet feed, you also have to add “Syncfusion.Licensing” assembly reference and include a license key in your projects. Please refer to this link to know about registering Syncfusion® license key in your application to use our components.
Step 3: Include the following namespaces in Program.cs file.
using Syncfusion.Presentation;
using Syncfusion.PresentationRenderer;
using Syncfusion.Pdf;
Step 4: Include the below code snippet in Program.cs to convert PowerPoint to PDF.
//Open the existing PowerPoint presentation.
using (IPresentation pptxDoc = Presentation.Open(Path.GetFullPath("Data/Input.pptx")))
{
    //Convert the PowerPoint presentation to PDF document.
    using (PdfDocument pdfDocument = PresentationToPdfConverter.Convert(pptxDoc))
    {
        //Save the PDF document to the file system.
        pdfDocument.Save("Sample.pdf");
    }
}
Step 5: Build the project.
Click on Build → Build Solution or press Ctrl+Shift+B to build the project.
Step 6: Run the project.
Click the Start button (green arrow) or press F5 to run the app.
You can download a complete working sample from GitHub.
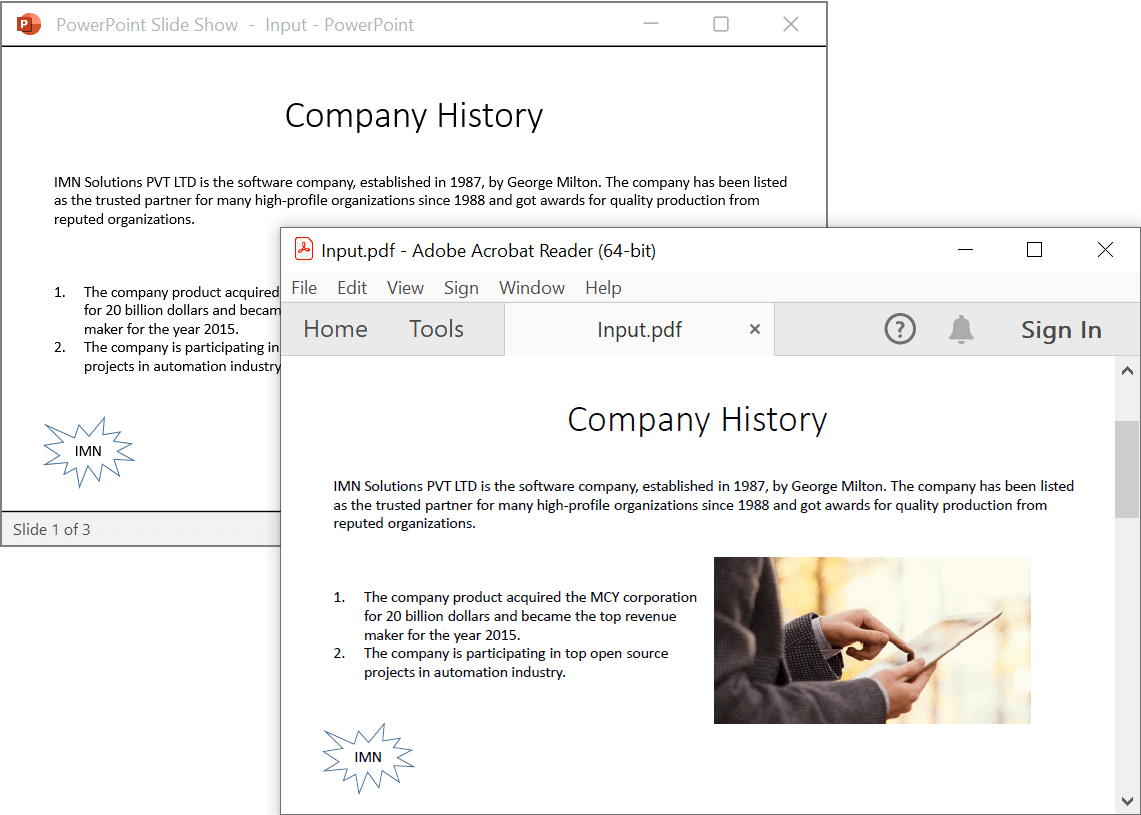
By executing the program, you will get the PDF as follows.
Prerequisites:
- Visual Studio Code.
- Install .NET 8 SDK or later.
- Open Visual Studio Code and install the C# for Visual Studio Code extension from the Extensions Marketplace.
Step 1: Create a new .NET Core console application project.
- Open the command palette by pressing Ctrl+Shift+P and type .NET:New Project and enter.
- Choose the Console App template.

- Select the project location, type the project name and press enter.
- Then choose Create project.
Step 2: To convert a PowerPoint document to PDF in console app, install Syncfusion.PresentationRenderer.Net.Core to the project.
- Press Ctrl + ` (backtick) to open the integrated terminal in Visual Studio Code.
- Ensure you’re in the project root directory where your .csproj file is located.
- Run the command
dotnet add package Syncfusion.PresentationRenderer.Net.Coreto install the NuGet package.

- If you’re deploying the application in a Linux environment, refer to the documentation for the required additional NuGet packages.
- Starting with v16.2.0.x, if you reference Syncfusion® assemblies from trial setup or from the NuGet feed, you also have to add “Syncfusion.Licensing” assembly reference and include a license key in your projects. Please refer to this link to know about registering Syncfusion® license key in your application to use our components.
Step 3: Include the following namespaces in Program.cs file.
using Syncfusion.Presentation;
using Syncfusion.PresentationRenderer;
using Syncfusion.Pdf;
Step 4: Include the below code snippet in Program.cs to convert PowerPoint to PDF.
//Open the existing PowerPoint presentation.
using (IPresentation pptxDoc = Presentation.Open(Path.GetFullPath("Data/Input.pptx")))
{
    //Convert the PowerPoint presentation to PDF document.
    using (PdfDocument pdfDocument = PresentationToPdfConverter.Convert(pptxDoc))
    {
        //Save the PDF document to the file system.
        pdfDocument.Save("Sample.pdf");
    }
}
Step 5: Build the project.
Run the following command in terminal to build the project.
dotnet build
Step 6: Run the project.
Run the following command in terminal to run the project.
dotnet run
You can download a complete working sample from GitHub.
By executing the program, you will get the PDF as follows.
Prerequisites:
- JetBrains Rider.
- Install .NET 8 SDK or later.
Step 1. Open JetBrains Rider and create a new .NET Core console application project.
- Launch JetBrains Rider.
- Click new solution on the welcome screen.

- In the new Solution dialog, select Project Type as Console.
- Enter a project name and specify the location.
- Select the target framework (e.g., .NET 8.0, .NET 9.0).
- Click create.

Step 2: Install the NuGet package from NuGet.org.
- Click the NuGet icon in the Rider toolbar and type Syncfusion.PresentationRenderer.Net.Core in the search bar.
- Ensure that “nuget.org” is selected as the package source.
- Select the latest Syncfusion.PresentationRenderer.Net.Core NuGet package from the list.
- Click the + (Add) button to add the package.

- Click the Install button to complete the installation.

- If you’re deploying the application in a Linux environment, refer to the documentation for the required additional NuGet packages.
- Starting with v16.2.0.x, if you reference Syncfusion® assemblies from trial setup or from the NuGet feed, you also have to add “Syncfusion.Licensing” assembly reference and include a license key in your projects. Please refer to this link to know about registering Syncfusion® license key in your application to use our components.
Step 3: Include the following namespaces in Program.cs file.
using Syncfusion.Presentation;
using Syncfusion.PresentationRenderer;
using Syncfusion.Pdf;
Step 4: Include the below code snippet in Program.cs to convert PowerPoint to PDF.
//Open the existing PowerPoint presentation.
using (IPresentation pptxDoc = Presentation.Open(Path.GetFullPath("Data/Input.pptx")))
{
    //Convert the PowerPoint presentation to PDF document.
    using (PdfDocument pdfDocument = PresentationToPdfConverter.Convert(pptxDoc))
    {
        //Save the PDF document to the file system.
        pdfDocument.Save("Sample.pdf");
    }
}
Step 5: Build the project.
Click the Build button in the toolbar or press Ctrl+Shift+B to build the project.
Step 6: Run the project.
Click the Run button (green arrow) in the toolbar or press F5 to run the app.
You can download a complete working sample from GitHub.
By executing the program, you will get the PDF as follows.
Convert PowerPoint to PDF in .NET Framework
Prerequisites:
- Visual Studio 2022.
- Install .NET desktop development workload with necessary .NET Framework SDK.
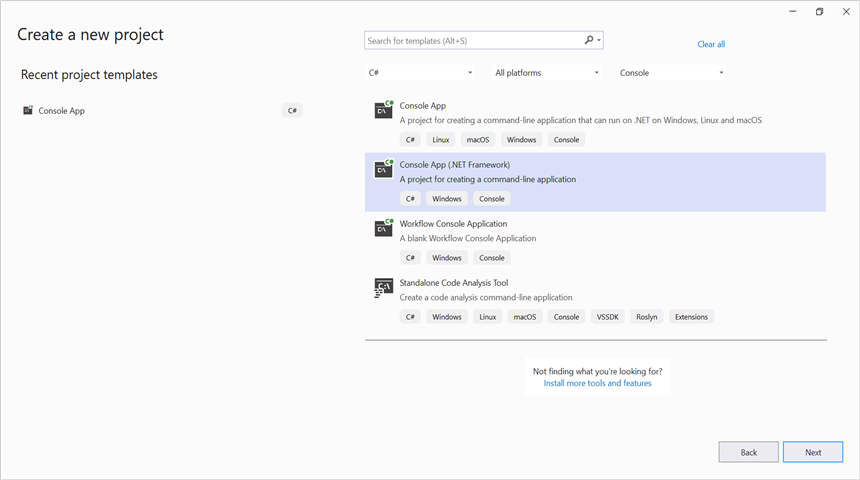
Step 1: Create a new .NET FrameWork console application project.
Step 2: Install Syncfusion.PresentationToPdfConverter.WinForms NuGet package as a reference to your Windows Forms application from the NuGet.org.
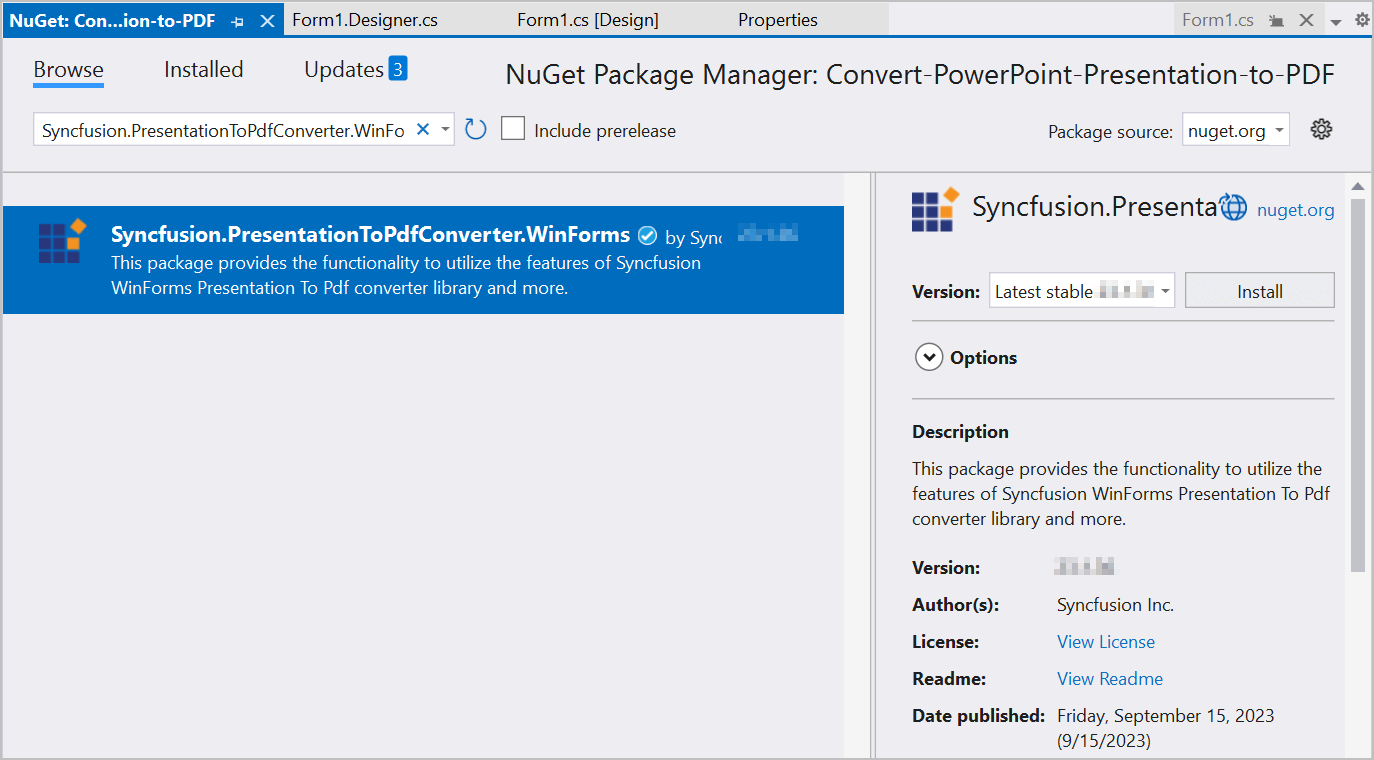
- The Syncfusion.PresentationToPdfConverter.WinForms is a dependency for Syncfusion® Windows Forms GUI controls and is named with the suffix “WinForms”. It contains platform-independent .NET Framework assemblies (compatible with versions 4.0, 4.5, 4.5.1, and 4.6) for the PowerPoint library and does not include any Windows Forms-related references or code. Therefore, we recommend using this package for .NET Framework Console applications.
- Starting with v16.2.0.x, if you reference Syncfusion® assemblies from trial setup or from the NuGet feed, you also have to add “Syncfusion.Licensing” assembly reference and include a license key in your projects. Please refer to this link to know about registering Syncfusion® license key in your application to use our components.
Step 3: Include the following namespaces in Program.cs file.
using Syncfusion.Pdf;
using Syncfusion.Presentation;
using Syncfusion.PresentationToPdfConverter;
Step 4: Include the below code snippet in Program.cs to convert PowerPoint to PDF.
//Open a PowerPoint Presentation.
using (IPresentation pptxDoc = Presentation.Open("Data/Input.pptx"))
{
    //Convert the PowerPoint Presentation into PDF document.
    using (PdfDocument pdfDocument = PresentationToPdfConverter.Convert(pptxDoc))
    {
        //Save the PDF document.
        pdfDocument.Save("Sample.pdf");
    }
}
Step 5: Build the project.
Click on Build → Build Solution or press Ctrl+Shift+B to build the project.
Step 6: Run the project.
Click the Start button (green arrow) or press F5 to run the app.
You can download a complete working sample from GitHub.
By executing the program, you will get the PDF as follows.
Prerequisites:
- JetBrains Rider.
- Install .NET Framework Developer Pack.
Step 1. Open JetBrains Rider and create a new .NET Framework console application project.
- Launch JetBrains Rider.
- Click new solution on the welcome screen.
- In the new Solution dialog, select Project Type as Console.
- Enter a project name and specify the location.
- Select the target framework as Full Framework and choose the desired version.
- Click create.

Step 2: Install the NuGet package from NuGet.org.
- Click the NuGet icon in the Rider toolbar and type Syncfusion.PresentationToPdfConverter.WinForms in the search bar.
- Ensure that “nuget.org” is selected as the package source.
- Select the latest Syncfusion.PresentationToPdfConverter.WinForms NuGet package from the list.
- Click the + (Add) button to add the package.

- Click the Install button to complete the installation.

Starting with v16.2.0.x, if you reference Syncfusion® assemblies from trial setup or from the NuGet feed, you also have to add “Syncfusion.Licensing” assembly reference and include a license key in your projects. Please refer to this link to know about registering Syncfusion® license key in your application to use our components.
Step 3: Include the following namespaces in Program.cs file.
using Syncfusion.Pdf;
using Syncfusion.Presentation;
using Syncfusion.PresentationToPdfConverter;
Step 4: Include the below code snippet in Program.cs to convert PowerPoint to PDF.
//Open a PowerPoint Presentation.
using (IPresentation pptxDoc = Presentation.Open("Data/Input.pptx"))
{
    //Convert the PowerPoint Presentation into PDF document.
    using (PdfDocument pdfDocument = PresentationToPdfConverter.Convert(pptxDoc))
    {
        //Save the PDF document.
        pdfDocument.Save("Sample.pdf");
    }
}
Step 5: Build the project.
Click the Build button in the toolbar or press Ctrl+Shift+B to build the project.
Step 6: Run the project.
Click the Run button (green arrow) in the toolbar or press F5 to run the app.
You can download a complete working sample from GitHub.
By executing the program, you will get the PDF as follows.