Create Markdown Document in Blazor
13 Aug 202623 minutes to read
Syncfusion® Essential® Markdown is a .NET Markdown library used to create, read, and edit Markdown documents programmatically without external dependencies. Using this library, you can create a Markdown document in Blazor.
Blazor Web App (Server)
Prerequisites:
- Visual Studio 2022 or later.
- Install .NET 8 SDK or later.
Step 1: Create a new C# Blazor Web app project.
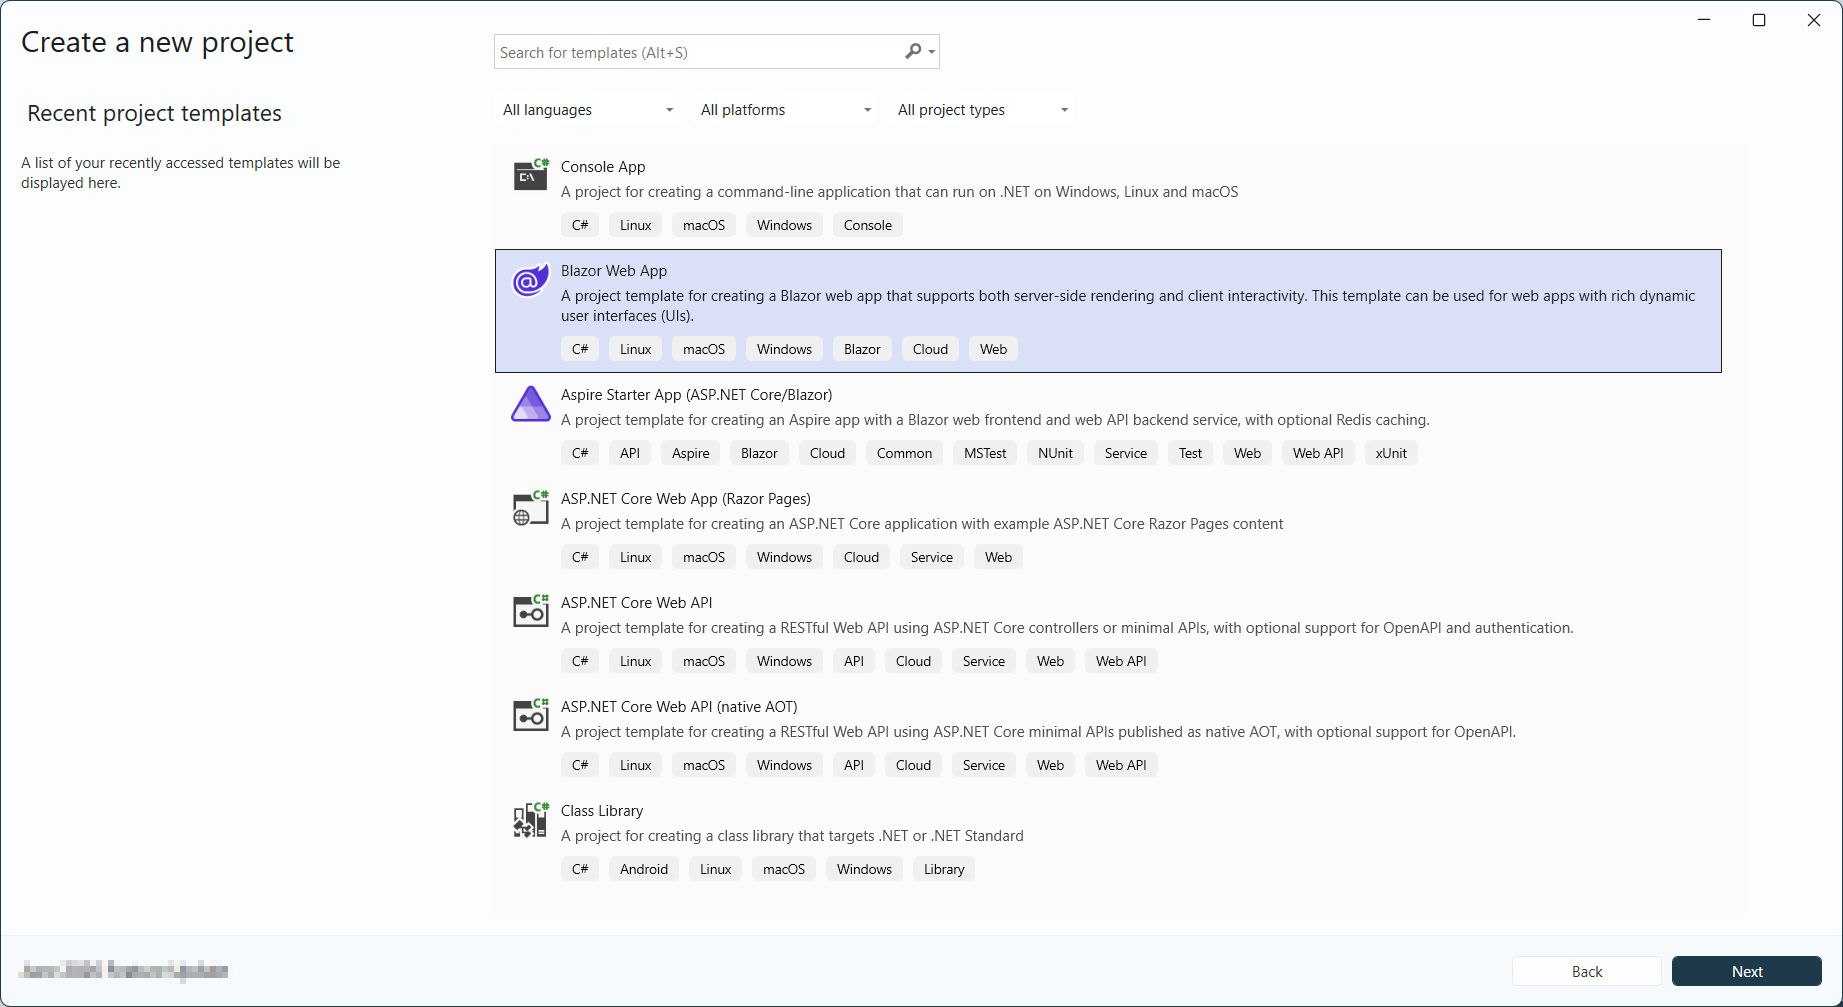
- Select “Blazor Web App” from the template and click Next.
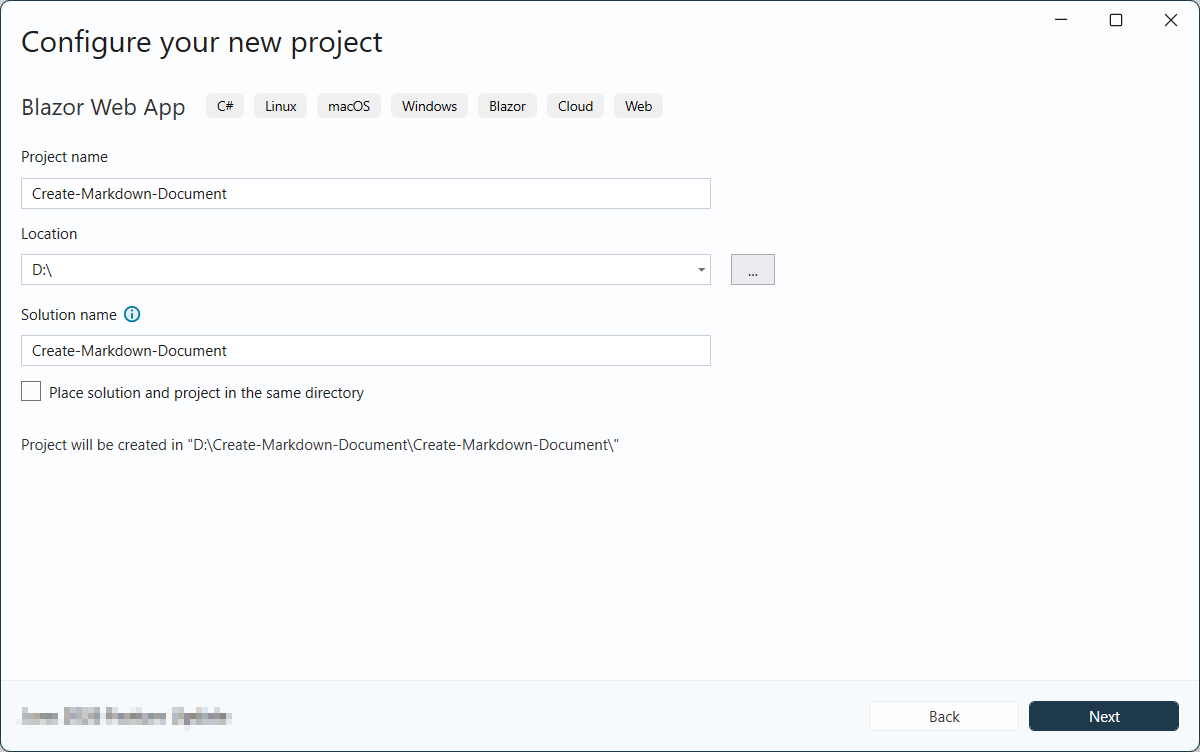
- Name the project and click Next.
- Select the framework and click Create button.
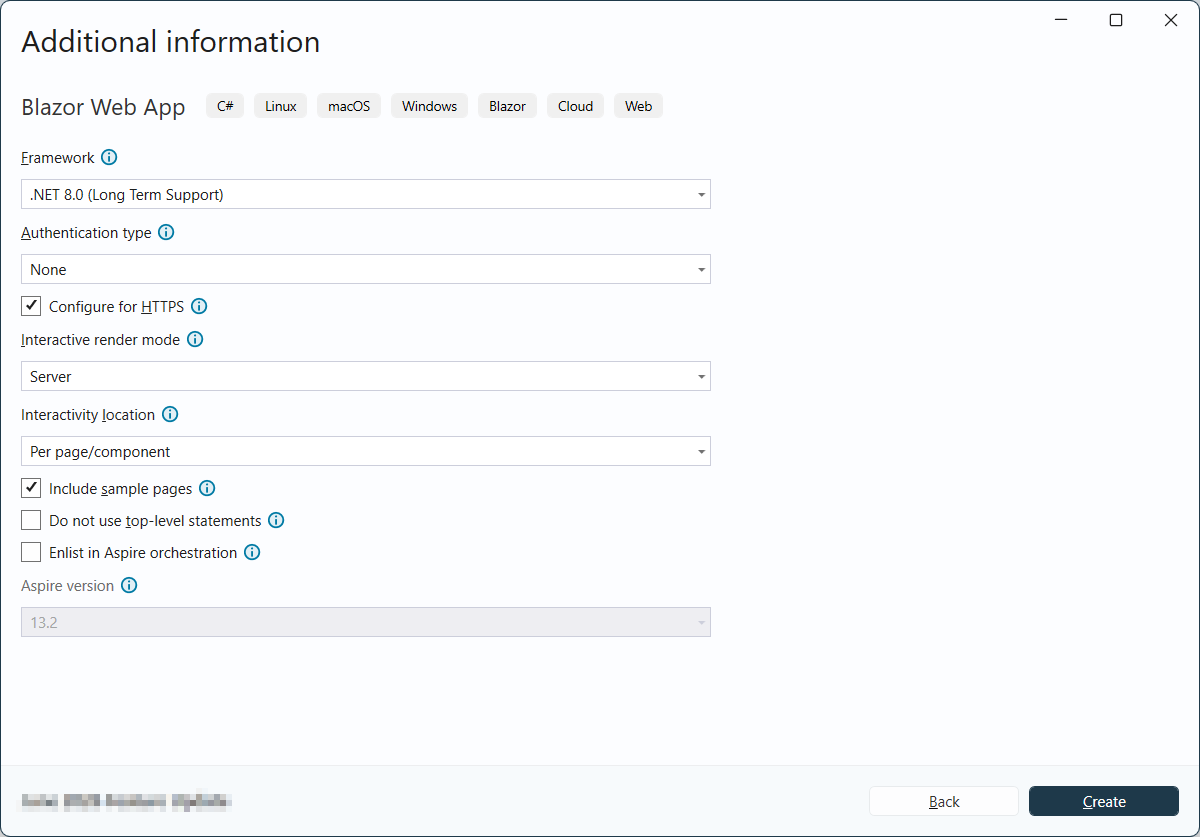
Ensure the Interactive render mode is set to Server and Interactivity location is set to Per page/component during project creation so the
@rendermode InteractiveServerdirective works correctly.
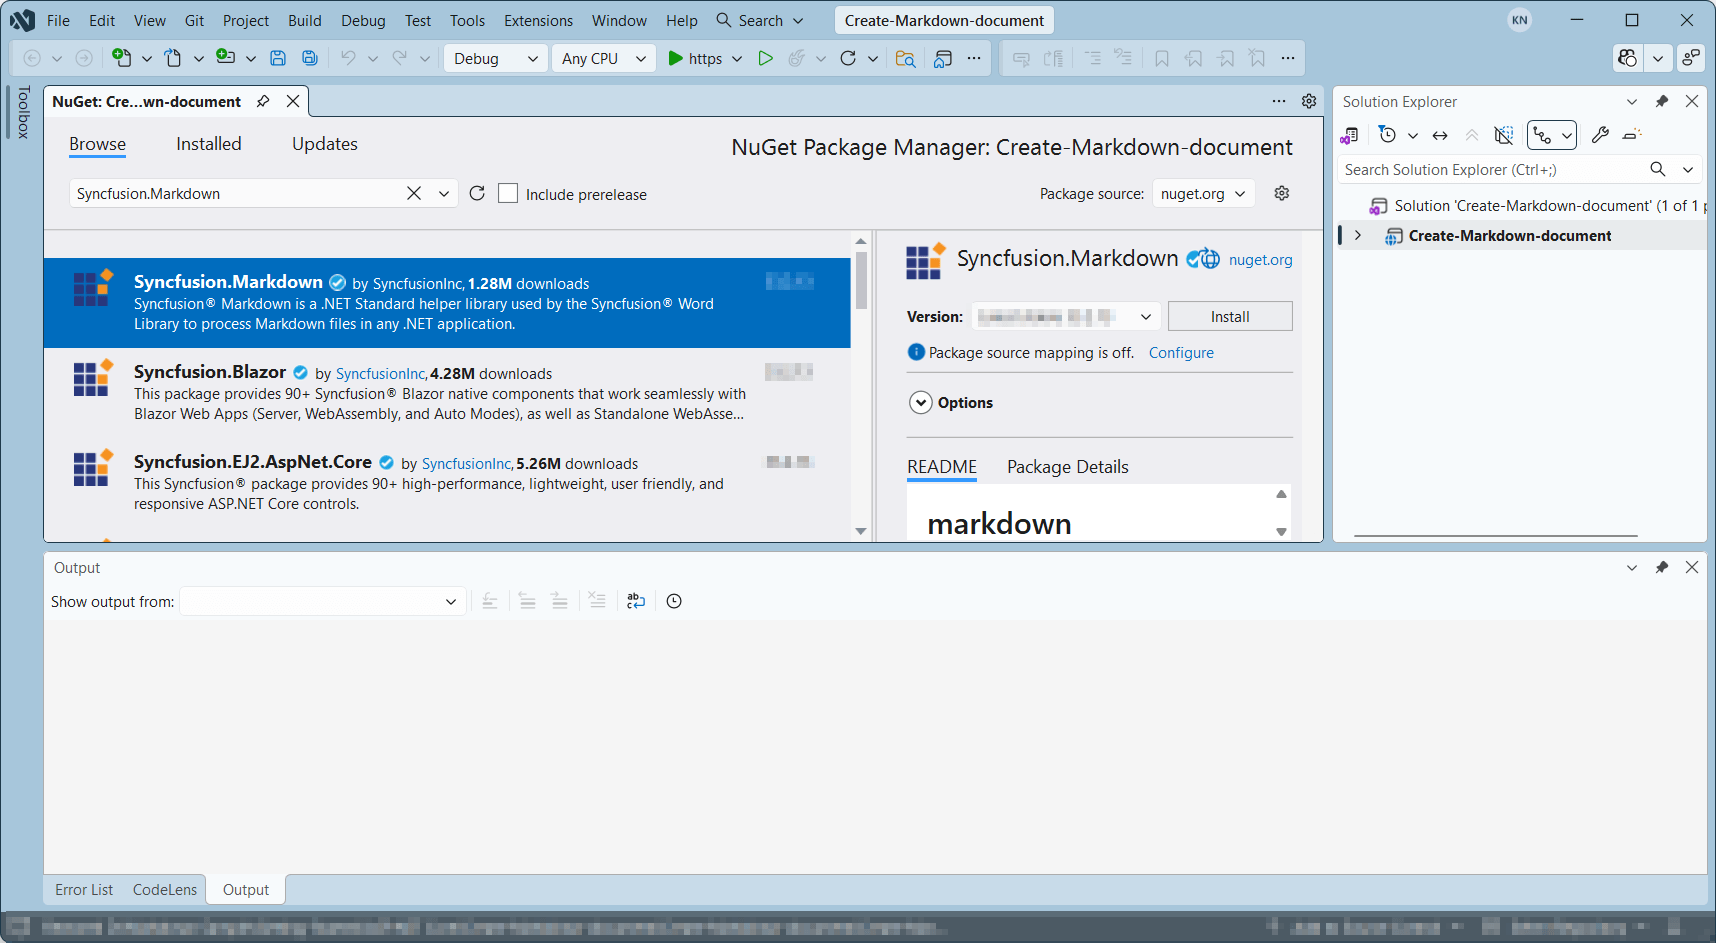
Step 2: Install the Syncfusion.Markdown NuGet package.
To create a Markdown document in a Blazor Web App Server, install Syncfusion.Markdown into the Blazor project.
Starting with v34.x.x, if you reference Syncfusion® assemblies from the trial setup or from the NuGet feed, you must add a reference to the Syncfusion.Licensing assembly and include a valid license key in your application.
Install the Syncfusion.Licensing NuGet package and register the license key during application startup.
Syncfusion.Licensing.SyncfusionLicenseProvider.RegisterLicense("YOUR_LICENSE_KEY");For more information about generating and registering a license key, refer to the Syncfusion® licensing documentation. Register the license key in
Program.csbefore any Syncfusion type is used.
Step 3: Create a Razor file named Markdown.razor in the Pages folder, which is located inside the Components folder.
Include the following namespaces in the file:
@rendermode InteractiveServer
@page "/Markdown"
@using System.IO;
@using Create_Markdown_Document;
@inject Create_Markdown_Document.Data.MarkdownService service
@inject Microsoft.JSInterop.IJSRuntime JS
Step 4: Add a button to Markdown.razor.
Include the following code to create a new button that triggers document creation:
<h2>Syncfusion Markdown Library</h2>
<p>The Syncfusion Markdown library is a Blazor Markdown library used to create, read, and edit Markdown files in applications without external dependencies.</p>
<button class="btn btn-primary" @onclick="@CreateMarkdown">Create Markdown</button>
Step 5: Implement CreateMarkdown method in Markdown.razor.
Add the following code to create and download the Markdown document:
@code {
    MemoryStream documentStream;
    /// <summary>
    /// Creates and downloads the Markdown document.
    /// </summary>
    protected async void CreateMarkdown()
    {
        documentStream = service.CreateMarkdown();
        await JS.SaveAs("Sample.md", documentStream.ToArray());
        documentStream.Dispose();
    }
}
Step 6: Create a new cs file MarkdownService.cs in the Data folder.
Create the
Datafolder inside the project root if it does not already exist.
Include the following namespaces in the file:
using Syncfusion.Office.Markdown;
using System.IO;
Step 7: Implement the CreateMarkdown method in MarkdownService.cs.
Create a new method named CreateMarkdown in the MarkdownService class that returns a MemoryStream, and include the following code snippet to create a simple Markdown document in Blazor Web App Server:
public MemoryStream CreateMarkdown()
{
    // Creates a new instance of MarkdownDocument.
    MarkdownDocument markdownDocument = new MarkdownDocument();
    // Adds a heading to the Markdown document.
    MdParagraph mdHeadingParagraph = markdownDocument.AddParagraph();
    // Applies the Heading 1 style to the paragraph.
    mdHeadingParagraph.ApplyParagraphStyle("Heading 1");
    MdTextRange mdHeadingTextRange = mdHeadingParagraph.AddTextRange();
    mdHeadingTextRange.Text = "Adventure Works Cycles";
    // Adds a paragraph to the Markdown document.
    MdParagraph mdParagraph = markdownDocument.AddParagraph();
    MdTextRange mdTextRange = mdParagraph.AddTextRange();
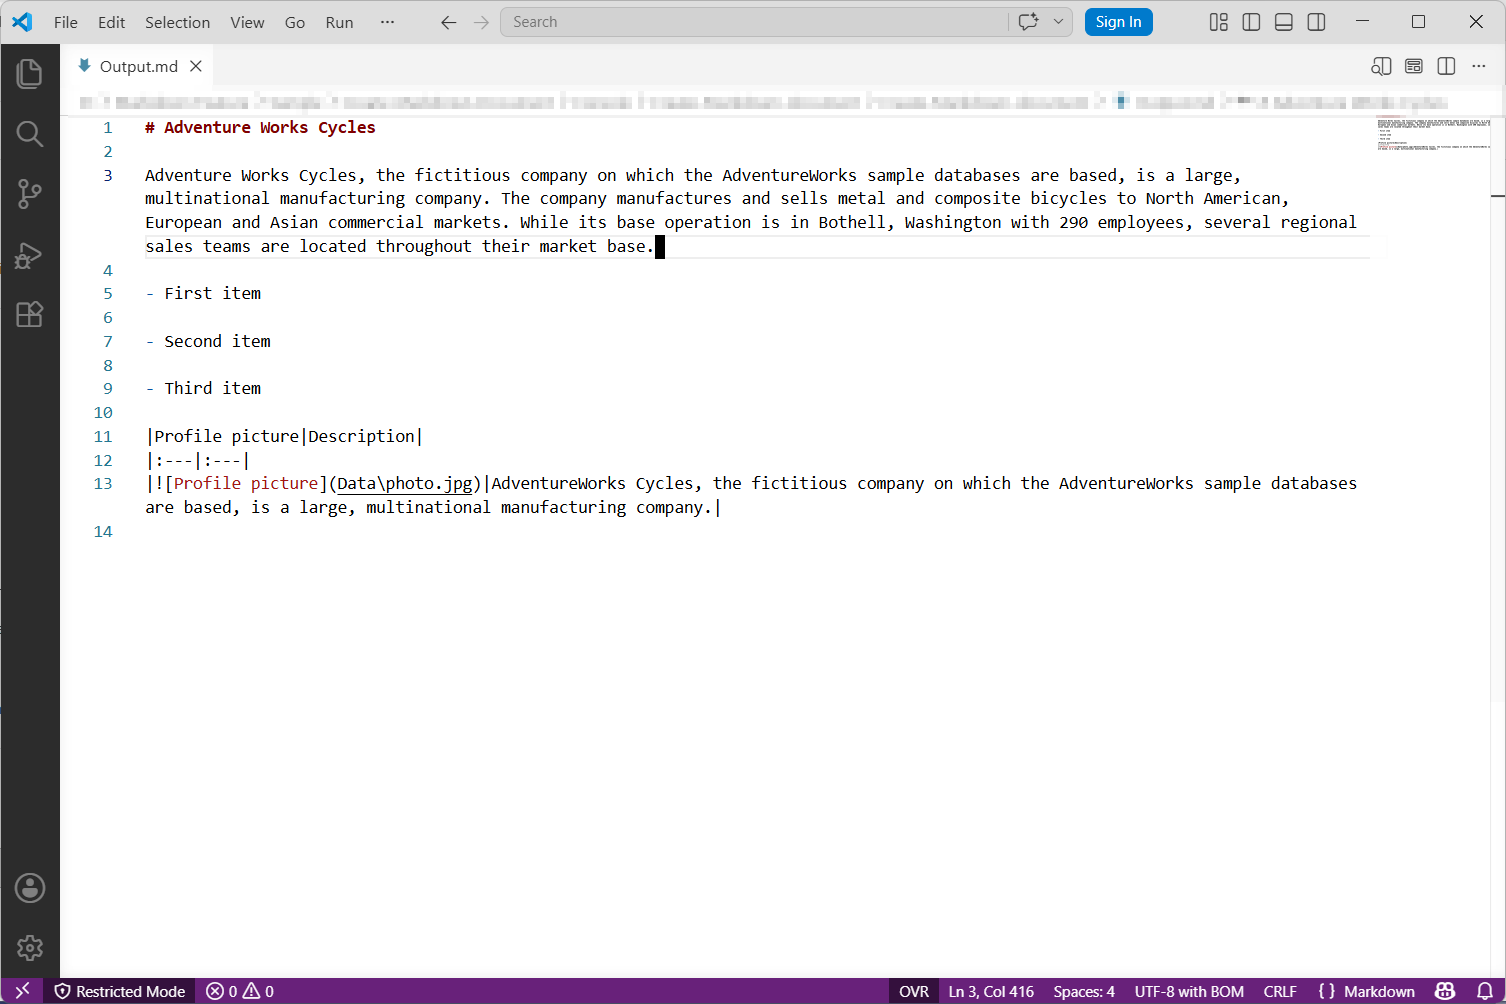
    mdTextRange.Text = "Adventure Works Cycles, the fictitious company on which the AdventureWorks sample databases are based, is a large, multinational manufacturing company. The company manufactures and sells metal and composite bicycles to North American, European and Asian commercial markets. While its base operation is in Bothell, Washington with 290 employees, several regional sales teams are located throughout their market base.";
    // Adds the first list item.
    MdParagraph item1 = markdownDocument.AddParagraph();
    item1.ListFormat = new MdListFormat();
    item1.ListFormat.IsNumbered = false;
    item1.ListFormat.ListLevel = 0;
    item1.ListFormat.ListValue = "- ";
    item1.AddTextRange().Text = "First item";
    // Adds the second list item.
    MdParagraph item2 = markdownDocument.AddParagraph();
    item2.ListFormat = new MdListFormat();
    item2.ListFormat.IsNumbered = false;
    item2.ListFormat.ListLevel = 0;
    item2.ListFormat.ListValue = "- ";
    item2.AddTextRange().Text = "Second item";
    // Adds the third list item.
    MdParagraph item3 = markdownDocument.AddParagraph();
    item3.ListFormat = new MdListFormat();
    item3.ListFormat.IsNumbered = false;
    item3.ListFormat.ListLevel = 0;
    item3.ListFormat.ListValue = "- ";
    item3.AddTextRange().Text = "Third item";
    // Adds a table to the Markdown document.
    MdTable table = markdownDocument.AddTable();
    table.ColumnAlignments.Add(MdColumnAlignment.Left);
    table.ColumnAlignments.Add(MdColumnAlignment.Left);
    // Adds the header row.
    MdTableRow headerRow = table.AddTableRow();
    MdTableCell header1 = headerRow.AddTableCell();
    header1.Items.Add(new MdTextRange { Text = "Profile picture" });
    MdTableCell header2 = headerRow.AddTableCell();
    header2.Items.Add(new MdTextRange { Text = "Description" });

    // Adds a data row.
    MdTableRow dataRow = table.AddTableRow();
    MdTableCell cell1 = dataRow.AddTableCell();
    MdPicture picture = new MdPicture();
    picture.Url = "Data\\photo.jpg";
    picture.AltText = "Profile picture";
    cell1.Items.Add(picture);
    MdTableCell cell2 = dataRow.AddTableCell();
    cell2.Items.Add(new MdTextRange { Text = "AdventureWorks Cycles, the fictitious company on which the AdventureWorks sample databases are based, is a large, multinational manufacturing company." });
	// Saves the Markdown document to MemoryStream
	MemoryStream stream = new MemoryStream();
	markdownDocument.Save(stream);
	stream.Position = 0;
	// Disposes the document
	markdownDocument.Dispose();
	return stream;
}
Step 8: Add the service in Program.cs.
Add the following line to the Program.cs file to register MarkdownService as a scoped service in the Blazor application.
builder.Services.AddScoped<Create_Markdown_Document.Data.MarkdownService>();Step 9: Create FileUtils.cs for JavaScript interoperability.
Create a new class file named FileUtils in the project and add the following code to invoke the JavaScript action for file download in the browser.
public static class FileUtils
{
    public static ValueTask<object> SaveAs(this IJSRuntime js, string filename, byte[] data)
       => js.InvokeAsync<object>(
            "saveAsFile",
            filename,
            Convert.ToBase64String(data));
}
Step 10: Add JavaScript function to App.razor.
Add the following JavaScript function in the App.razor file located in the Components folder.
<script type="text/javascript">
    function saveAsFile(filename, bytesBase64) {
        if (navigator.msSaveBlob) {
            // Download document in Edge browser
            var data = window.atob(bytesBase64);
            var bytes = new Uint8Array(data.length);
            for (var i = 0; i < data.length; i++) {
                bytes[i] = data.charCodeAt(i);
            }
            var blob = new Blob([bytes.buffer], { type: "application/octet-stream" });
            navigator.msSaveBlob(blob, filename);
        }
        else {
            var link = document.createElement('a');
            link.download = filename;
            link.href = "data:application/octet-stream;base64," + bytesBase64;
            document.body.appendChild(link);
            link.click();
            document.body.removeChild(link);
        }
    }
</script>
Step 11: Add navigation link.
Add the following code snippet to the Components/Layout/NavMenu.razor file.
<div class="nav-item px-3">
    <NavLink class="nav-link" href="markdown">
        <span class="oi oi-list-rich" aria-hidden="true"></span> Create Markdown
    </NavLink>
</div>
Step 12: Build the project.
Click on Build → Build Solution or press Ctrl+Shift+B to build the project.
Step 13: Run the project.
Click the Start button (green arrow) or press F5 to run the application.
A complete working sample is available on GitHub.
The code sample references an image file (
photo.jpg). Download this asset from the GitHub sample Data folder and place it in the application’swwwroot/Datafolder so theMdPicture.Urlvalue ("Data/photo.jpg") resolves correctly at runtime.
By executing the program, you will get the Markdown document as follows.
Blazor WebAssembly Standalone App
Prerequisites:
- Visual Studio 2022 or later.
- Install .NET 8 SDK or later.
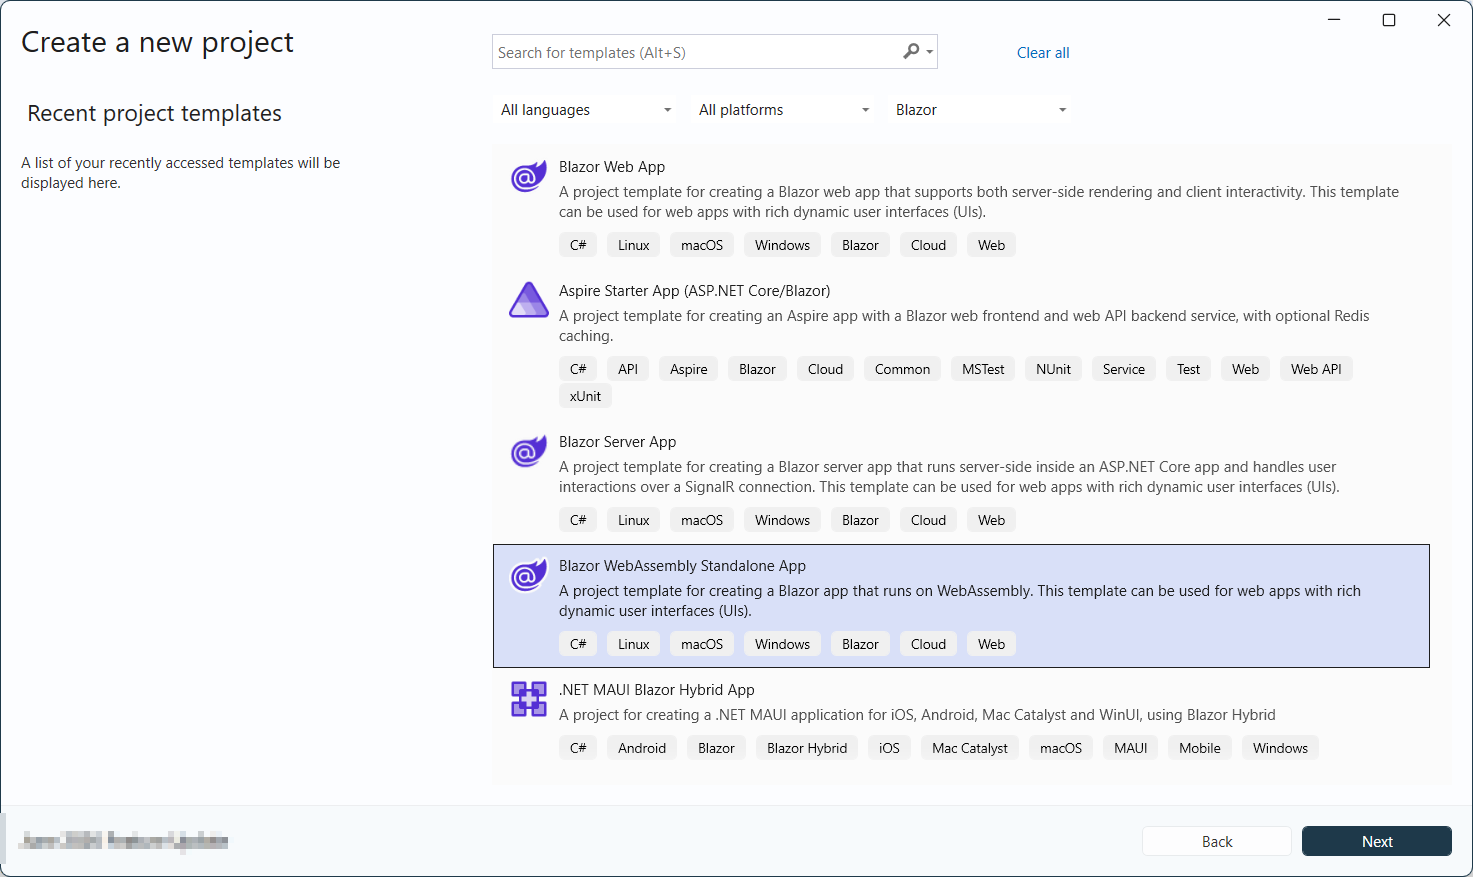
Step 1: Create a new C# Blazor WASM Standalone app project.
Select “Blazor WebAssembly Standalone App” from the template and click Next.
Step 2: Install the Syncfusion.Markdown NuGet package.
To create a Markdown document in a Blazor WASM Standalone app, install Syncfusion.Markdown into the Blazor project.
Starting with v34.x.x, if you reference Syncfusion® assemblies from the trial setup or from the NuGet feed, you must add a reference to the Syncfusion.Licensing assembly and include a valid license key in your application.
Install the Syncfusion.Licensing NuGet package and register the license key during application startup.
Syncfusion.Licensing.SyncfusionLicenseProvider.RegisterLicense("YOUR_LICENSE_KEY");For more information about generating and registering a license key, refer to the Syncfusion® licensing documentation.
Step 3: Create a Razor file named Markdown.razor in the Pages folder.
Add the following namespaces:
@page "/Markdown"
@inject Microsoft.JSInterop.IJSRuntime JS
@using Syncfusion.Office.Markdown
@using System.IO
Step 4: Add a button to Markdown.razor.
Add the following code to create a new button that triggers document creation:
<h2>Syncfusion Markdown Library</h2>
<p>The Syncfusion Markdown library is used to create, read, and edit Markdown files in applications without external dependencies.</p>
<button class="btn btn-primary" @onclick="@CreateMarkdown">Create Markdown</button>
Step 5: Implement CreateMarkdown method in Markdown.razor.
Create a new async method named CreateMarkdown and include the following code snippet to create a Markdown document in a Blazor WASM Standalone app.
@functions {
    async void CreateMarkdown()
    {
        // Creates a new instance of MarkdownDocument.
        MarkdownDocument markdownDocument = new MarkdownDocument();
        // Adds a heading to the Markdown document.
        MdParagraph mdHeadingParagraph = markdownDocument.AddParagraph();
        // Applies the Heading 1 style to the paragraph.
        mdHeadingParagraph.ApplyParagraphStyle("Heading 1");
        MdTextRange mdHeadingTextRange = mdHeadingParagraph.AddTextRange();
        mdHeadingTextRange.Text = "Adventure Works Cycles";
        // Adds a paragraph to the Markdown document.
        MdParagraph mdParagraph = markdownDocument.AddParagraph();
        MdTextRange mdTextRange = mdParagraph.AddTextRange();
        mdTextRange.Text = "Adventure Works Cycles, the fictitious company on which the AdventureWorks sample databases are based, is a large, multinational manufacturing company. The company manufactures and sells metal and composite bicycles to North American, European and Asian commercial markets. While its base operation is in Bothell, Washington with 290 employees, several regional sales teams are located throughout their market base.";
        // Adds the first list item.
        MdParagraph item1 = markdownDocument.AddParagraph();
        item1.ListFormat = new MdListFormat();
        item1.ListFormat.IsNumbered = false;
        item1.ListFormat.ListLevel = 0;
        item1.ListFormat.ListValue = "- ";
        item1.AddTextRange().Text = "First item";
        // Adds the second list item.
        MdParagraph item2 = markdownDocument.AddParagraph();
        item2.ListFormat = new MdListFormat();
        item2.ListFormat.IsNumbered = false;
        item2.ListFormat.ListLevel = 0;
        item2.ListFormat.ListValue = "- ";
        item2.AddTextRange().Text = "Second item";
        // Adds the third list item.
        MdParagraph item3 = markdownDocument.AddParagraph();
        item3.ListFormat = new MdListFormat();
        item3.ListFormat.IsNumbered = false;
        item3.ListFormat.ListLevel = 0;
        item3.ListFormat.ListValue = "- ";
        item3.AddTextRange().Text = "Third item";
        // Adds a table to the Markdown document.
        MdTable table = markdownDocument.AddTable();
        table.ColumnAlignments.Add(MdColumnAlignment.Left);
        table.ColumnAlignments.Add(MdColumnAlignment.Left);
        // Adds the header row.
        MdTableRow headerRow = table.AddTableRow();
        MdTableCell header1 = headerRow.AddTableCell();
        header1.Items.Add(new MdTextRange { Text = "Profile picture" });
        MdTableCell header2 = headerRow.AddTableCell();
        header2.Items.Add(new MdTextRange { Text = "Description" });

        // Adds a data row.
        MdTableRow dataRow = table.AddTableRow();
        MdTableCell cell1 = dataRow.AddTableCell();
        MdPicture picture = new MdPicture();
        picture.Url = "Data\\photo.jpg";
        picture.AltText = "Profile picture";
        cell1.Items.Add(picture);
        MdTableCell cell2 = dataRow.AddTableCell();
        cell2.Items.Add(new MdTextRange { Text = "AdventureWorks Cycles, the fictitious company on which the AdventureWorks sample databases are based, is a large, multinational manufacturing company." });
        // Saves the Markdown document to MemoryStream
        MemoryStream stream = new MemoryStream();
        markdownDocument.Save(stream);
        stream.Position = 0;
		// Disposes the document
		markdownDocument.Dispose();
        await JS.SaveAs("Sample.md", stream.ToArray());
        stream.Dispose();
    }
}
Step 6: Create FileUtils.cs for JavaScript interoperability.
Create a new class file named FileUtils and add the following code to invoke the JavaScript action for file download in the browser.
public static class FileUtils
{
    public static ValueTask<object> SaveAs(this IJSRuntime js, string filename, byte[] data)
       => js.InvokeAsync<object>(
            "saveAsFile",
            filename,
            Convert.ToBase64String(data));
}
Step 7: Add JavaScript function to index.html.
Add the following JavaScript function in the index.html file present under wwwroot.
<script type="text/javascript">
    function saveAsFile(filename, bytesBase64) {
        if (navigator.msSaveBlob) {
            // Download document in Edge browser
            var data = window.atob(bytesBase64);
            var bytes = new Uint8Array(data.length);
            for (var i = 0; i < data.length; i++) {
                bytes[i] = data.charCodeAt(i);
            }
            var blob = new Blob([bytes.buffer], { type: "application/octet-stream" });
            navigator.msSaveBlob(blob, filename);
        }
        else {
            var link = document.createElement('a');
            link.download = filename;
            link.href = "data:application/octet-stream;base64," + bytesBase64;
            document.body.appendChild(link);
            link.click();
            document.body.removeChild(link);
        }
    }
</script>
Step 8: Add navigation link.
Add the following code snippet to the Layout/NavMenu.razor file.
<div class="nav-item px-3">
    <NavLink class="nav-link" href="markdown">
        <span class="oi oi-list-rich" aria-hidden="true"></span> Create Markdown
    </NavLink>
</div>
Step 9: Build the project.
Click on Build → Build Solution or press Ctrl+Shift+B to build the project.
Step 10: Run the project.
Click the Start button (green arrow) or press F5 to run the application.
A complete working sample is available on GitHub.
The code sample references an image file (
photo.jpg). Download this asset from the GitHub sample Data folder and place it in the application’swwwroot/Datafolder so theMdPicture.Urlvalue ("Data/photo.jpg") resolves correctly at runtime.
By executing the program, you will get the Markdown document as follows.
While the Markdown library functions in WASM Standalone, server-side deployment is recommended. Running the Markdown library client-side in WASM Standalone increases the application payload size because the library assemblies are downloaded to the browser.
Looking for the full .NET Markdown Library overview, features, pricing, and documentation? Visit the .NET Markdown Library page.