Notes in React Spreadsheet
14 Aug 202624 minutes to read
The Notes feature is used to insert comments, provide feedback, suggest changes, or leave remarks on specific cells while reviewing documents in the Spreadsheet. You can enable or disable the notes functionality using the enableNotes property, which defaults to true.
- When opening an Excel document with notes, they are displayed in the Spreadsheet control.
- Cells containing notes are marked with a small red triangle in the top-right corner. Hovering over these cells shows the note content.
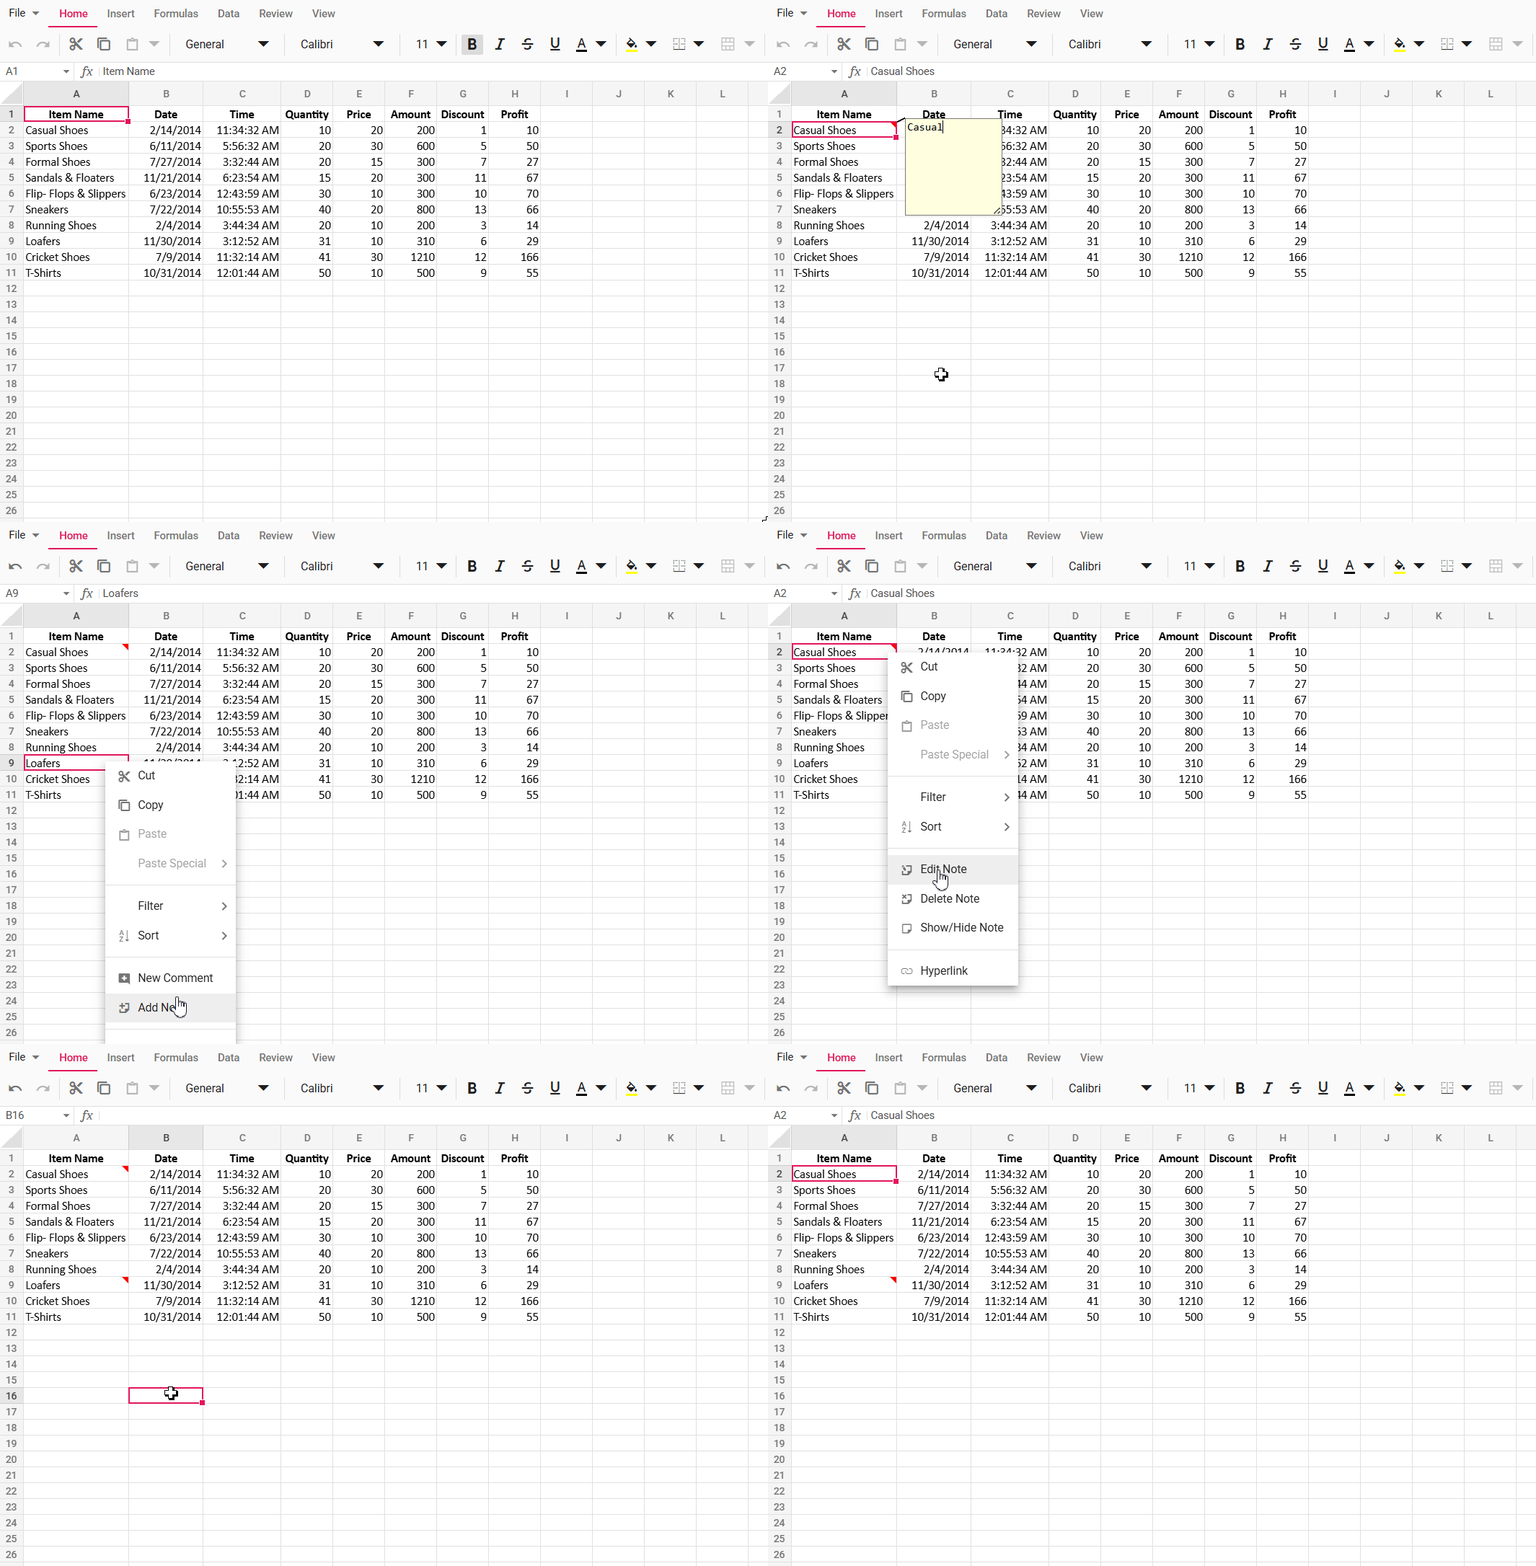
In the below example, you can add, edit, save, and delete notes.
import * as React from 'react';
import { createRoot } from 'react-dom/client';
import { SpreadsheetComponent, SheetsDirective, SheetDirective, RangesDirective } from '@syncfusion/ej2-react-spreadsheet';
import { RangeDirective, ColumnsDirective, ColumnDirective } from '@syncfusion/ej2-react-spreadsheet';
import { data } from './datasource';

function App() {
    const spreadsheetRef = React.useRef(null);
    function onCreated() {
        let spreadsheet = spreadsheetRef.current;
        if (spreadsheet) {
            spreadsheet.cellFormat({ fontWeight: 'bold', textAlign: 'center', verticalAlign: 'middle' }, 'A1:H1');
        }
    }

    return (
        <div>
            <SpreadsheetComponent ref={spreadsheetRef} allowOpen={true} allowSave={true} openUrl='https://document.syncfusion.com/web-services/spreadsheet-editor/api/spreadsheet/open' saveUrl='https://document.syncfusion.com/web-services/spreadsheet-editor/api/spreadsheet/save' created={onCreated.bind(this)}>
                <SheetsDirective>
                    <SheetDirective name="Price Details">
                        <RangesDirective>
                            <RangeDirective dataSource={data}></RangeDirective>
                        </RangesDirective>
                        <ColumnsDirective>
                            <ColumnDirective width={130}></ColumnDirective>
                            <ColumnDirective width={92}></ColumnDirective>
                            <ColumnDirective width={96}></ColumnDirective>
                        </ColumnsDirective>
                    </SheetDirective>
                </SheetsDirective>
            </SpreadsheetComponent>
        </div>
    );
};
export default App;

const root = createRoot(document.getElementById('root'));
root.render(<App />);
import * as React from 'react';
import { createRoot } from 'react-dom/client';
import { SpreadsheetComponent, SheetsDirective, SheetDirective, RangesDirective } from '@syncfusion/ej2-react-spreadsheet';
import { RangeDirective, ColumnsDirective, ColumnDirective } from '@syncfusion/ej2-react-spreadsheet';
import { data } from './datasource';
function App() {
const spreadsheetRef = React.useRef<SpreadsheetComponent>(null);
function onCreated() {
let spreadsheet = spreadsheetRef.current;
if (spreadsheet) {
spreadsheet.cellFormat({ fontWeight: 'bold', textAlign: 'center', verticalAlign: 'middle' }, 'A1:H1');
}
}
return (
<div>
<SpreadsheetComponent ref={spreadsheetRef} allowOpen={true} allowSave={true} openUrl='https://document.syncfusion.com/web-services/spreadsheet-editor/api/spreadsheet/open' saveUrl='https://document.syncfusion.com/web-services/spreadsheet-editor/api/spreadsheet/save' created={onCreated.bind(this)}>
<SheetsDirective>
<SheetDirective name="Price Details">
<RangesDirective>
<RangeDirective dataSource={data}></RangeDirective>
</RangesDirective>
<ColumnsDirective>
<ColumnDirective width={130}></ColumnDirective>
<ColumnDirective width={92}></ColumnDirective>
<ColumnDirective width={96}></ColumnDirective>
</ColumnsDirective>
</SheetDirective>
</SheetsDirective>
</SpreadsheetComponent>
</div>
);
};
export default App;
const root = createRoot(document.getElementById('root')!);
root.render(<App />);Adding a note
In the active worksheet, you can add a note in the following ways:
- Context Menu: Right-click the desired cell and select Add Note.
- Ribbon: Select the cell, navigate to the Review tab, click the Notes dropdown, and select Add Note.
- Keyboard Shortcut: Select the cell and press Shift + F2.
-
Programmatically:
- Use the
updateCellmethod with the note model to add a note to a specific cell. - Bind notes via code-behind during initial load by associating the note model with the cell model.
- Use the
A dialog box will open where you can enter the note content. After entering the content, you can either click on other cells or press the Esc button to automatically save the note and close the dialog box.
Editing a note
In the active worksheet, you can modify the content of an existing notes in the document:
- Context Menu: Right-click the cell containing the note and select Edit Note.
- Ribbon: Select the cell containing the note, navigate to the Review tab, click the Notes dropdown, and select Edit Note.
- Keyboard Shortcut: Select the cell containing the note and press Shift + F2.
The note editor dialog box will open with the existing content. After editing the content, you can either click on other cells or press the Esc button to automatically save the changes and close the dialog box.
Deleting a note
You can remove notes from cells using the following ways:
- Context Menu: Right-click the cell containing the note and select Delete Note.
- Ribbon: Select the cell containing the note, navigate to the Review tab, click the Notes dropdown, and select Delete Note.
The note will be removed from the cell, and the red triangle indicator will be removed.
Navigating Between Notes
The Spreadsheet provides intuitive navigation to quickly move between cells containing notes in your worksheet. These options are accessible through the Notes dropdown in the Review tab.
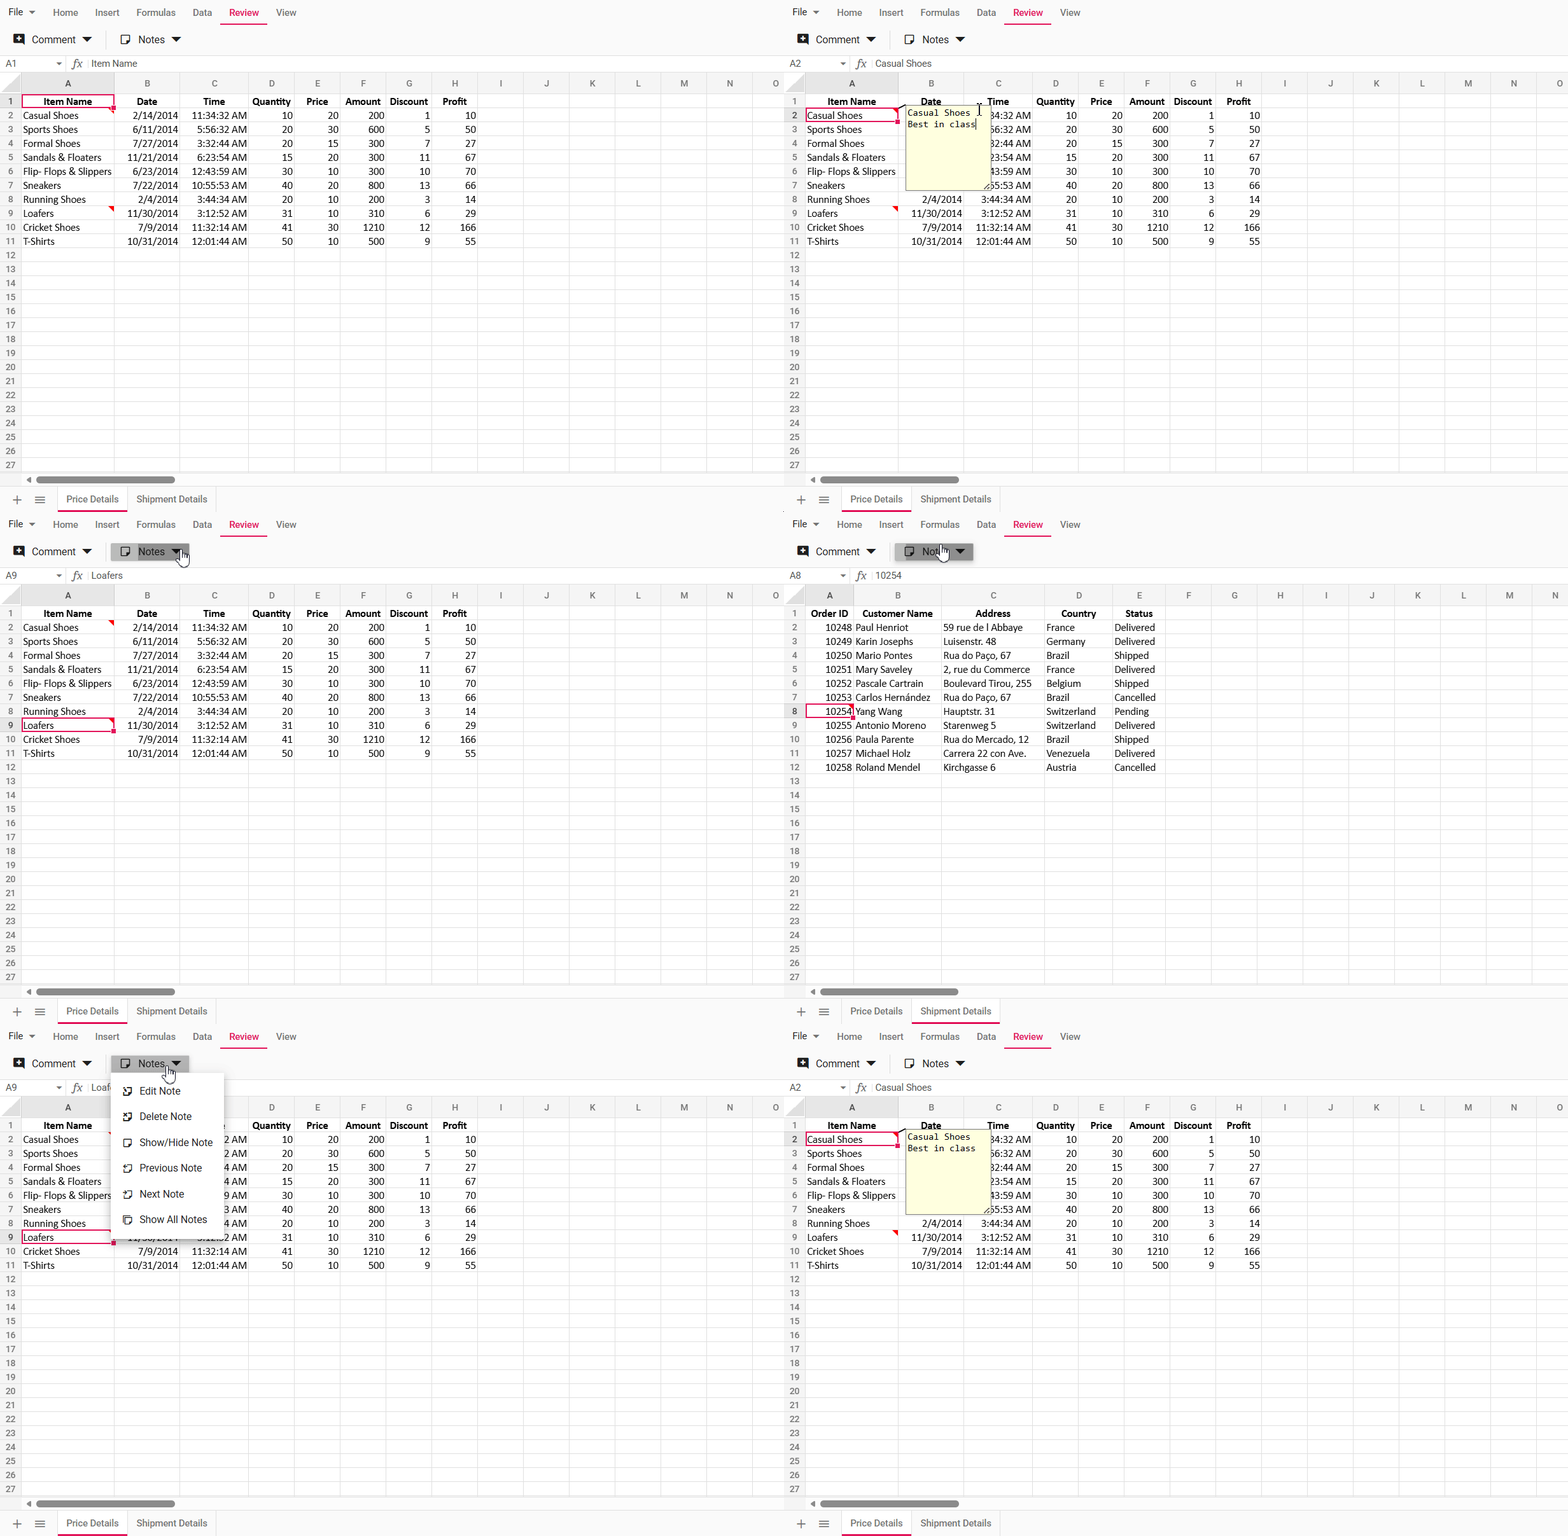
Previous Note
To navigate to the previous note:
- Go to the Review tab, open the Notes dropdown, and select Previous Note.
- The Spreadsheet will highlight the previous note in the current worksheet, searching leftward and then upward.
- If no earlier note exists in the current sheet, the search continues in the previous worksheet.
- If the workbook has no notes, the selection stays on the current cell.
Next Note
To navigate to the next note:
- Go to the Review tab, open the Notes dropdown, and select Next Note.
- The Spreadsheet will highlight the next note in the current worksheet, searching rightward and then downward.
- If no later note exists in the current sheet, the search continues in the next worksheet.
- If the workbook has no notes, the selection stays on the current cell.
This navigation feature streamlines reviewing by letting you jump directly between notes across worksheets.
It ensures efficient traversal, so you don’t miss any feedback or comments while working through your document.
Show/Hide Note
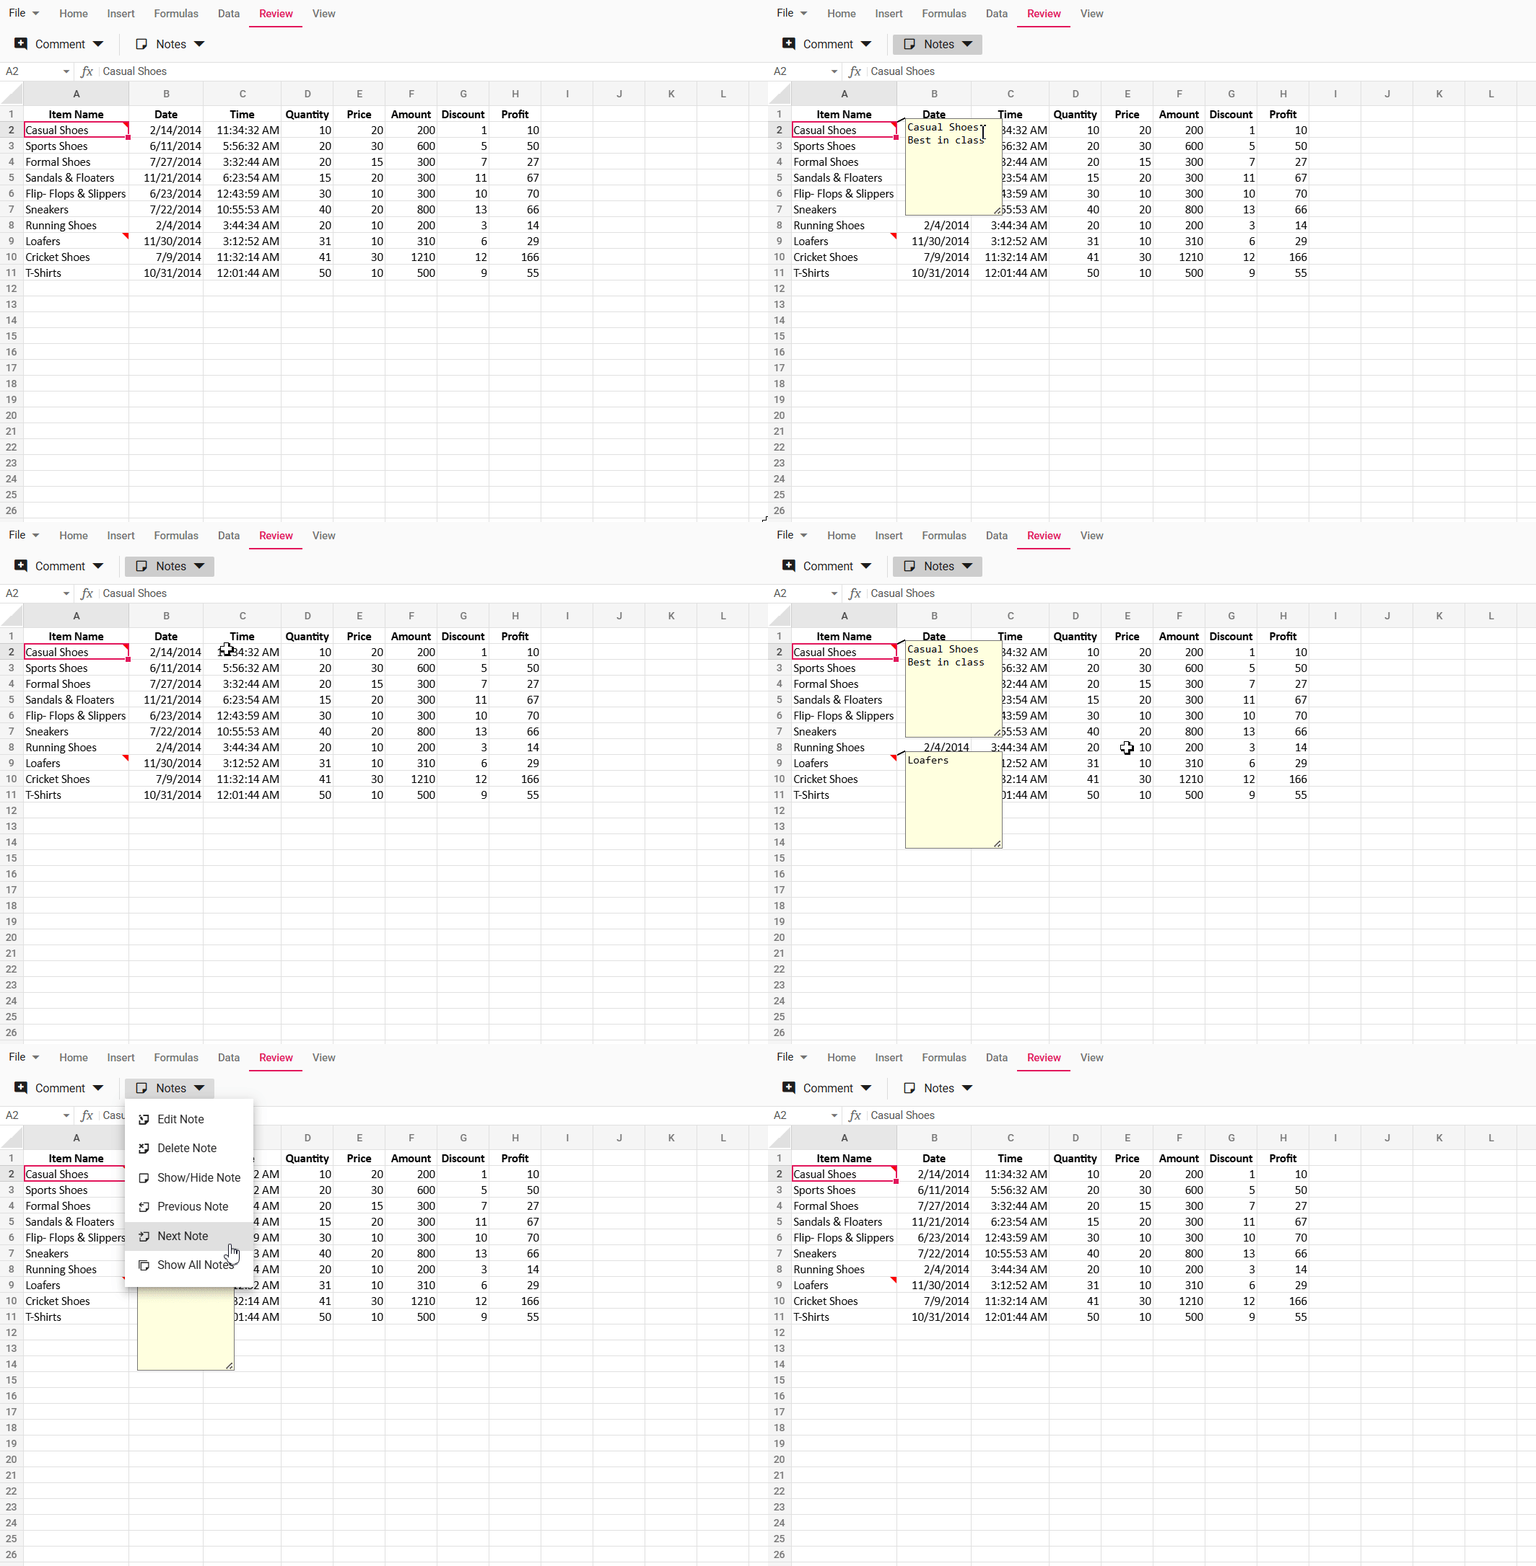
The Show/Hide Note option allows you to toggle the visibility of individual notes as sticky notes within the worksheet. When enabled, the note appears as a persistent floating text box, making it convenient to reference key information without hovering over the cell.
To toggle the visibility of a note:
- Context Menu: Right-click the cell containing the note and select Show/Hide Note.
- Ribbon: Select the cell, go to the Review tab, click the Notes dropdown, and choose Show/Hide Note.
Behavior:
- Default State (Hidden): Notes are hidden by default and only appear when hovering over the cell, which displays a red triangle indicator.
- Sticky State (Visible): Toggling Show/Hide Note on a hidden note makes it visible as a sticky note, which remains on display even when navigating to other cells or selections.
- Toggle Functionality: Selecting Show/Hide Note again on a visible note hides it, reverting to the default state.
- Independent Control: Each note can be toggled individually, allowing you to display only the most relevant notes for your current task.
Show All Notes
The Show All Notes option enables you to display all notes in the current worksheet simultaneously as sticky notes, simplifying the review of multiple comments at a glance.
To activate:
- Navigate to the Review tab, click the Notes dropdown, and select Show All Notes.
All notes in the worksheet will appear as floating text boxes near their respective cells.
Note: After using Show All Notes, you can hide individual notes selectively via the Show/Hide Note option. Additionally, any new notes added to the worksheet will automatically appear as visible sticky notes when Show All Notes is active.
This functionality enhances workflow efficiency by providing flexible control over note visibility, whether for individual focus or comprehensive review.
Saving the Document with Notes
You can save and export Spreadsheet data along with notes into an Excel document.
To do this, go to File > Save As in the ribbon menu.
Notes are preserved when exporting to:
- Microsoft Excel (.xlsx)
- Microsoft Excel 97–2003 (.xls)
Notes are not included when exporting to:
- Comma Separated Values (.csv)
- Excel Macro-Enabled Workbook (.xlsm)
- Excel Binary Workbook (.xlsb)
- PDF Document (.pdf)
Disabling notes
To disable the note functionality, you need to set the enableNotes property to false.
- Notes in the document will not be displayed when opened in the Spreadsheet when
enableNotesset tofalse. - The Add Note option will be removed from the context menu.
- Keyboard shortcuts related to notes will no longer work.
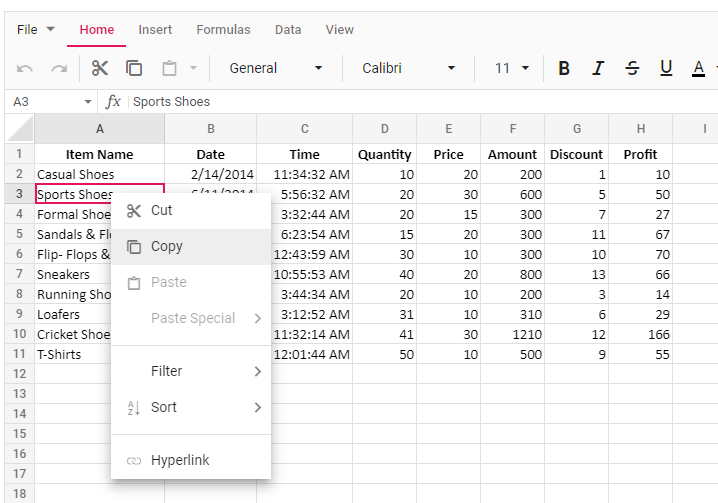
In the below example, the note functionality is disabled in the Spreadsheet.
import * as React from 'react';
import { createRoot } from 'react-dom/client';
import { SpreadsheetComponent, SheetsDirective, SheetDirective, RangesDirective } from '@syncfusion/ej2-react-spreadsheet';
import { RangeDirective, ColumnsDirective, ColumnDirective } from '@syncfusion/ej2-react-spreadsheet';
import { data } from './datasource';

function App() {
    const spreadsheetRef = React.useRef(null);
    function onCreated() {
        let spreadsheet = spreadsheetRef.current;
        if (spreadsheet) {
            spreadsheet.cellFormat({ fontWeight: 'bold', textAlign: 'center', verticalAlign: 'middle' }, 'A1:H1');
        }
    }

    return (
        <div>
            <SpreadsheetComponent ref={spreadsheetRef} allowOpen={true} allowSave={true} openUrl='https://document.syncfusion.com/web-services/spreadsheet-editor/api/spreadsheet/open' saveUrl='https://document.syncfusion.com/web-services/spreadsheet-editor/api/spreadsheet/save' created={onCreated.bind(this)} enableNotes={false}>
                <SheetsDirective>
                    <SheetDirective name="Price Details">
                        <RangesDirective>
                            <RangeDirective dataSource={data}></RangeDirective>
                        </RangesDirective>
                        <ColumnsDirective>
                            <ColumnDirective width={130}></ColumnDirective>
                            <ColumnDirective width={92}></ColumnDirective>
                            <ColumnDirective width={96}></ColumnDirective>
                        </ColumnsDirective>
                    </SheetDirective>
                </SheetsDirective>
            </SpreadsheetComponent>
        </div>
    );
};
export default App;

const root = createRoot(document.getElementById('root'));
root.render(<App />);
import * as React from 'react';
import { createRoot } from 'react-dom/client';
import { SpreadsheetComponent, SheetsDirective, SheetDirective, RangesDirective } from '@syncfusion/ej2-react-spreadsheet';
import { RangeDirective, ColumnsDirective, ColumnDirective } from '@syncfusion/ej2-react-spreadsheet';
import { data } from './datasource';
function App() {
const spreadsheetRef = React.useRef<SpreadsheetComponent>(null);
function onCreated() {
let spreadsheet = spreadsheetRef.current;
if (spreadsheet) {
spreadsheet.cellFormat({ fontWeight: 'bold', textAlign: 'center', verticalAlign: 'middle' }, 'A1:H1');
}
}
return (
<div>
<SpreadsheetComponent ref={spreadsheetRef} allowOpen={true} allowSave={true} openUrl='https://document.syncfusion.com/web-services/spreadsheet-editor/api/spreadsheet/open' saveUrl='https://document.syncfusion.com/web-services/spreadsheet-editor/api/spreadsheet/save' created={onCreated.bind(this)} enableNotes={false}>
<SheetsDirective>
<SheetDirective name="Price Details">
<RangesDirective>
<RangeDirective dataSource={data}></RangeDirective>
</RangesDirective>
<ColumnsDirective>
<ColumnDirective width={130}></ColumnDirective>
<ColumnDirective width={92}></ColumnDirective>
<ColumnDirective width={96}></ColumnDirective>
</ColumnsDirective>
</SheetDirective>
</SheetsDirective>
</SpreadsheetComponent>
</div>
);
};
export default App;
const root = createRoot(document.getElementById('root')!);
root.render(<App />);Integrating Notes During Initial Loading and Using Cell Data Binding
You can add notes to cells initially when the Spreadsheet loads by using cell data binding.
This is done through the notes property in the cell settings.
- Define the
notesproperty inside the cell configuration. - When the Spreadsheet initializes, the notes will automatically appear in the specified cells.
- Each cell can have its own note content bound through the model.
In the below example, you can navigate between notes using Previous Note and Next Note options, toggle individual note visibility with Show/Hide Note, display all notes at once using Show All Notes and see how notes are added using the updateCell method in the created event.
import * as React from 'react';
import { createRoot } from 'react-dom/client';
import { SpreadsheetComponent, SheetsDirective, SheetDirective, RangesDirective, RowsDirective, RowDirective } from '@syncfusion/ej2-react-spreadsheet';
import { RangeDirective, ColumnsDirective, ColumnDirective, CellsDirective, CellDirective  } from '@syncfusion/ej2-react-spreadsheet';
import { data } from './datasource';

function App() {
    const spreadsheetRef = React.useRef(null);
    function onCreated() {
        let spreadsheet = spreadsheetRef.current;
        if (spreadsheet) {
            spreadsheet.cellFormat({ fontWeight: 'bold', textAlign: 'center', verticalAlign: 'middle' }, 'A1:H1');
            spreadsheet.updateCell({ notes: { text: 'These shoes have been the most profitable this month.' } }, 'A10:A10');
        }
    }

    return (
        <div>
            <SpreadsheetComponent ref={spreadsheetRef} allowOpen={true} allowSave={true} openUrl='https://document.syncfusion.com/web-services/spreadsheet-editor/api/spreadsheet/open' saveUrl='https://document.syncfusion.com/web-services/spreadsheet-editor/api/spreadsheet/save' created={onCreated.bind(this)}>
                <SheetsDirective>
                    <SheetDirective name="Price Details">
                        <RangesDirective>
                            <RangeDirective dataSource={data}></RangeDirective>
                        </RangesDirective>
                        <RowsDirective>
                            <RowDirective index={2}>
                                <CellsDirective>
                                    <CellDirective index={0} notes=></CellDirective>
                                </CellsDirective>
                            </RowDirective>
                        </RowsDirective>
                        <ColumnsDirective>
                            <ColumnDirective width={130}></ColumnDirective>
                            <ColumnDirective width={92}></ColumnDirective>
                            <ColumnDirective width={96}></ColumnDirective>
                        </ColumnsDirective>
                    </SheetDirective>
                </SheetsDirective>
            </SpreadsheetComponent>
        </div>
    );
};
export default App;

const root = createRoot(document.getElementById('root'));
root.render(<App />);
import * as React from 'react';
import { createRoot } from 'react-dom/client';
import { SpreadsheetComponent, SheetsDirective, SheetDirective, RangesDirective, RowsDirective, RowDirective, CellsDirective, CellDirective, } from '@syncfusion/ej2-react-spreadsheet';
import { RangeDirective, ColumnsDirective, ColumnDirective } from '@syncfusion/ej2-react-spreadsheet';
import { data } from './datasource';
function App() {
const spreadsheetRef = React.useRef<SpreadsheetComponent>(null);
function onCreated() {
let spreadsheet = spreadsheetRef.current;
if (spreadsheet) {
spreadsheet.cellFormat({ fontWeight: 'bold', textAlign: 'center', verticalAlign: 'middle' }, 'A1:H1');
spreadsheet.updateCell({ notes: { text: 'These shoes have been the most profitable this month.' } }, 'A10:A10');
}
}
return (
<div>
<SpreadsheetComponent ref={spreadsheetRef} allowOpen={true} allowSave={true} openUrl='https://document.syncfusion.com/web-services/spreadsheet-editor/api/spreadsheet/open' saveUrl='https://document.syncfusion.com/web-services/spreadsheet-editor/api/spreadsheet/save' created={onCreated.bind(this)}>
<SheetsDirective>
<SheetDirective name="Price Details">
<RangesDirective>
<RangeDirective dataSource={data}></RangeDirective>
</RangesDirective>
<RowsDirective>
<RowDirective index={2}>
<CellsDirective>
<CellDirective index={0} notes=></CellDirective>
</CellsDirective>
</RowDirective>
</RowsDirective>
<ColumnsDirective>
<ColumnDirective width={130}></ColumnDirective>
<ColumnDirective width={92}></ColumnDirective>
<ColumnDirective width={96}></ColumnDirective>
</ColumnsDirective>
</SheetDirective>
</SheetsDirective>
</SpreadsheetComponent>
</div>
);
};
export default App;
const root = createRoot(document.getElementById('root')!);
root.render(<App />);Limitations
- When importing a document with notes, the formatting of the content in the notes will not be available. Similarly, while adding notes, we cannot apply formatting to them.
- The style and appearance of the dialog box for the notes, including size, color, border, and other elements, cannot be directly changed.
- Exporting the workbook along with notes is not supported in file formats such as Comma Separated Values (.csv), Excel Macro-Enabled Workbook (.xlsm), Excel Binary Workbook (.xlsb), and PDF Document (.pdf).
- Notes added outside the used ranges of the worksheet will not be included in the exported document.