Create Excel Files in Blazor Web App with Excel Library
14 Aug 202623 minutes to read
.NET Excel Library for Blazor platform can be used to create, read, edit Excel files. This also convert Excel files to PDF.
Create a simple Excel report in Blazor Server-Side Web application
The below steps illustrates the creation of a simple Invoice formatted Excel document in Blazor Server-Side web application.
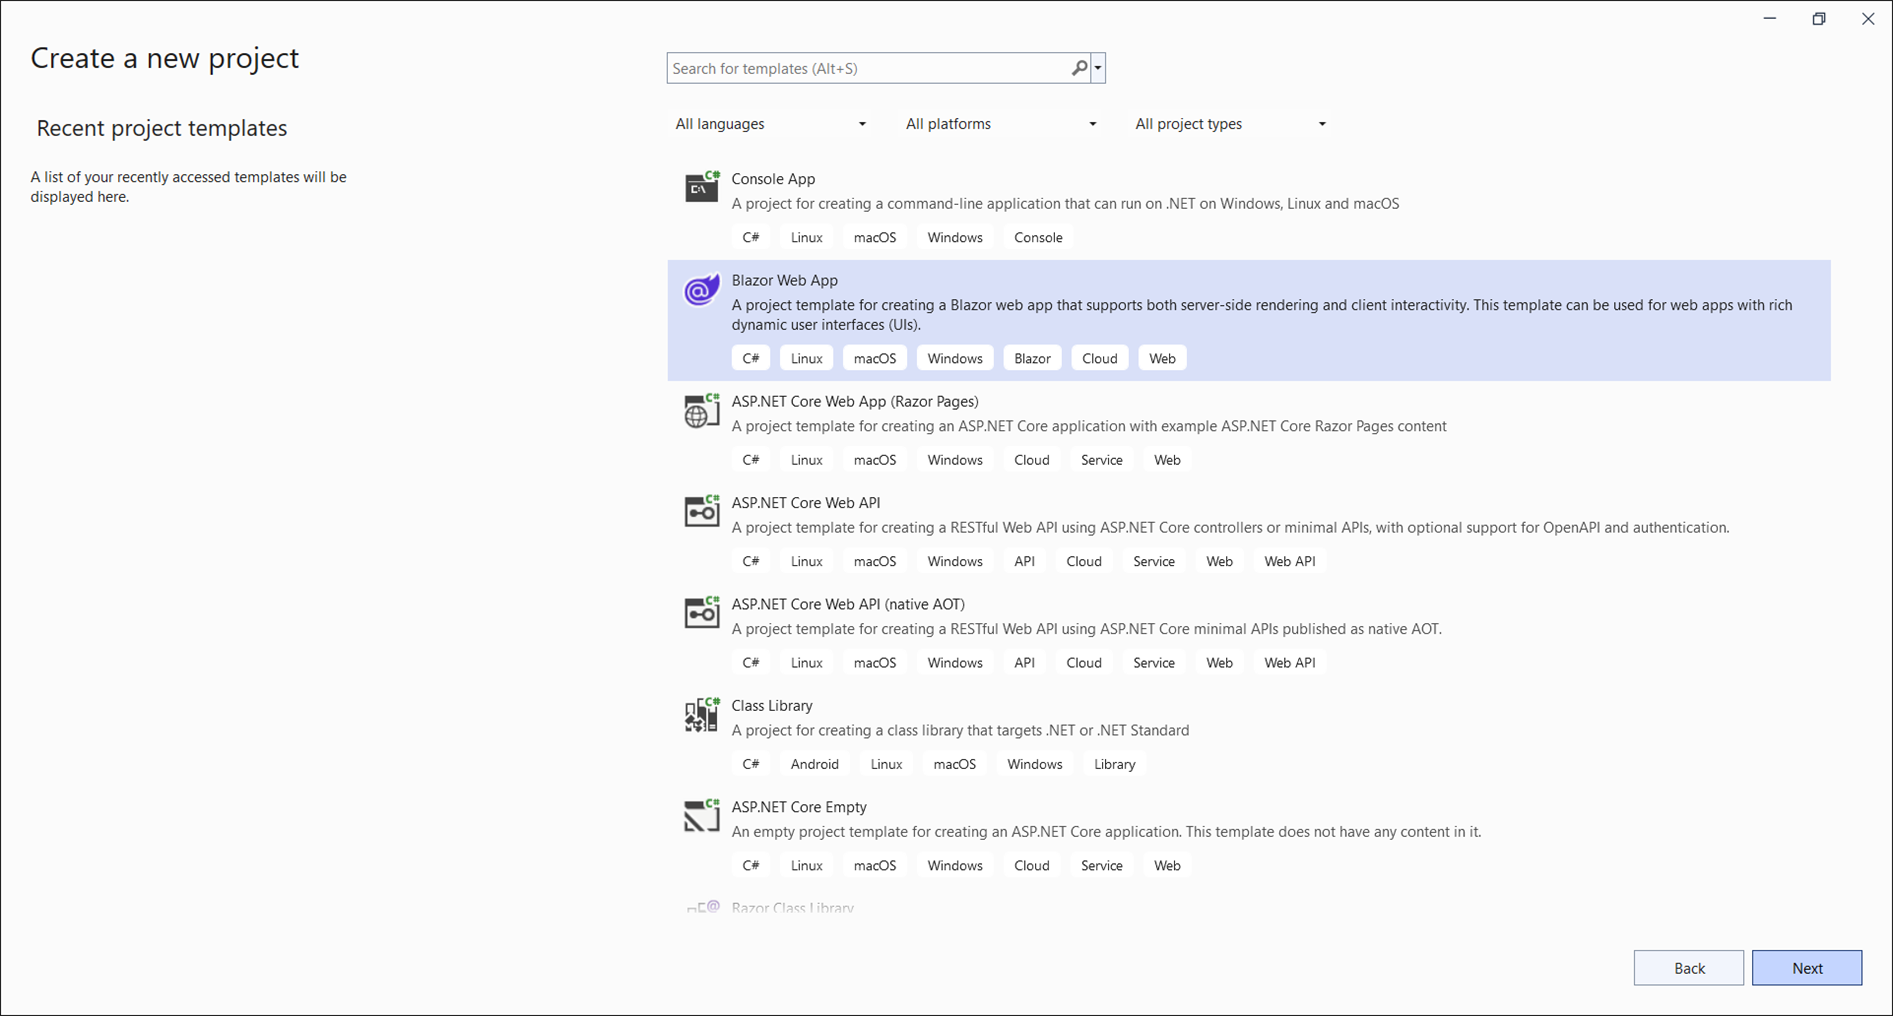
Step 1: Create a new C# Blazor Web application project.
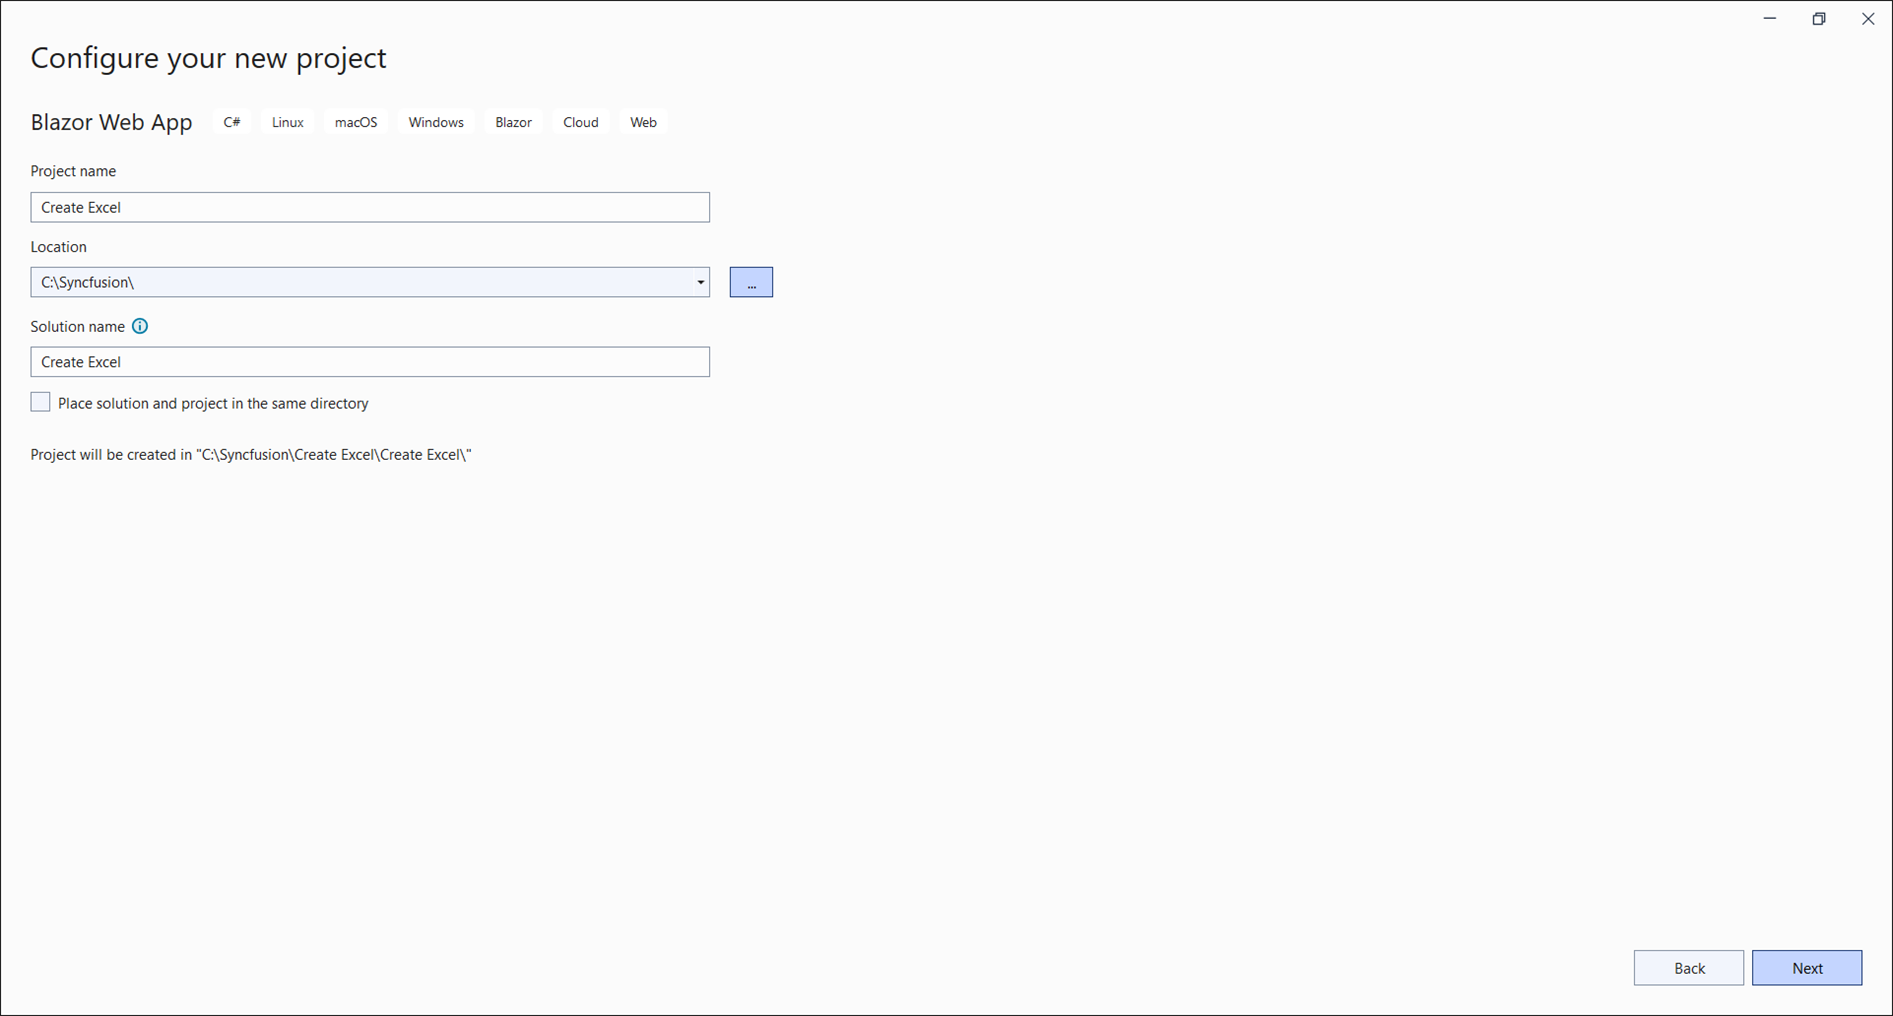
Step 2: Name the project.
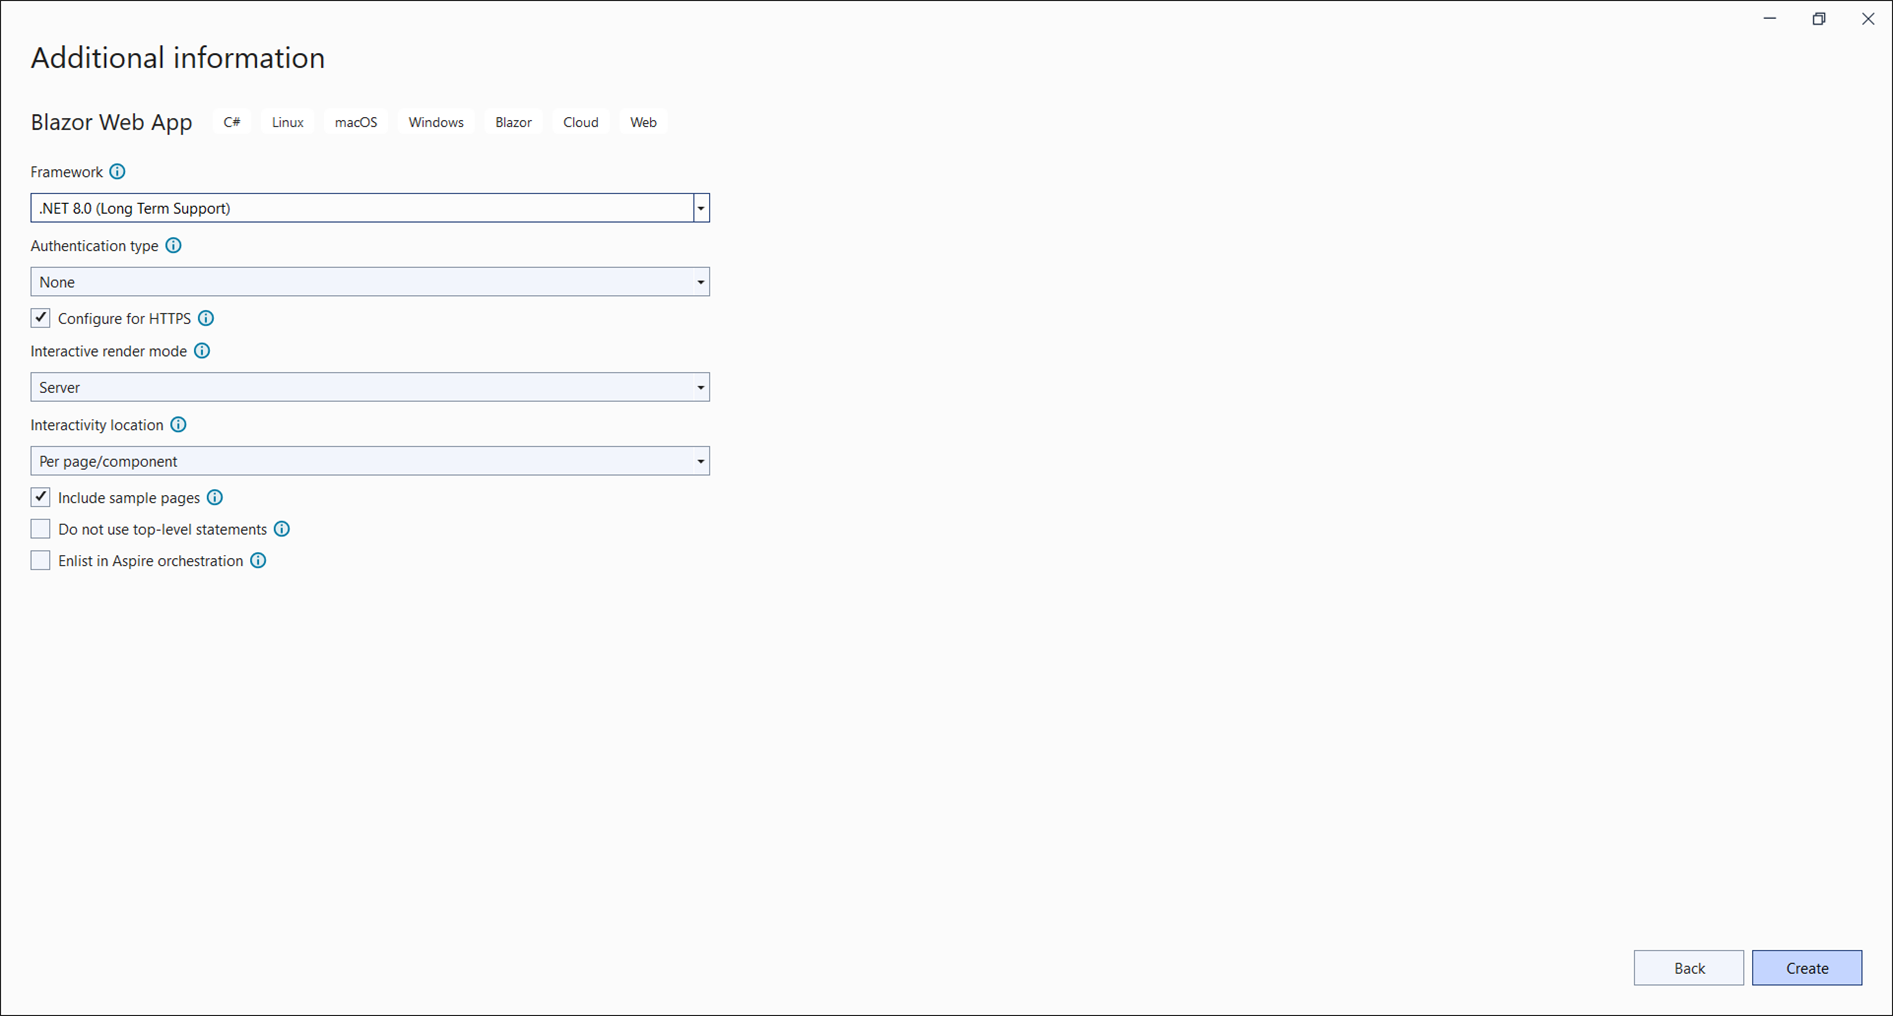
Step 3: Select the framework and click Create button.
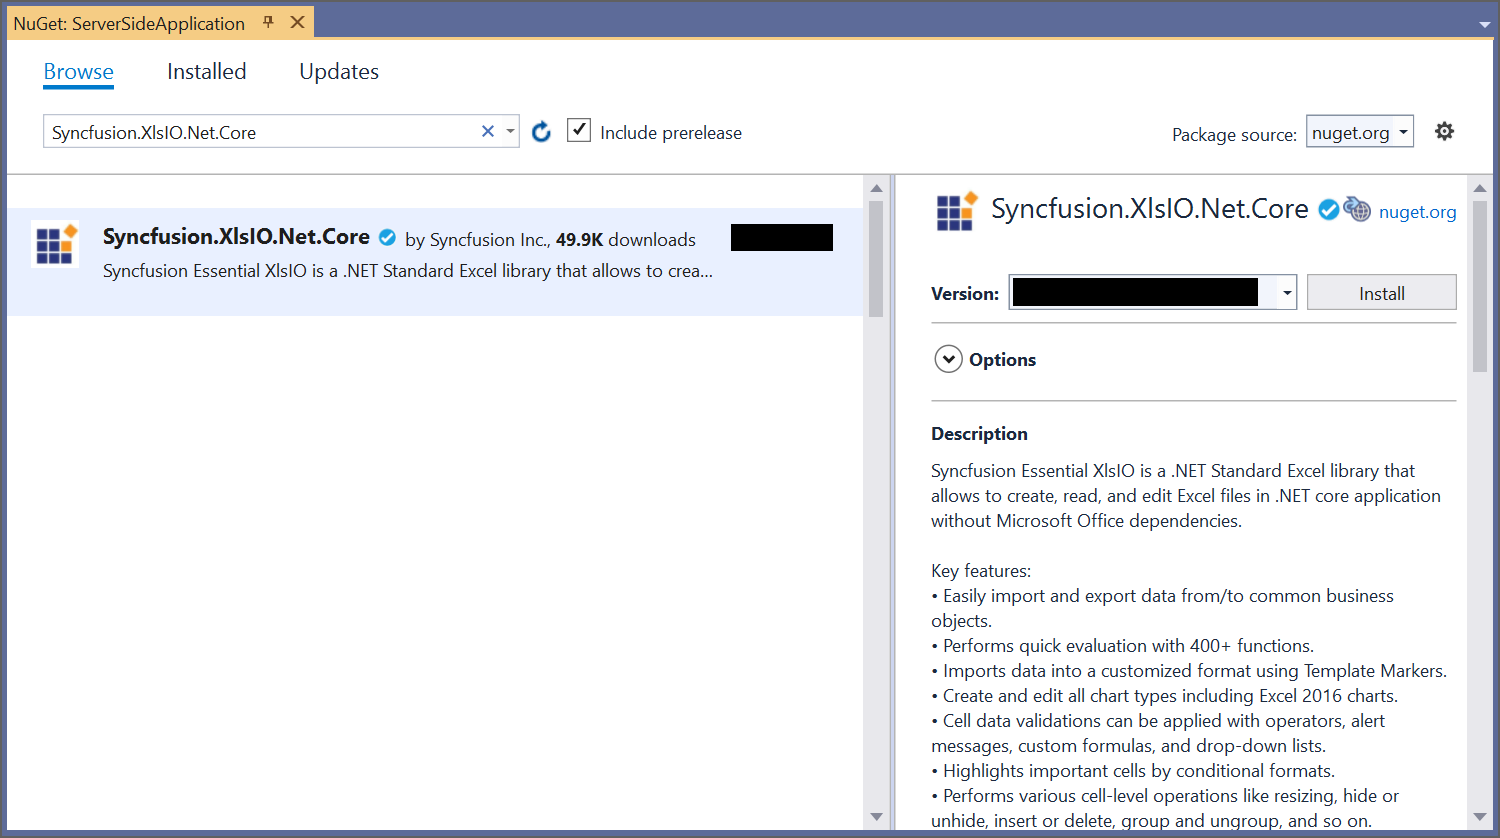
Step 4: Install the Syncfusion.XlsIO.Net.Core NuGet package as reference to your Blazor web application from NuGet.org.
Starting with v16.2.0.x, if you reference Syncfusion® assemblies from trial setup or from the NuGet feed, you also have to add “Syncfusion.Licensing” assembly reference and include a license key in your projects. Please refer to this link to know about registering Syncfusion® license key in your applications to use our components.
Step 5: Create a razor file with name as Excel under Pages folder, which is located inside the Components folder and include the following namespaces in the file.
@rendermode InteractiveServer
   @page "/excel"
   @using System.IO;
   @using Create_Excel;
   @inject Create_Excel.Components.Data.ExcelService service
   @inject Microsoft.JSInterop.IJSRuntime JS
Step 6: Add the following code to create a new button.
<h2>.NET Excel Library (Essential XlsIO)</h2>
   <p>.NET Excel Library (Essential XlsIO)  is a Blazor Excel library used to create, read, edit, and convert Excel files in your applications without Microsoft Office dependencies.</p>
   <button class="btn btn-primary" @onclick="@CreateDocument">Create Document</button>
Step 7: Add the following code in Excel.razor file to create and download the Excel document.
@code {
       MemoryStream excelStream;

       /// <summary>
       /// Create and download the Excel document
       /// </summary>
       protected async void CreateDocument()
       {
           excelStream = service.CreateExcel();
           await JS.SaveAs("Sample.xlsx", excelStream.ToArray());
       }
   }
Step 8: Create a new cs file with name as ExcelService under Data folder and include the following namespaces in the file.
using Syncfusion.XlsIO;
   using Syncfusion.Drawing;
   using System.IO;
Step 9: Create a new MemoryStream method with name as CreateExcel and include the following code snippet to create a simple Invoice formatted Excel document in Blazor Server-Side web application.
//Create an instance of ExcelEngine
   using (ExcelEngine excelEngine = new ExcelEngine())
   {
     IApplication application = excelEngine.Excel;
     application.DefaultVersion = ExcelVersion.Xlsx;

     //Create a workbook
     IWorkbook workbook = application.Workbooks.Create(1);
     IWorksheet worksheet = workbook.Worksheets[0];

     //Add a picture
     FileStream imageStream = new FileStream("AdventureCycle.png", FileMode.Open);
     Image image = Image.FromStream(imageStream);
     IPictureShape shape = worksheet.Pictures.AddPicture(1, 1, image, 20, 20);

     //Disable gridlines in the worksheet
     worksheet.IsGridLinesVisible = false;

     //Enter values to the cells from A3 to A5
     worksheet.Range["A3"].Text = "46036 Michigan Ave";
     worksheet.Range["A4"].Text = "Canton, USA";
     worksheet.Range["A5"].Text = "Phone: +1 231-231-2310";

     //Make the text bold
     worksheet.Range["A3:A5"].CellStyle.Font.Bold = true;

     //Merge cells
     worksheet.Range["D1:E1"].Merge();

     //Enter text to the cell D1 and apply formatting
     worksheet.Range["D1"].Text = "INVOICE";
     worksheet.Range["D1"].CellStyle.Font.Bold = true;
     worksheet.Range["D1"].CellStyle.Font.RGBColor = Color.FromArgb(42, 118, 189);
     worksheet.Range["D1"].CellStyle.Font.Size = 35;

     //Apply alignment in the cell D1
     worksheet.Range["D1"].CellStyle.HorizontalAlignment = ExcelHAlign.HAlignRight;
     worksheet.Range["D1"].CellStyle.VerticalAlignment = ExcelVAlign.VAlignTop;

     //Enter values to the cells from D5 to E8
     worksheet.Range["D5"].Text = "INVOICE#";
     worksheet.Range["E5"].Text = "DATE";
     worksheet.Range["D6"].Number = 1028;
     worksheet.Range["E6"].Value = "12/31/2018";
     worksheet.Range["D7"].Text = "CUSTOMER ID";
     worksheet.Range["E7"].Text = "TERMS";
     worksheet.Range["D8"].Number = 564;
     worksheet.Range["E8"].Text = "Due Upon Receipt";

     //Apply RGB backcolor to the cells from D5 to E8
     worksheet.Range["D5:E5"].CellStyle.Color = Color.FromArgb(42, 118, 189);
     worksheet.Range["D7:E7"].CellStyle.Color = Color.FromArgb(42, 118, 189);

     //Apply known colors to the text in cells D5 to E8
     worksheet.Range["D5:E5"].CellStyle.Font.Color = ExcelKnownColors.White;
     worksheet.Range["D7:E7"].CellStyle.Font.Color = ExcelKnownColors.White;

     //Make the text as bold from D5 to E8
     worksheet.Range["D5:E8"].CellStyle.Font.Bold = true;

     //Apply alignment to the cells from D5 to E8
     worksheet.Range["D5:E8"].CellStyle.HorizontalAlignment = ExcelHAlign.HAlignCenter;
     worksheet.Range["D5:E5"].CellStyle.VerticalAlignment = ExcelVAlign.VAlignCenter;
     worksheet.Range["D7:E7"].CellStyle.VerticalAlignment = ExcelVAlign.VAlignCenter;
     worksheet.Range["D6:E6"].CellStyle.VerticalAlignment = ExcelVAlign.VAlignTop;

     //Enter value and applying formatting in the cell A7
     worksheet.Range["A7"].Text = "  BILL TO";
     worksheet.Range["A7"].CellStyle.Color = Color.FromArgb(42, 118, 189);
     worksheet.Range["A7"].CellStyle.Font.Bold = true;
     worksheet.Range["A7"].CellStyle.Font.Color = ExcelKnownColors.White;

     //Apply alignment
     worksheet.Range["A7"].CellStyle.HorizontalAlignment = ExcelHAlign.HAlignLeft;
     worksheet.Range["A7"].CellStyle.VerticalAlignment = ExcelVAlign.VAlignCenter;

     //Enter values in the cells A8 to A12
     worksheet.Range["A8"].Text = "Steyn";
     worksheet.Range["A9"].Text = "Great Lakes Food Market";
     worksheet.Range["A10"].Text = "20 Whitehall Rd";
     worksheet.Range["A11"].Text = "North Muskegon,USA";
     worksheet.Range["A12"].Text = "+1 231-654-0000";

     //Create a Hyperlink for e-mail in the cell A13
     IHyperLink hyperlink = worksheet.HyperLinks.Add(worksheet.Range["A13"]);
     hyperlink.Type = ExcelHyperLinkType.Url;
     hyperlink.Address = "[email protected]";
     hyperlink.ScreenTip = "Send Mail";

     //Merge column A and B from row 15 to 22
     worksheet.Range["A15:B15"].Merge();
     worksheet.Range["A16:B16"].Merge();
     worksheet.Range["A17:B17"].Merge();
     worksheet.Range["A18:B18"].Merge();
     worksheet.Range["A19:B19"].Merge();
     worksheet.Range["A20:B20"].Merge();
     worksheet.Range["A21:B21"].Merge();
     worksheet.Range["A22:B22"].Merge();

     //Enter details of products and prices
     worksheet.Range["A15"].Text = "  DESCRIPTION";
     worksheet.Range["C15"].Text = "QTY";
     worksheet.Range["D15"].Text = "UNIT PRICE";
     worksheet.Range["E15"].Text = "AMOUNT";
     worksheet.Range["A16"].Text = "Cabrales Cheese";
     worksheet.Range["A17"].Text = "Chocos";
     worksheet.Range["A18"].Text = "Pasta";
     worksheet.Range["A19"].Text = "Cereals";
     worksheet.Range["A20"].Text = "Ice Cream";
     worksheet.Range["C16"].Number = 3;
     worksheet.Range["C17"].Number = 2;
     worksheet.Range["C18"].Number = 1;
     worksheet.Range["C19"].Number = 4;
     worksheet.Range["C20"].Number = 3;
     worksheet.Range["D16"].Number = 21;
     worksheet.Range["D17"].Number = 54;
     worksheet.Range["D18"].Number = 10;
     worksheet.Range["D19"].Number = 20;
     worksheet.Range["D20"].Number = 30;
     worksheet.Range["D23"].Text = "Total";

     //Apply number format
     worksheet.Range["D16:E22"].NumberFormat = "$0.00";
     worksheet.Range["E23"].NumberFormat = "$0.00";

     //Apply incremental formula for column Amount by multiplying Qty and UnitPrice
     application.EnableIncrementalFormula = true;
     worksheet.Range["E16:E20"].Formula = "=C16*D16";

     //Formula for Sum the total
     worksheet.Range["E23"].Formula = "=SUM(E16:E22)";

     //Apply borders
     worksheet.Range["A16:E22"].CellStyle.Borders[ExcelBordersIndex.EdgeTop].LineStyle = ExcelLineStyle.Thin;
     worksheet.Range["A16:E22"].CellStyle.Borders[ExcelBordersIndex.EdgeBottom].LineStyle = ExcelLineStyle.Thin;
     worksheet.Range["A16:E22"].CellStyle.Borders[ExcelBordersIndex.EdgeTop].Color = ExcelKnownColors.Grey_25_percent;
     worksheet.Range["A16:E22"].CellStyle.Borders[ExcelBordersIndex.EdgeBottom].Color = ExcelKnownColors.Grey_25_percent;
     worksheet.Range["A23:E23"].CellStyle.Borders[ExcelBordersIndex.EdgeTop].LineStyle = ExcelLineStyle.Thin;
     worksheet.Range["A23:E23"].CellStyle.Borders[ExcelBordersIndex.EdgeBottom].LineStyle = ExcelLineStyle.Thin;
     worksheet.Range["A23:E23"].CellStyle.Borders[ExcelBordersIndex.EdgeTop].Color = ExcelKnownColors.Black;
     worksheet.Range["A23:E23"].CellStyle.Borders[ExcelBordersIndex.EdgeBottom].Color = ExcelKnownColors.Black;

     //Apply font setting for cells with product details
     worksheet.Range["A3:E23"].CellStyle.Font.FontName = "Arial";
     worksheet.Range["A3:E23"].CellStyle.Font.Size = 10;
     worksheet.Range["A15:E15"].CellStyle.Font.Color = ExcelKnownColors.White;
     worksheet.Range["A15:E15"].CellStyle.Font.Bold = true;
     worksheet.Range["D23:E23"].CellStyle.Font.Bold = true;

     //Apply cell color
     worksheet.Range["A15:E15"].CellStyle.Color = Color.FromArgb(42, 118, 189);

     //Apply alignment to cells with product details
     worksheet.Range["A15"].CellStyle.HorizontalAlignment = ExcelHAlign.HAlignLeft;
     worksheet.Range["C15:C22"].CellStyle.HorizontalAlignment = ExcelHAlign.HAlignCenter;
     worksheet.Range["D15:E15"].CellStyle.HorizontalAlignment = ExcelHAlign.HAlignCenter;

     //Apply row height and column width to look good
     worksheet.Range["A1"].ColumnWidth = 36;
     worksheet.Range["B1"].ColumnWidth = 11;
     worksheet.Range["C1"].ColumnWidth = 8;
     worksheet.Range["D1:E1"].ColumnWidth = 18;
     worksheet.Range["A1"].RowHeight = 47;
     worksheet.Range["A2"].RowHeight = 15;
     worksheet.Range["A3:A4"].RowHeight = 15;
     worksheet.Range["A5"].RowHeight = 18;
     worksheet.Range["A6"].RowHeight = 29;
     worksheet.Range["A7"].RowHeight = 18;
     worksheet.Range["A8"].RowHeight = 15;
     worksheet.Range["A9:A14"].RowHeight = 15;
     worksheet.Range["A15:A23"].RowHeight = 18;

     //Save the document as a stream and retrun the stream.
     using (MemoryStream stream = new MemoryStream())
     {
       //Save the created Excel document to MemoryStream
       workbook.SaveAs(stream);
       return stream;
     }
   }
Step 10: Create a new class file in the project, with name as FileUtils and add the following code to invoke the JavaScript action for downloading the file in browser.
public static class FileUtils
   {
       public static ValueTask<object> SaveAs(this IJSRuntime js, string filename, byte[] data)
           => js.InvokeAsync<object>(
              "saveAsFile",
              filename,
              Convert.ToBase64String(data));
   }
Step 11: Add the following JavaScript function in the App.razor.
<script type="text/javascript">
     function saveAsFile(filename, bytesBase64) {

     if (navigator.msSaveBlob)
     {
       //Download document in Edge browser
       var data = window.atob(bytesBase64);
       var bytes = new Uint8Array(data.length);
       for (var i = 0; i < data.length; i++)
       {
         bytes[i] = data.charCodeAt(i);
       }
       var blob = new Blob([bytes.buffer], { type: "application/octet-stream" });
       navigator.msSaveBlob(blob, filename);
     }
     else
     {
       var link = document.createElement('a');
       link.download = filename;
       link.href = "data:application/octet-stream;base64," + bytesBase64;
       document.body.appendChild(link); // Needed for Firefox
       link.click();
       document.body.removeChild(link);
     }
   }
   </script>
Step 12: Add the following code in NavMenu.razor file present under Layout folder.
<div class="nav-item px-3">
    <NavLink class="nav-link" href="Excel">
        <span class="oi oi-list-rich" aria-hidden="true"></span> Create Excel
    </NavLink>
</div>
Step 13: Add the service in the Program.cs file.
builder.Services.AddScoped <Create_Excel.Components.Data.ExcelService>();A complete working example of how to create an Excel file in Blazor Server-Side web application in C# is present on this GitHub page.
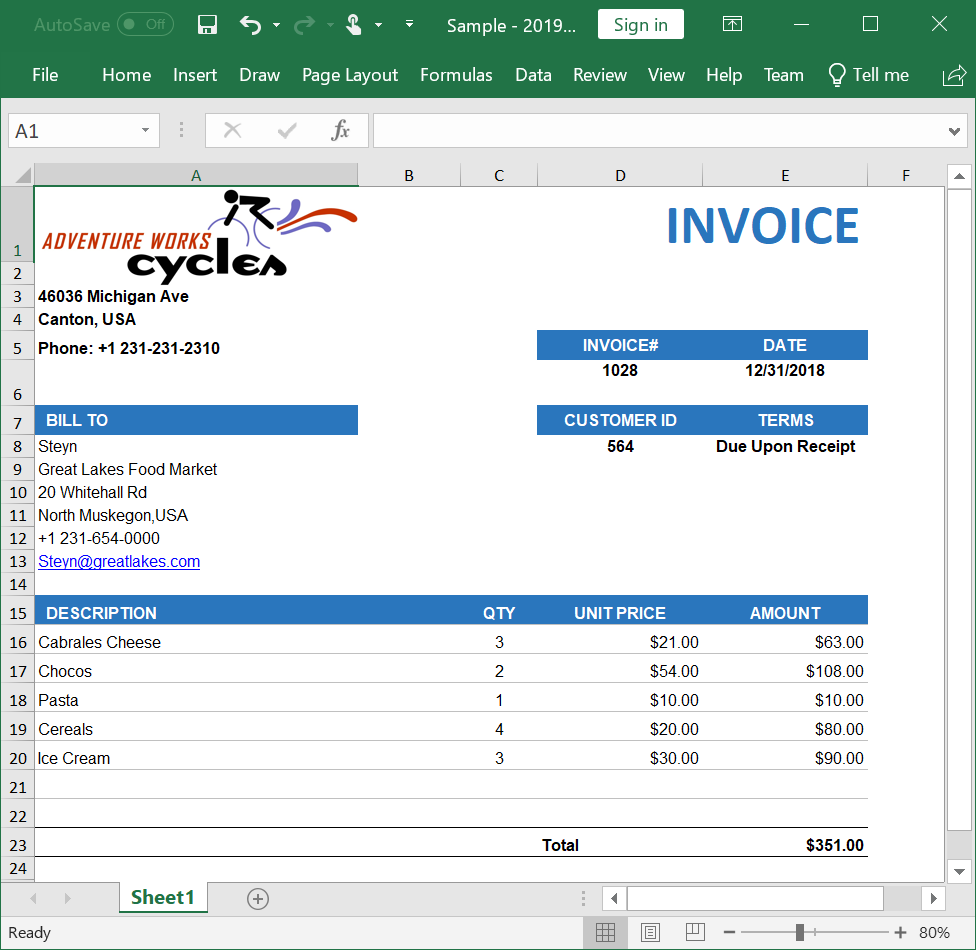
By executing the program, you will get the Excel file as below.
Read and Edit Excel file in Blazor Server-Side web application
The below code snippet illustrates how to read and edit an Excel file in Blazor Server-Side web application.
//Create an instance of ExcelEngine
using (ExcelEngine excelEngine = new ExcelEngine())
{
  //Instantiate the Excel application object
  IApplication application = excelEngine.Excel;

  //Set the default application version
  application.DefaultVersion = ExcelVersion.Xlsx;

  //Load the existing Excel workbook into IWorkbook
  FileStream inputStream = new FileStream("Sample.xlsx", FileMode.Open);
  IWorkbook workbook = application.Workbooks.Open(inputStream);

  //Get the first worksheet in the workbook into IWorksheet
  IWorksheet worksheet = workbook.Worksheets[0];

  //Assign some text in a cell
  worksheet.Range["A3"].Text = "Hello World";

  //Access a cell value from Excel
  var value = worksheet.Range["A1"].Value;

  //Save the document as a stream and retrun the stream.
  using (MemoryStream stream = new MemoryStream())
  {
    //Save the created Excel document to MemoryStream.
    workbook.SaveAs(stream);

    return stream;
  }
}
A complete working example of how to read and edit an Excel file in Blazor Server-Side web application in C# is present on this GitHub page.