Create Excel Files in AWS Elastic Beanstalk with Excel Library
14 Aug 202619 minutes to read
Syncfusion® XlsIO is a .NET Core Excel library that can be used to create, read, and edit Excel files. This library supports manipulating Excel documents in AWS Elastic Beanstalk.
Prerequisites
Before you begin, ensure the following:
- An active AWS account with permissions to create Elastic Beanstalk applications, environments, and S3 buckets. If you do not have one, see Create an AWS account.
- A Syncfusion license key. Register it in
Program.cs(see the snippet in Step 2a below) or store it in an Elastic Beanstalk environment property (for example,SYNCFUSION_LICENSE_KEY) and load it viaEnvironment.GetEnvironmentVariablesee the Syncfusion licensing overview.
Steps to create an Excel document in AWS Elastic Beanstalk
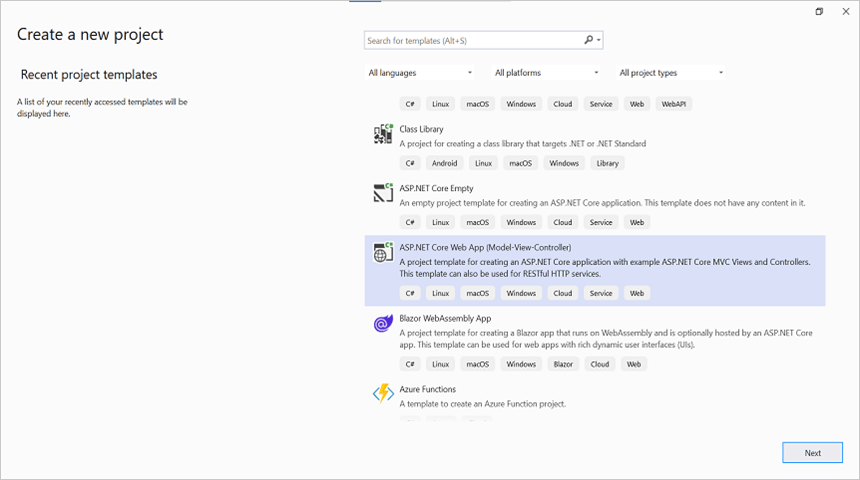
Step 1: Create a new ASP.NET Core Web application (Model-View-Controller) project.
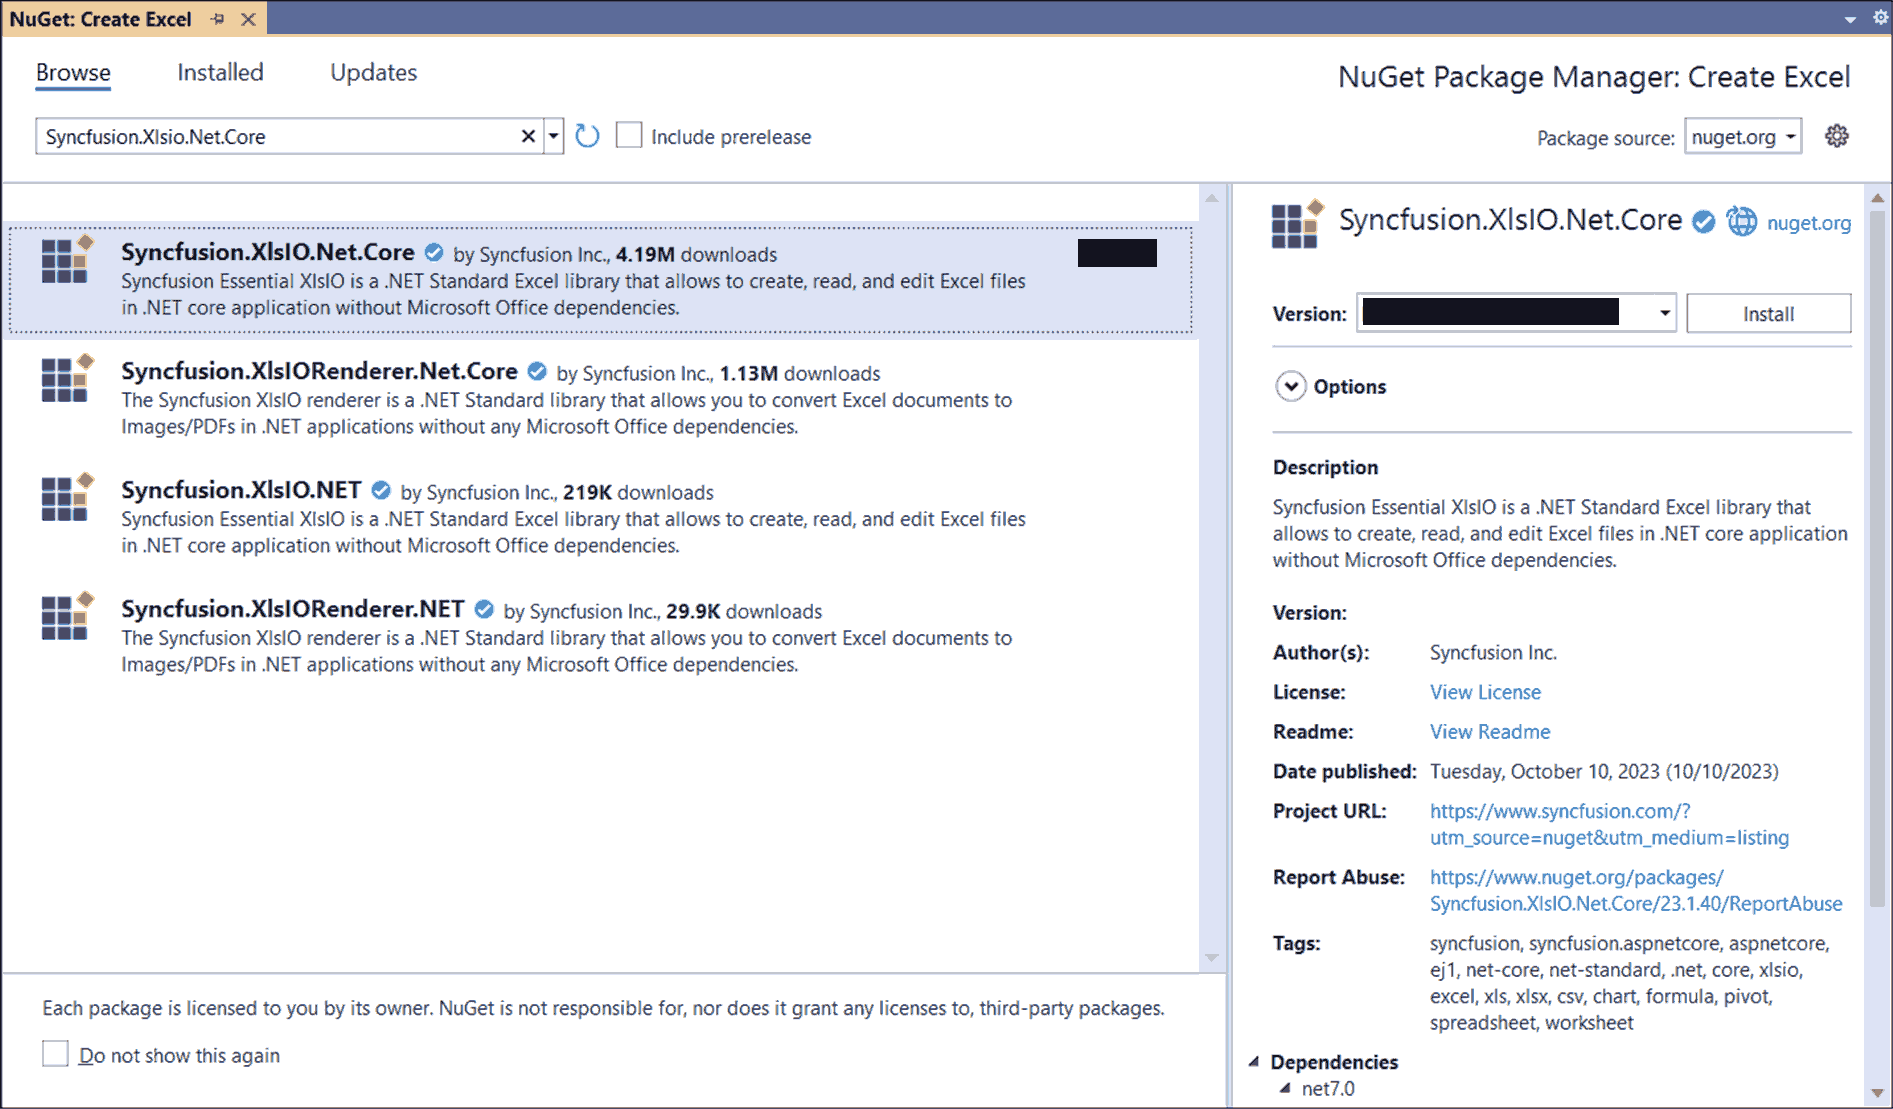
Step 2: Install the Syncfusion.XlsIO.Net.Core NuGet package as a reference to your project from NuGet.org.
Starting with v16.2.0.x, if you reference Syncfusion® assemblies from trial setup or from the NuGet feed, you also have to add “Syncfusion.Licensing” assembly reference and include a license key in your projects. Please refer to this link to know about registering Syncfusion® license key in your application to use our components.
Step 2a: Register your Syncfusion license key in Program.cs (before app.Run()). Replace the placeholder with your actual key.
Syncfusion.Licensing.SyncfusionLicenseProvider.RegisterLicense("YOUR_LICENSE_KEY");For production deployments to Elastic Beanstalk, store the key in an environment property (for example, SYNCFUSION_LICENSE_KEY) and read it via Environment.GetEnvironmentVariable so the key is not committed to source control.
Step 3: Include the following namespaces in the HomeController.cs file.
using Syncfusion.XlsIO;
using Syncfusion.Drawing;
using System.IO;
Step 4: A default action method named Index is present in HomeController.cs. Right-click the Index method and select Go To View to open the associated view page Index.cshtml.
Step 5: Add a new button in the Index.cshtml as shown below.
@{
    Html.BeginForm("CreatExcelDocument", "Home", FormMethod.Get);
    {
        <div>
           <input type="submit" value="Create Excel document" style="width:200px;height:27px" />
        </div>
    }
    Html.EndForm();
}
Step 6: Add a new action method CreateExcelDocument in HomeController.cs and include the following code snippet to create an Excel document and download it.
The code below assumes the following action method signature. Place the body inside the
CreateExcelDocumentmethod:
public FileContentResult CreateExcelDocument()
{
    // ... place the snippet below inside this method ...
}
The image file (
AdventureCycles-Logo.png) is read from the working directory. On AWS Elastic Beanstalk, the working directory is typically/var/app/current/. Add the file to the project’s root orwwwroot/(set Copy to Output Directory to Copy if newer) so it is included in the deployment package.
//Create an instance of ExcelEngine
using (ExcelEngine excelEngine = new ExcelEngine())
{
    IApplication application = excelEngine.Excel;
    application.DefaultVersion = ExcelVersion.Xlsx;

    //Create a workbook
    IWorkbook workbook = application.Workbooks.Create(1);
    IWorksheet worksheet = workbook.Worksheets[0];

    //Adding a picture (wrap in using for proper disposal)
    using (FileStream imageStream = new FileStream("AdventureCycles-Logo.png", FileMode.Open, FileAccess.Read))
    {
        IPictureShape shape = worksheet.Pictures.AddPicture(1, 1, imageStream, 20, 20);
    }

    //Disable gridlines in the worksheet
    worksheet.IsGridLinesVisible = false;

    //Enter values to the cells from A3 to A5
    worksheet.Range["A3"].Text = "46036 Michigan Ave";
    worksheet.Range["A4"].Text = "Canton, USA";
    worksheet.Range["A5"].Text = "Phone: +1 231-231-2310";

    //Make the text bold
    worksheet.Range["A3:A5"].CellStyle.Font.Bold = true;

    //Merge cells
    worksheet.Range["D1:E1"].Merge();

    //Enter text to the cell D1 and apply formatting.
    worksheet.Range["D1"].Text = "INVOICE";
    worksheet.Range["D1"].CellStyle.Font.Bold = true;
    worksheet.Range["D1"].CellStyle.Font.RGBColor = Color.FromArgb(42, 118, 189);
    worksheet.Range["D1"].CellStyle.Font.Size = 35;

    //Apply alignment in the cell D1
    worksheet.Range["D1"].CellStyle.HorizontalAlignment = ExcelHAlign.HAlignRight;
    worksheet.Range["D1"].CellStyle.VerticalAlignment = ExcelVAlign.VAlignTop;

    //Enter values to the cells from D5 to E8
    worksheet.Range["D5"].Text = "INVOICE#";
    worksheet.Range["E5"].Text = "DATE";
    worksheet.Range["D6"].Number = 1028;
    worksheet.Range["E6"].Value = "12/31/2018";
    worksheet.Range["D7"].Text = "CUSTOMER ID";
    worksheet.Range["E7"].Text = "TERMS";
    worksheet.Range["D8"].Number = 564;
    worksheet.Range["E8"].Text = "Due Upon Receipt";

    //Apply RGB backcolor to the cells from D5 to E8
    worksheet.Range["D5:E5"].CellStyle.Color = Color.FromArgb(42, 118, 189);
    worksheet.Range["D7:E7"].CellStyle.Color = Color.FromArgb(42, 118, 189);

    //Apply known colors to the text in cells D5 to E8
    worksheet.Range["D5:E5"].CellStyle.Font.Color = ExcelKnownColors.White;
    worksheet.Range["D7:E7"].CellStyle.Font.Color = ExcelKnownColors.White;

    //Make the text as bold from D5 to E8
    worksheet.Range["D5:E8"].CellStyle.Font.Bold = true;

    //Apply alignment to the cells from D5 to E8
    worksheet.Range["D5:E8"].CellStyle.HorizontalAlignment = ExcelHAlign.HAlignCenter;
    worksheet.Range["D5:E5"].CellStyle.VerticalAlignment = ExcelVAlign.VAlignCenter;
    worksheet.Range["D7:E7"].CellStyle.VerticalAlignment = ExcelVAlign.VAlignCenter;
    worksheet.Range["D6:E6"].CellStyle.VerticalAlignment = ExcelVAlign.VAlignTop;

    //Enter value and applying formatting in the cell A7
    worksheet.Range["A7"].Text = "  BILL TO";
    worksheet.Range["A7"].CellStyle.Color = Color.FromArgb(42, 118, 189);
    worksheet.Range["A7"].CellStyle.Font.Bold = true;
    worksheet.Range["A7"].CellStyle.Font.Color = ExcelKnownColors.White;

    //Apply alignment
    worksheet.Range["A7"].CellStyle.HorizontalAlignment = ExcelHAlign.HAlignLeft;
    worksheet.Range["A7"].CellStyle.VerticalAlignment = ExcelVAlign.VAlignCenter;

    //Enter values in the cells A8 to A12
    worksheet.Range["A8"].Text = "Steyn";
    worksheet.Range["A9"].Text = "Great Lakes Food Market";
    worksheet.Range["A10"].Text = "20 Whitehall Rd";
    worksheet.Range["A11"].Text = "North Muskegon,USA";
    worksheet.Range["A12"].Text = "+1 231-654-0000";

    //Create a Hyperlink for e-mail in the cell A13
    IHyperLink hyperlink = worksheet.HyperLinks.Add(worksheet.Range["A13"]);
    hyperlink.Type = ExcelHyperLinkType.Url;
    hyperlink.Address = "[email protected]";
    hyperlink.ScreenTip = "Send Mail";

    //Merge column A and B from row 15 to 22
    worksheet.Range["A15:B15"].Merge();
    worksheet.Range["A16:B16"].Merge();
    worksheet.Range["A17:B17"].Merge();
    worksheet.Range["A18:B18"].Merge();
    worksheet.Range["A19:B19"].Merge();
    worksheet.Range["A20:B20"].Merge();
    worksheet.Range["A21:B21"].Merge();
    worksheet.Range["A22:B22"].Merge();

    //Enter details of products and prices
    worksheet.Range["A15"].Text = "  DESCRIPTION";
    worksheet.Range["C15"].Text = "QTY";
    worksheet.Range["D15"].Text = "UNIT PRICE";
    worksheet.Range["E15"].Text = "AMOUNT";
    worksheet.Range["A16"].Text = "Cabrales Cheese";
    worksheet.Range["A17"].Text = "Chocos";
    worksheet.Range["A18"].Text = "Pasta";
    worksheet.Range["A19"].Text = "Cereals";
    worksheet.Range["A20"].Text = "Ice Cream";
    worksheet.Range["C16"].Number = 3;
    worksheet.Range["C17"].Number = 2;
    worksheet.Range["C18"].Number = 1;
    worksheet.Range["C19"].Number = 4;
    worksheet.Range["C20"].Number = 3;
    worksheet.Range["D16"].Number = 21;
    worksheet.Range["D17"].Number = 54;
    worksheet.Range["D18"].Number = 10;
    worksheet.Range["D19"].Number = 20;
    worksheet.Range["D20"].Number = 30;
    worksheet.Range["D23"].Text = "Total";

    //Apply number format
    worksheet.Range["D16:E22"].NumberFormat = "$0.00";
    worksheet.Range["E23"].NumberFormat = "$0.00";

    //Apply incremental formula for column Amount by multiplying Qty and UnitPrice
    application.EnableIncrementalFormula = true;
    worksheet.Range["E16:E20"].Formula = "=C16*D16";

    //Formula for Sum the total
    worksheet.Range["E23"].Formula = "=SUM(E16:E22)";

    //Apply borders
    worksheet.Range["A16:E22"].CellStyle.Borders[ExcelBordersIndex.EdgeTop].LineStyle = ExcelLineStyle.Thin;
    worksheet.Range["A16:E22"].CellStyle.Borders[ExcelBordersIndex.EdgeBottom].LineStyle = ExcelLineStyle.Thin;
    worksheet.Range["A16:E22"].CellStyle.Borders[ExcelBordersIndex.EdgeTop].Color = ExcelKnownColors.Grey_25_percent;
    worksheet.Range["A16:E22"].CellStyle.Borders[ExcelBordersIndex.EdgeBottom].Color = ExcelKnownColors.Grey_25_percent;
    worksheet.Range["A23:E23"].CellStyle.Borders[ExcelBordersIndex.EdgeTop].LineStyle = ExcelLineStyle.Thin;
    worksheet.Range["A23:E23"].CellStyle.Borders[ExcelBordersIndex.EdgeBottom].LineStyle = ExcelLineStyle.Thin;
    worksheet.Range["A23:E23"].CellStyle.Borders[ExcelBordersIndex.EdgeTop].Color = ExcelKnownColors.Black;
    worksheet.Range["A23:E23"].CellStyle.Borders[ExcelBordersIndex.EdgeBottom].Color = ExcelKnownColors.Black;

    //Apply font setting for cells with product details
    worksheet.Range["A3:E23"].CellStyle.Font.FontName = "Arial";
    worksheet.Range["A3:E23"].CellStyle.Font.Size = 10;
    worksheet.Range["A15:E15"].CellStyle.Font.Color = ExcelKnownColors.White;
    worksheet.Range["A15:E15"].CellStyle.Font.Bold = true;
    worksheet.Range["D23:E23"].CellStyle.Font.Bold = true;

    //Apply cell color
    worksheet.Range["A15:E15"].CellStyle.Color = Color.FromArgb(42, 118, 189);

    //Apply alignment to cells with product details
    worksheet.Range["A15"].CellStyle.HorizontalAlignment = ExcelHAlign.HAlignLeft;
    worksheet.Range["C15:C22"].CellStyle.HorizontalAlignment = ExcelHAlign.HAlignCenter;
    worksheet.Range["D15:E15"].CellStyle.HorizontalAlignment = ExcelHAlign.HAlignCenter;

    //Apply row height and column width to look good
    worksheet.Range["A1"].ColumnWidth = 36;
    worksheet.Range["B1"].ColumnWidth = 11;
    worksheet.Range["C1"].ColumnWidth = 8;
    worksheet.Range["D1:E1"].ColumnWidth = 18;
    worksheet.Range["A1"].RowHeight = 47;
    worksheet.Range["A2"].RowHeight = 15;
    worksheet.Range["A3:A4"].RowHeight = 15;
    worksheet.Range["A5"].RowHeight = 18;
    worksheet.Range["A6"].RowHeight = 29;
    worksheet.Range["A7"].RowHeight = 18;
    worksheet.Range["A8"].RowHeight = 15;
    worksheet.Range["A9:A14"].RowHeight = 15;
    worksheet.Range["A15:A23"].RowHeight = 18;

    //Saving the Excel to the MemoryStream
    MemoryStream stream = new MemoryStream();
    workbook.SaveAs(stream);

    //Set the position as '0'.
    stream.Position = 0;

    //Download Excel document in the browser.
    return File(stream.ToArray(), "application/vnd.openxmlformats-officedocument.spreadsheetml.sheet", "Sample.xlsx");
}
Steps to publish as AWS Elastic Beanstalk
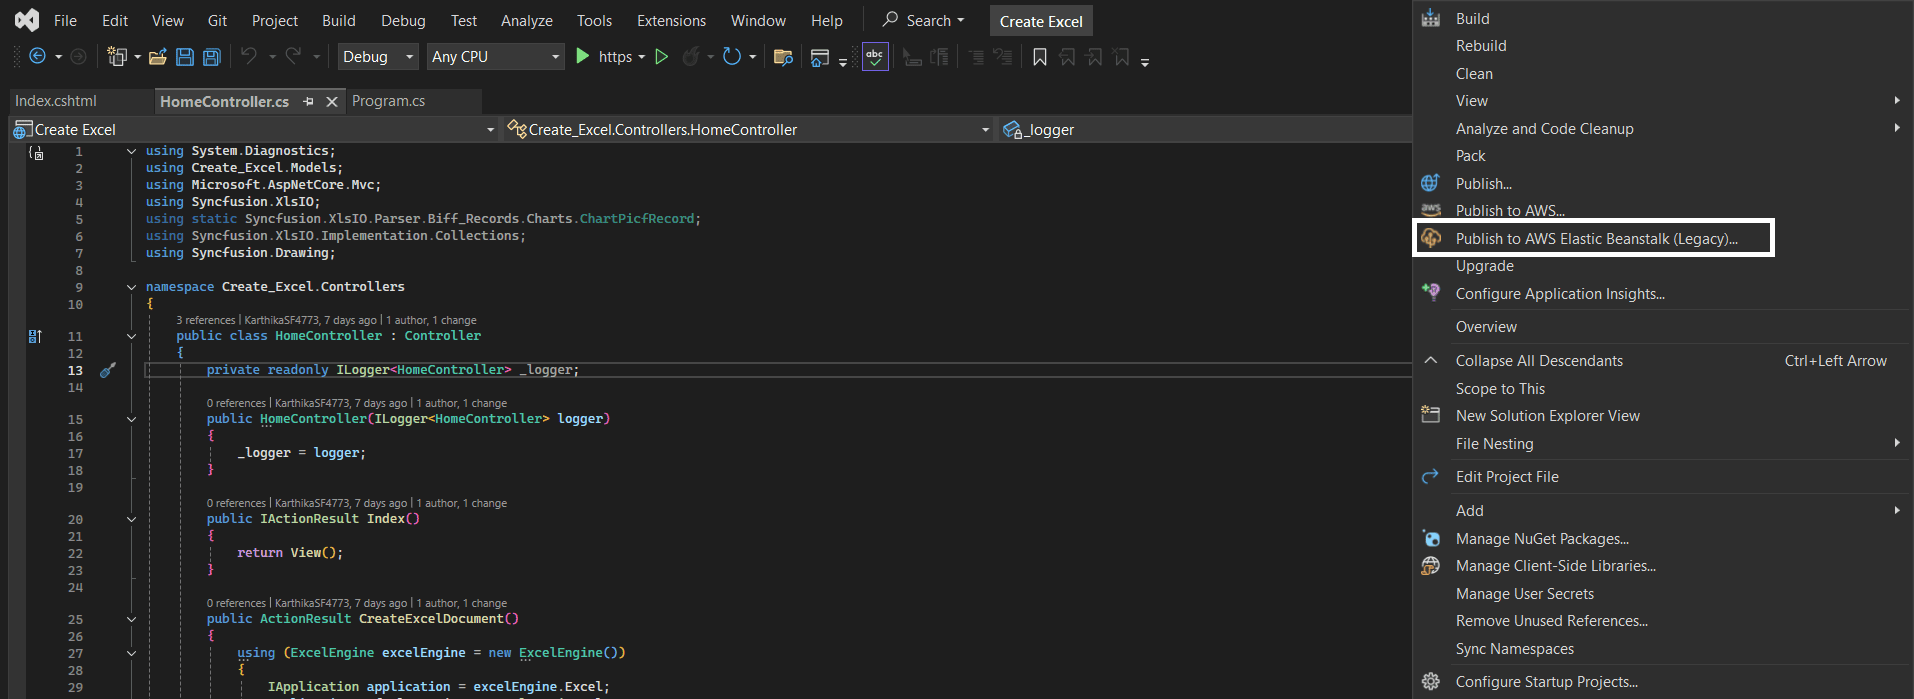
Step 1: Right-click the project and select Publish to AWS Elastic Beanstalk (Legacy) option.
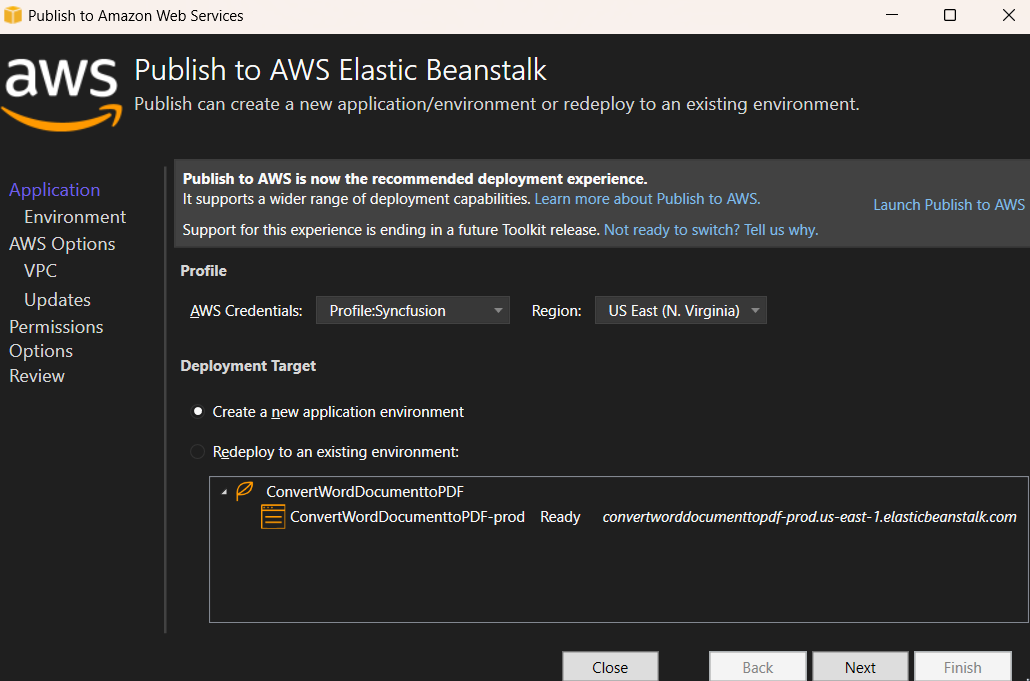
Step 2: Select the Deployment Target as Create a new application environment and click Next button.
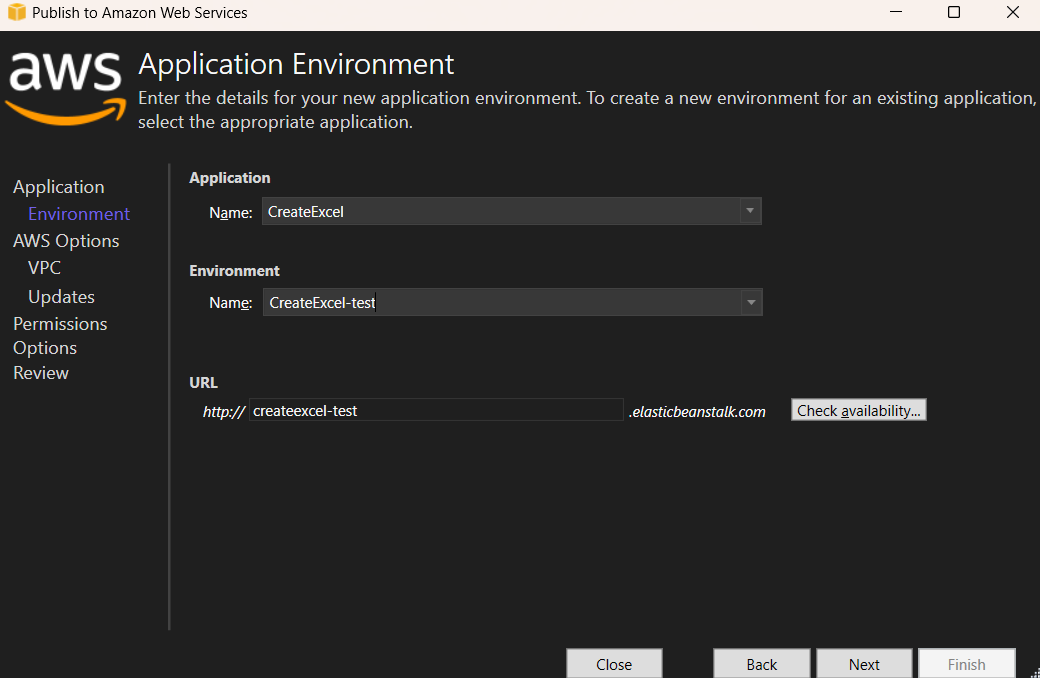
Step 3: Choose the Environment Name from the dropdown list; the URL is automatically assigned. Check that the URL is available. If available, click Next; otherwise, change the URL and try again.
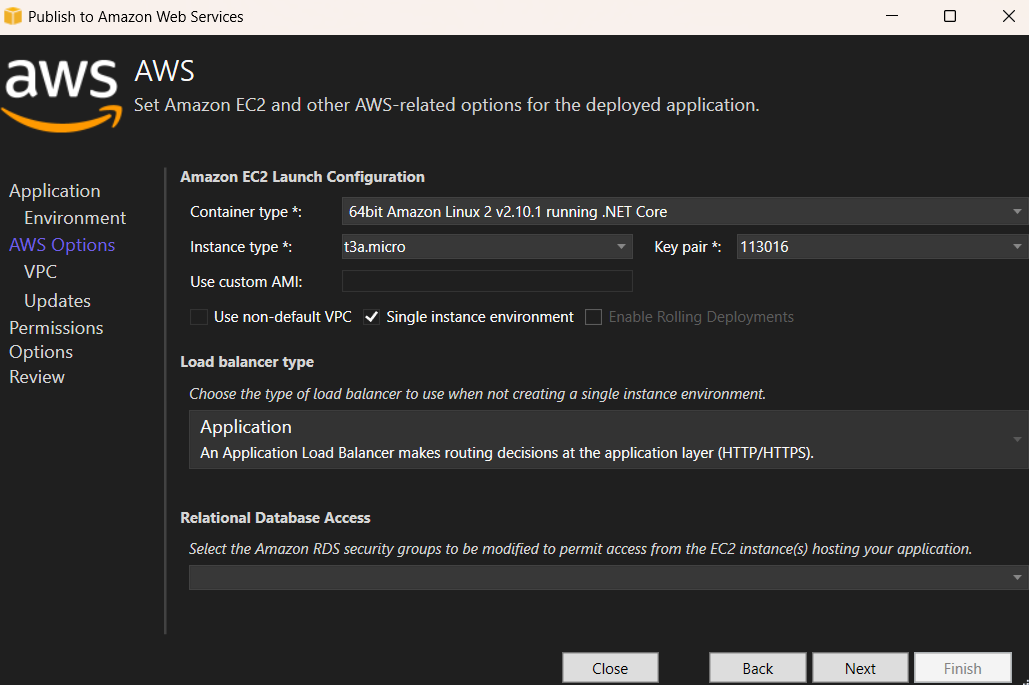
Step 4: Select the instance type in t3a.micro from the dropdown list and click next.
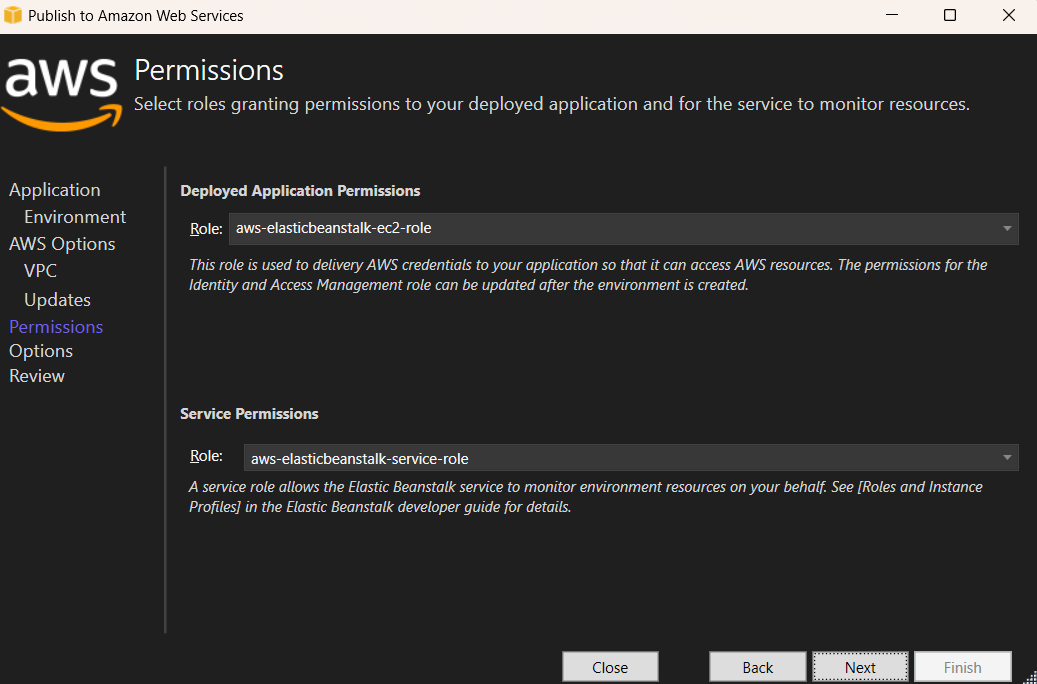
Step 5: Click the Next button to proceed further.
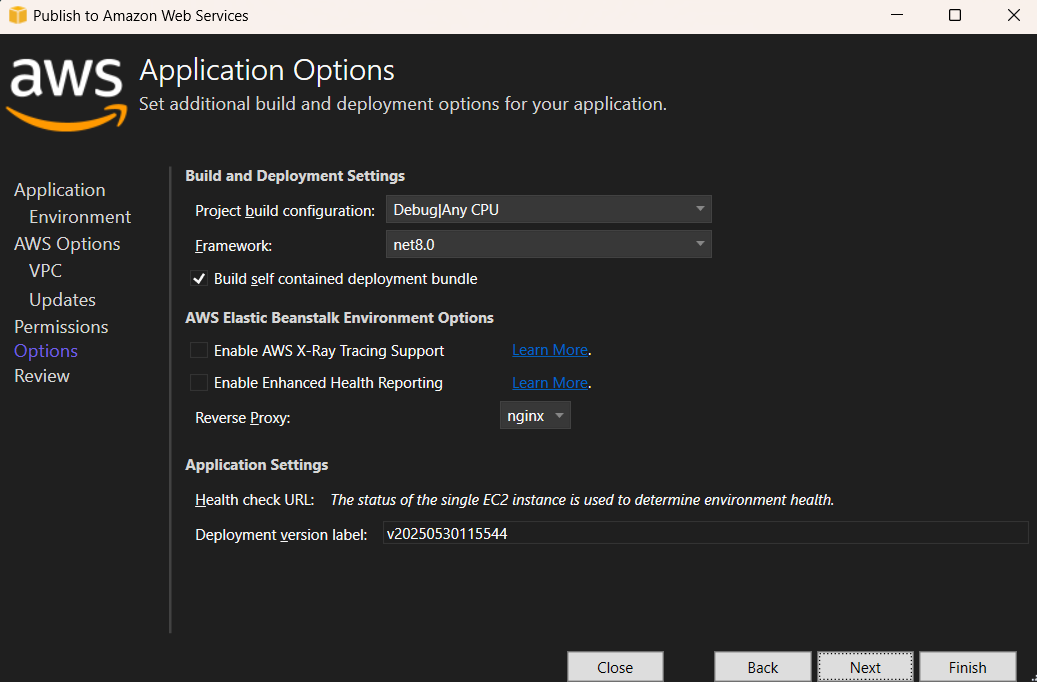
Step 6: Click the Next button.
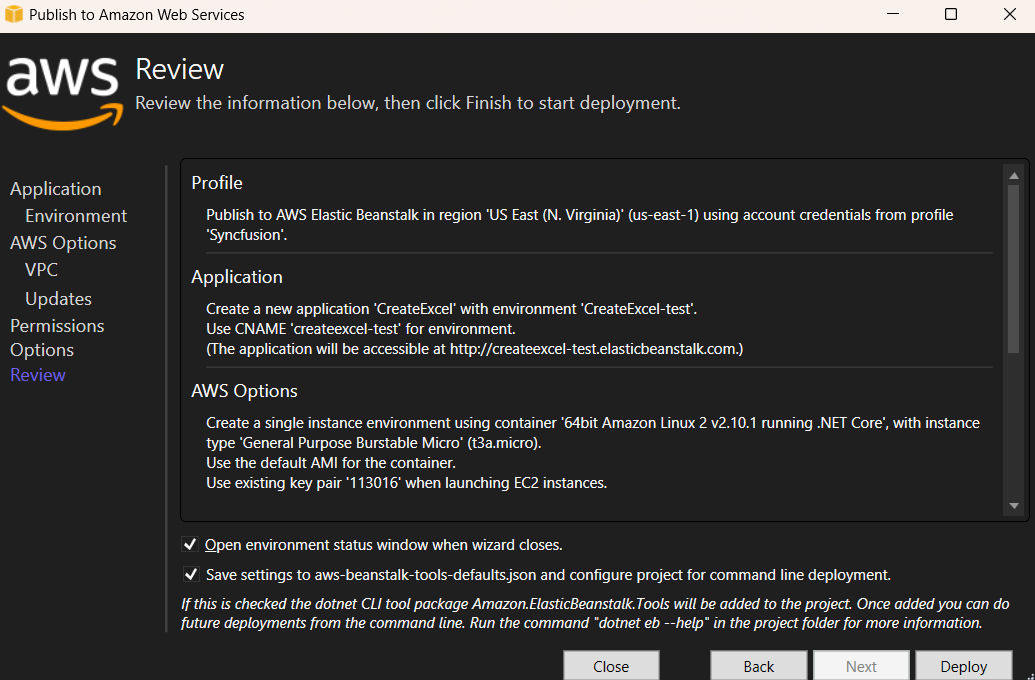
Step 7: Click the Deploy button to deploy the sample on AWS Elastic Beanstalk.
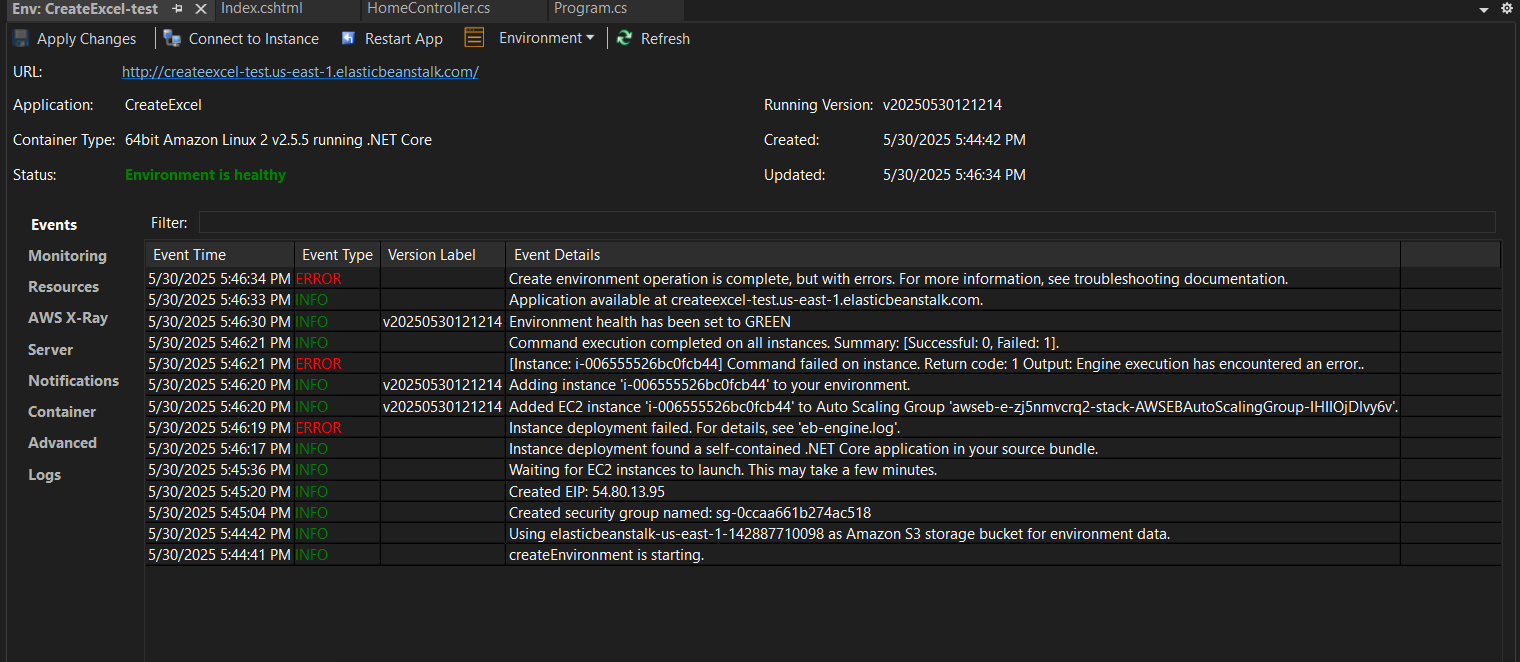
Step 8: After changing the status from Updating to Environment is healthy, click the URL.
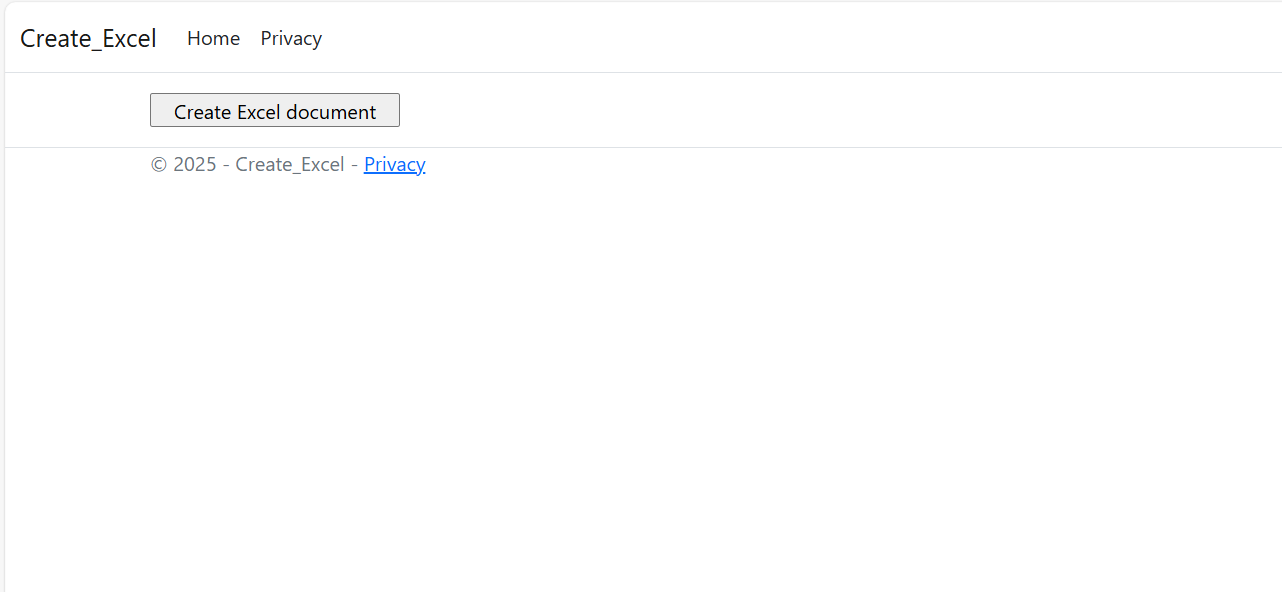
Step 9: After opening the provided URL, click Create Document button to download the Excel document.
You can download a complete working sample from GitHub.
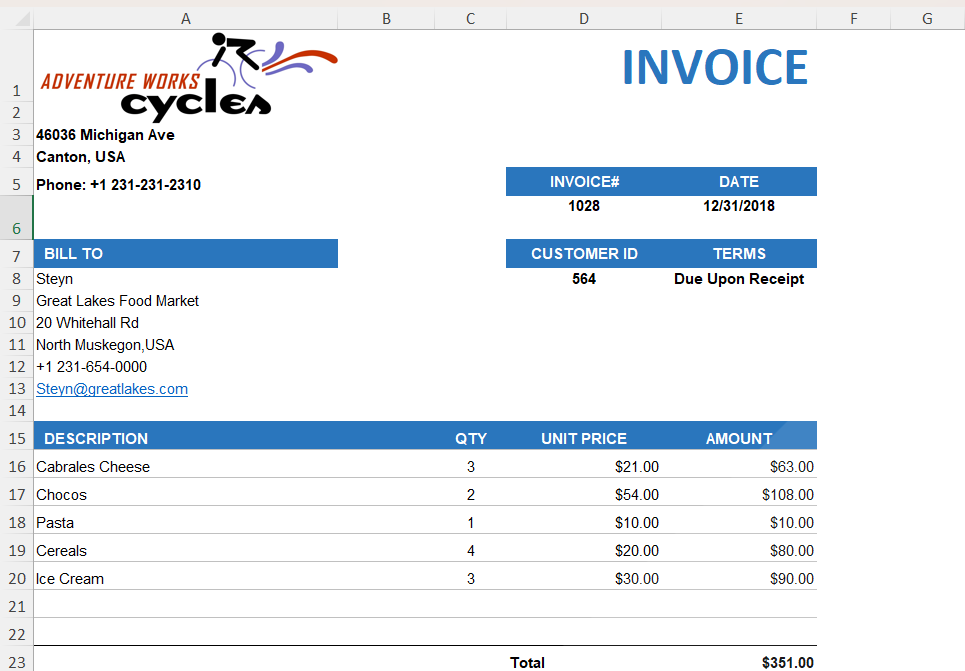
By executing the program, you will get the Excel document as follows.
Read and Edit an Excel File
The following code snippet illustrates how to read and edit an Excel file in AWS Elastic Beanstalk.
The snippet below assumes the following action method signature. Place the body inside the ReadAndEditExcel method:
public FileContentResult ReadAndEditExcel()
{
    // ... place the snippet below inside this method ...
}using (ExcelEngine excelEngine = new ExcelEngine())
{
//Instantiate the Excel application object
IApplication application = excelEngine.Excel;
//Assigns default application version
application.DefaultVersion = ExcelVersion.Xlsx;
//A existing workbook is opened.
IWorkbook workbook = application.Workbooks.Open("Data/InputTemplate.xlsx");
//Access first worksheet from the workbook.
IWorksheet worksheet = workbook.Worksheets[0];
//Set Text in cell A3.
worksheet.Range["A3"].Text = "Hello World";
//Saving the Excel to the MemoryStream (wrap in using for proper disposal)
using (MemoryStream stream = new MemoryStream())
{
workbook.SaveAs(stream);
//Set the position as '0'.
stream.Position = 0;
//Download Excel document in the browser.
return File(stream.ToArray(), "application/vnd.openxmlformats-officedocument.spreadsheetml.sheet", "Sample.xlsx");
}
}You can download a complete working sample from GitHub.
Click here to explore the rich set of Syncfusion® Excel library (XlsIO) features.
An online sample link to create an Excel document in ASP.NET Core.