Excel to Image Conversion in WPF using Excel Library
16 Aug 20265 minutes to read
Syncfusion® XlsIO is a .NET Excel Library used to create, read, edit, and convert Excel documents programmatically, without Microsoft Excel or interop dependencies.
Steps to convert an Excel document to Image in WPF
Step 1: Create a new WPF App (.NET Framework) project (Visual Studio → File → New → Project → WPF App (.NET Framework)). Target .NET Framework 4.5 or later.

Step 2: Name the project, choose the framework, and click Create.

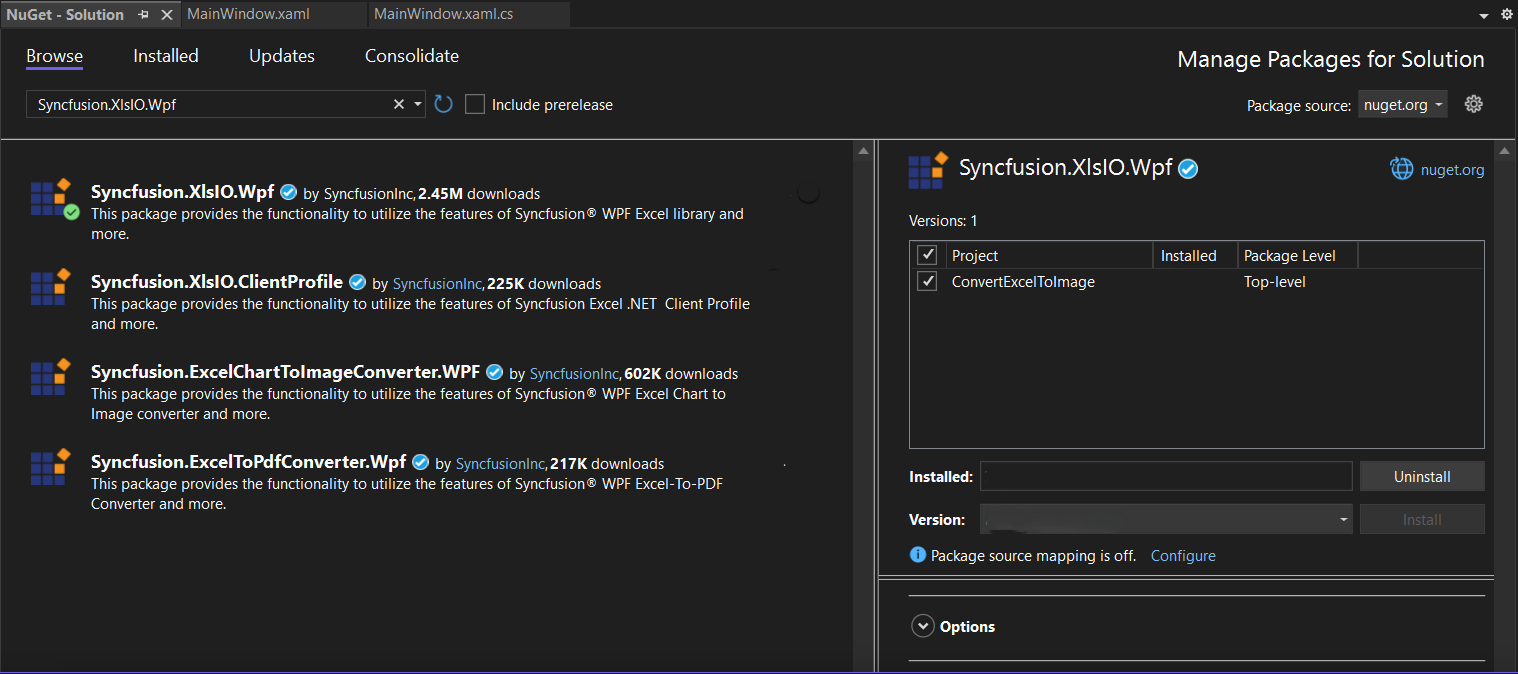
Step 3: Install the Syncfusion.XlsIO.Wpf NuGet package as a reference to your project from NuGet.org. This package transitively pulls in the required Syncfusion.XlsIO.Base assembly.
Starting with v16.2.0.x, if you reference Syncfusion® assemblies from the trial setup or from the NuGet feed, you must also add the
Syncfusion.Licensingreference and register a license key. Refer to this link to learn how to register the Syncfusion® license key. The simplest approach is to add the following call inApp.xaml.cs(or inMainbeforeapp.Run()) before constructing theExcelEngine:Syncfusion.Licensing.SyncfusionLicenseProvider.RegisterLicense("YOUR_LICENSE_KEY");
Step 4: Add a new button to MainWindow.xaml (inside the existing <Grid>) as shown below.
<Button Click="btnConvert_Click" VerticalAlignment="Center" Height="30" BorderBrush="LightBlue" HorizontalAlignment="Center" Width="150">
    <Button.Background>
        <LinearGradientBrush EndPoint="0.5,-0.04" StartPoint="0.5,1.04">
            <GradientStop Color="#FFD9E9F7" Offset="0"/>
            <GradientStop Color="#FFEFF8FF" Offset="1"/>
        </LinearGradientBrush>
    </Button.Background>
    <StackPanel Orientation="Horizontal" Height="23" Margin="0,0,0,-2.52" VerticalAlignment="Bottom" HorizontalAlignment="Right" Width="100" RenderTransformOrigin="0.5,0.5">
        <StackPanel.RenderTransform>
            <TransformGroup>
                <ScaleTransform/>
                <SkewTransform/>
                <RotateTransform Angle="-0.226"/>
                <TranslateTransform/>
            </TransformGroup>
        </StackPanel.RenderTransform>
        <Image Name="image2" Margin="2" HorizontalAlignment="Center" VerticalAlignment="Center" />
        <TextBlock Text="Excel to Image" Height="38" Width="187" Margin="0,4,0,3" TextWrapping="WrapWithOverflow" />
    </StackPanel>
</Button>
Step 5: Add the following namespaces in MainWindow.xaml.cs.
using Syncfusion.XlsIO;Step 6: Add the following code in the btnConvert_Click handler in MainWindow.xaml.cs to convert an Excel document to an image. Place a Sample.xlsx file in the project’s bin\Debug folder (or set its Copy to Output Directory property to Copy if newer) so the relative path resolves.
private void btnConvert_Click(object sender, RoutedEventArgs e)
{
    using (ExcelEngine excelEngine = new ExcelEngine())
    {
        IApplication application = excelEngine.Excel;
        application.DefaultVersion = ExcelVersion.Xlsx;

        // Open the existing Excel workbook.
        IWorkbook workbook = application.Workbooks.Open("Sample.xlsx");
        IWorksheet worksheet = workbook.Worksheets[0];

        // Convert the Excel worksheet (cells 1,1 to 20,4) to an image.
        // For the entire used range, use worksheet.ConvertToImage(worksheet.UsedRange).
        System.Drawing.Image image = worksheet.ConvertToImage(1, 1, 20, 4);

        // Save the image as a JPEG. The image is also returned as a System.Drawing.Image,
        // so you can convert it to a BitmapSource and display it in a WPF Image control.
        image.Save("Sample.Jpeg", ImageFormat.Jpeg);

        // Close the workbook to release resources.
        workbook.Close();

        // Notify the user that the image was generated.
        MessageBox.Show("Sample.Jpeg has been saved to " + System.AppDomain.CurrentDomain.BaseDirectory);
    }
}
You can download a complete working sample from GitHub.
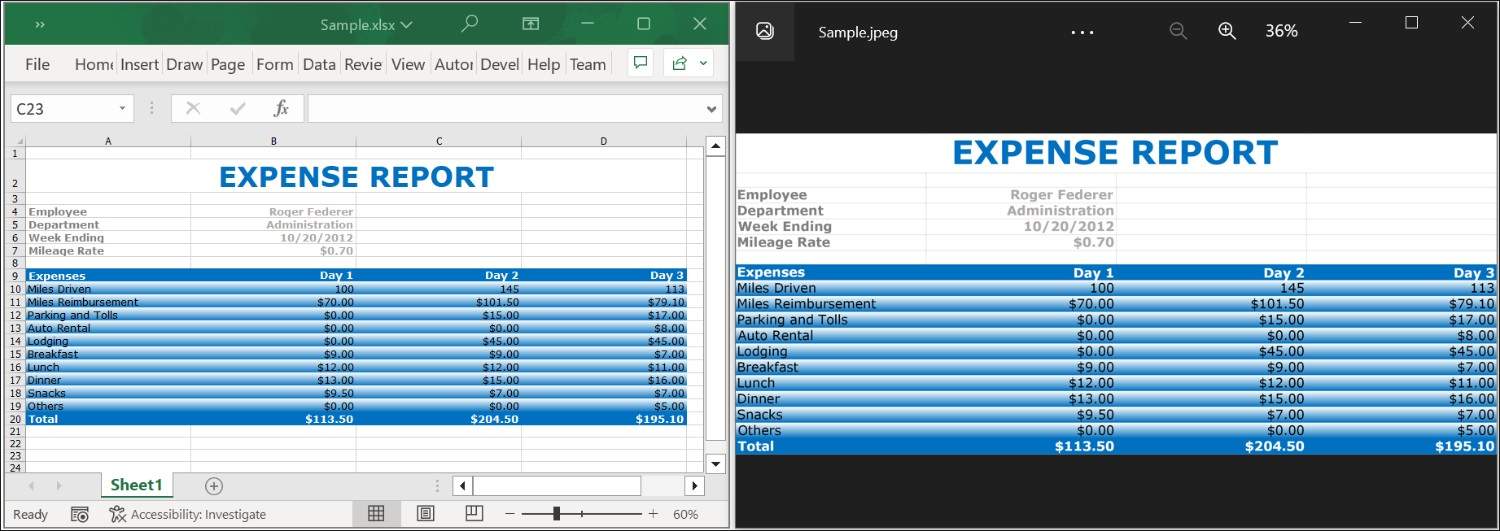
By executing the program, you will get the image as shown below.
Click here to explore the rich set of Syncfusion® Excel library (XlsIO) features.
An online sample link to convert an Excel document to Image in ASP.NET Core.