Description:
Updates the Attributes for a FlowFile by using the Attribute Expression Language and/or deletes the attributes based on a regular expression
Tags:
attributes, modification, update, delete, Attribute Expression Language
Properties:
In the list below, the names of required properties appear in bold. Any other properties (not in bold) are considered optional. The table also indicates any default values, and whether a property supports the Expression Language Guide.
| Name | Default Value | Allowable Values | Description |
| Delete Attributes Expression |
Regular expression for attributes to be deleted from flowfiles. Supports Expression Language: true |
Dynamic Properties:
Dynamic Properties allow the user to specify both the name and value of a property.
| Name | Value | Description |
| A FlowFile attribute to update | The value to set it to |
Updates a FlowFile attribute specified by the Dynamic Property's key with the value specified by the Dynamic Property's value Supports Expression Language: true |
Relationships:
| Name | Description |
| success | All FlowFiles are routed to this relationship |
Reads Attributes:
None specified.
Writes Attributes:
| Name | Description |
| See additional details | This processor may write or remove zero or more attributes as described in additional details |
Summary:
This processor updates the attributes of a FlowFile using properties or rules that are added by the user. There are three ways to use this processor to add or modify attributes. One way is the “Basic Usage”; this allows you to set default attribute changes that affect every FlowFile going through the processor. The second way is the “Advanced Usage”; this allows you to make conditional attribute changes that only affect a FlowFile if it meets certain conditions. It is possible to use both methods in the same processor at the same time. The third way is the “Delete Attributes Expression”; this allows you to provide a regular expression and any attributes with a matching name will be deleted.
Basic Usage
For basic usage, changes are made by adding a new processor property and referencing as its name the attribute you want to change. Then enter the desired attribute value as the Value. The Value can be as simple as any text string or it can be a Expression Language Guide statement that specifies how to formulate the value. (See the Expression Language Guide Usage Guide for details on crafting Expression Language Guide statements.)
As an example, to alter the standard “filename” attribute so that it has “.txt” appended to the end of it, add a new property and make the property name “filename” (to reference the desired attribute), and as the value, use the Expression Language Guide statement shown below:
-
Property: filename
-
Value: ${filename}.txt
The preceding example illustrates how to modify an existing attribute. If an attribute does not already exist, this processor can also be used to add a new attribute. For example, the following property could be added to create a new attribute called myAttribute that has the value myValue:
-
Property: myAttribute
-
Value: myValue
In this example, all FlowFiles passing through this processor will receive an additional FlowFile attribute called myAttribute with the value myValue. This type of configuration might be used in a flow where you want to tag every FlowFile with an attribute so that it can be used later in the flow, such as for routing in a RouteOnAttribute processor.
Advanced Usage
The preceding examples illustrate how to make changes to every FlowFile that goes through the processor. However, the UpdateAttribute processor may also be used to make conditional changes.
To change attributes based on some condition, use the Advanced User Interface (UI) in the processor by clicking the Advancedbutton in the lower right corner.
Clicking the Advanced button displays the Advanced UI. In the Advanced UI, Conditions and their associated Actions are entered as “Rules”. Each rule basically says, “If these conditions are met, then do this action.” One or more conditions may be used in a given rule, and they all must be met in order for the designated action(s) to be taken.
Adding Rules
To add rules and their associated conditions and actions, click on the buttons with the plus symbol located to the right of the “Rules”, “Conditions”, and “Actions” labels.
Upon adding a rule with its condition(s) and action(s), it is important to save it by clicking the Save button in the lower right corner. If you do not do so and attempt to add or navigate to another rule, an error message will appear, asking you if you want to save your changes.
Example Rules
This example has two rules: CheckForLargeFiles and CheckForGiantFiles. The CheckForLargeFiles rule has these conditions:
-
${filename:equals(‘fileOfInterest’)}
-
${fileSize:toNumber():ge(1048576)}
-
${fileSize:toNumber():lt(1073741824)}
Then it has this action for the filename attribute:
- ${filename}.meg
Taken together, this rule says:
-
If the value of the filename attribute is fileOfInterest, and
-
If the fileSize is greater than or equal to (ge) one megabyte (1,048,576 bytes), and
-
If the fileSize is less than (lt) one gigabyte (1,073,741,824 bytes)
-
Then change the value of the filename attribute by appending “.meg” to the filename.
Adding another Rule
Continuing with this example, we can add another rule to check for files that are larger than one gigabyte. When we add this second rule, we can use the previous rule as a template, so to speak, by taking advantage of the “Copy from existing rule” option in the New Rule window. Simply start typing the name of an existing rule, and it will show up in a dropdown menu below the entry field.
In this example, the CheckForGiantFiles rule has these conditions:
-
${filename:equals(‘fileOfInterest’)}
-
${fileSize:toNumber():gt(1073741824)}
Then it has this action for the filename attribute:
- ${filename}.gig
Taken together, this rule says:
-
If the value of the filename attribute is fileOfInterest, and
-
If the fileSize is greater than (gt) one gigabyte (1,073,741,824 bytes)
-
Then change the value of the filename attribute by appending “.gig” to the filename.
Combining the Basic Usage with the Advanced Usage
The UpdateAttribute processor allows you to make both basic usage changes (i.e., to every FlowFile) and advanced usage changes (i.e., conditional) at the same time; however, if they both affect the same attribute(s), then the conditional changes take precedence. This has the added benefit of supporting a type of “else” construct. In other words, if none of the rules match for the attribute, then the basic usage changes will be made.
Deleting Attributes
Deleting attributes is a simple as providing a regular expression for attribute names to be deleted. This can be a simple regular expression that will match a single attribute or more complex regular expression to match a group of similarly named attributes or even seveal individual attribute names.
-
lastUser - will delete an attribute with the name “lastUser”.
-
user.* - will delete attributes beginning with “user”, including for example “username, “userName”, “userID”, and “users”. But it will not delete “User” or “localuser”.
-
*(user. host.* .*Date)** - will delete “user”, “username”, “userName”, “hostInfo”, “hosts”, and “updateDate”, but not “User”, “HOST”, “update”, or “updatedate”.
The delete attributes function does not produce a Provenance Event if the alternate.identified Attribute is deleted.
FlowFile Policy
Another setting in the Advanced UI is the FlowFile Policy. It is located in the upper-left corner of the UI, and it defines the processor’s behavior when multiple rules match. It may be changed using the dropdown menu. By default, the FlowFile Policy is set to “use clone”.
If the FlowFile policy is set to “use clone”, and multiple rules match, then a copy of the incoming FlowFile is created, such that the number of outgoing FlowFiles is equal to the number of rules that match. In other words, if two rules (A and B) both match, then there will be two outgoing FlowFiles, one for Rule A and one for Rule B. This can be useful in situations where you want to add an attribute to use as a flag for routing later. In this example, there will be two copies of the file available, one to route for the A path, and one to route for the B path.
If the FlowFile policy is set to “use original”, then all matching rules are applied to the same incoming FlowFile, and there is only one outgoing FlowFile with all the attribute changes applied. In this case, the order of the rules matters and the action for each rule that matches will be applied in that order. If multiple rules contain actions that update the same attribute, the action from the last matching rule will take precedence. Notably, you can drag and drop the rules into a certain order within the Rules list.
Filtering Rules
The Advanced UI supports the creation of an arbitrarily large number of rules. In order to manage large rule sets, the listing of rules may be filtered using the Filter mechanism in the lower left corner. Rules may be filtered by any text in the name, condition, or action.
Closing the Advanced UI
Once all changes have been saved in the Advanced UI, the UI can be closed using the X in the top right corner.
Properties:
The properties in this processor are added by the user. The expression language is supported in user-added properties for this processor. See the Expression Language Guide Guide to learn how to formulate proper expression language statements to perform the desired functions.
If an Attribute is added with the name alternate.identifier and that attribute’s value is a URI, an ADD_INFO Provenance Event will be registered, correlating the FlowFile with the given alternate identifier.
Relationships:
-
success
- If the processor successfully updates the specified attribute(s), then the FlowFile follows this relationship.
How to configure?
Step 1: Drag and drop the UpdateAttribute processor to canvas.
Step 2: Double click the processor to configure, the configuration dialog will be opened as follows,
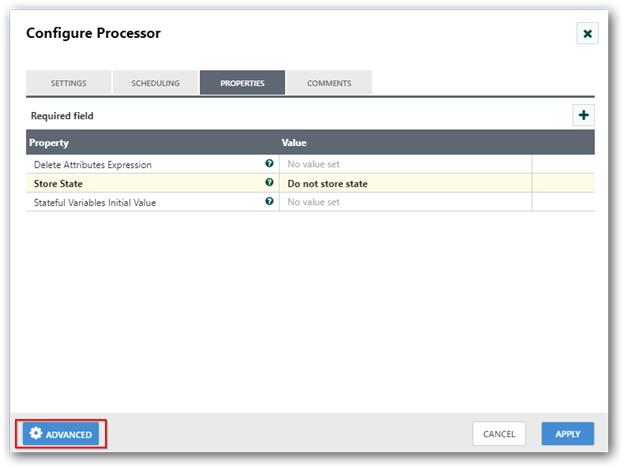
Step 3: Check the usage of each property and update those values.
Properties and usage
Delete Attributes Expression: It is used to delete attributes from flow file using regular expression. The attributes which matches the expression will be deleted even if the attributes are updated in this processor.
Store State: It is used to store attributes in processors state.
- Do not store state.
- Store state locally.
Stateful Variables Initial Value: It is used to set initial value for the stateful variables. This is required while running stateful variables but it can be empty.
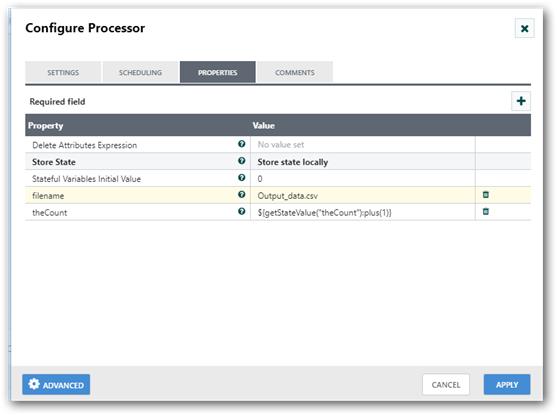
Example for Store State:
For example, you can use update attribute processors store state option to check the number of flow files transmitted. Here initial value for state variable is set as 0.
Created a new property theCount to get the flow file count and added value using expression language ${getStateValue(“theCount”):plus(1)}
Here getStateValue method is used to retrieve state value of the count property and it is incremented by one for each iteration which will show the number of flowfiles processed.
Configure advanced option
Update attribute is also used to update the attribute values based on conditions using advanced option.
You must add rules for updating attributes. Each rule contains a condition to be checked and action to be performed for each condition.
Example for advanced options
To read customer details and store the customers whose age is less than 25, store the customers whose age is greater than 25 with different file name To do this you should add two rules in UpdateAttribute as follows,
Rule 1: Age<25
Condition: ${data:getDelimitedField(3):lt(25)}
Action: filename = AgeLessthan25
Rule 2: Age>25
Condition: ${data:getDelimitedField(3):gt(25)}
Action: filename = AgeGreaterthan25
