How can I help you?
Getting Started
This section explains briefly about how to create a NumericTextBox control in your application with JavaScript. From the following steps you can learn how to create and use NumericTextBox in your application.You will learn how to use our JavaScript textboxes widgets in the Electric bill calculator Application from the following documentation. This will guide you to use the wide range functionalities of textbox widgets features to complete this application.
Create Textboxes Widgets
Create an HTML file and add the following template to the HTML file for Textbox widget creation.
<!DOCTYPE html>
<html>
<head>
    <meta name="viewport" content="width=device-width, initial-scale=1.0" charset="utf-8" />
    <!-- style sheet for default theme(flat azure) -->
    <link href="http://cdn.syncfusion.com/33.1.44/js/web/flat-azure/ej.web.all.min.css" rel="stylesheet" />
    <!--scripts-->
    <script src="http://cdn.syncfusion.com/js/assets/external/jquery-1.10.2.min.js"></script>
    <script src="http://cdn.syncfusion.com/33.1.44/js/web/ej.web.all.min.js"> </script>
</head>
<body>
    <!--adds Textboxes elements here -->
</body>
</html>
Add necessary input elements to render Textboxes widget.
<div class="element-text" style="">Electricity Bill Calculator</div>
<br />
<table class="editors">
    <tbody>
        <tr>
            <td>
                <label>Unit meters</label>
            </td>
            <td>
                <input id="unitCalc" type="text" />
            </td>
        </tr>
        <tr>
            <td>
                <label>Service Tax</label>
            </td>
            <td>
                <input id="service" type="text" />
            </td>
        </tr>
        <tr>
            <td>
                <label>Fare</label>
            </td>
            <td>
                <input id="amountPerUnit" type="text" />
            </td>
        </tr>
        <tr>
            <td>
                <label>Mobile No</label>
            </td>
            <td>
                <input id="mobileNo" type="text" />
            </td>
        </tr>
    </tbody>
</table>
<div class="pay-bill">
    <button class="e-btn" id="calcBill">Calculate</button>
</div>
Initialize the Textboxes widget as shown in the following section.
// Declares Necessary variable creation
        $(function () {
            // document ready
            // simple Numeric creation
            $("#unitCalc").ejNumericTextbox({
                watermarkText: "Units" // set watermark in numeric
            });
            // simple Percentage creation
            $("#service").ejPercentageTextbox({
                watermarkText: "Service Tax" // sets watermark in percentage
            });
            // simple Currency creation
            $("#amountPerUnit").ejCurrencyTextbox({
                watermarkText: "Amount per unit" // sets watermark in currency
            });
            // simple MaskEdit creation
            $("#mobileNo").ejMaskEdit({
                watermarkText: "Mobile No" // sets watermark in mask edit
            });

            // simple Button creation
            $("#calcBill").ejButton({
                width: "100px",
                height: "30px",
            });
});<style type="text/css" class="cssStyles">
.element-text
{
display: inline-block;
font-size: 20px;
font-weight: bolder;
height: 50px;
position: relative;
text-align: center;
top: -20px;
}
.editors
{
max-width: 400px;
}
.pay-bill
{
margin-left: 208px;
margin-top: 15px;
}
.editors label
{
display: block;
width: 130px;
}
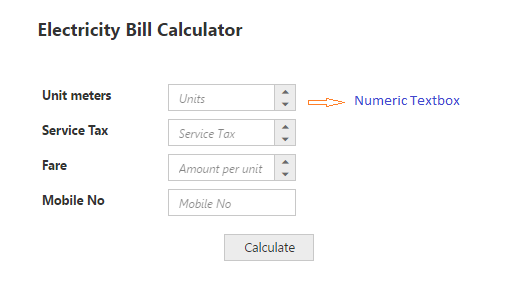
</style>The following screenshot displays the output when the above code is executed.
Set the MinValue, MaxValue and value in NumericTextBox
You can set the “minValue”,“maxValue” and “value” in Numeric, Percentage and Currency text boxes for maintaining the range in Textboxes widgets. In this scenario, you have to enter the values between the given ranges. The following code example illustrates how to achieve this.
// Declares the Necessary variable creation
$(function () {
// document ready
// simple Numeric creation
$("#unitCalc").ejNumericTextbox({
watermarkText: "Units", // sets watermark in numeric
value: 35, // sets value
minValue: 1, // sets min value
maxValue: 10000 // sets max value
});
// simple Percentage creation
$("#service").ejPercentageTextbox({
watermarkText: " Service Tax", // sets watermark in percentage
value: 3,// sets value
minValue: 5, // sets min value
maxValue: 100// sets max value
});
// simple Currency creation
$("#amountPerUnit").ejCurrencyTextbox({
watermarkText: " Amount per unit", //sets watermark in currency
value: 55, // sets value
minValue: 5,// sets min value
maxValue: 55// sets max value
});
// simple MaskEdit creation
$("#mobileNo").ejMaskEdit({
watermarkText: "Mobile No", // sets watermark in mask edit
maskFormat: "99-999-99999"// sets mask format
});
// simple Button creation
$("#calcBill").ejButton({
width: "100px",
height: "30px",
contentType: "textandimage",
prefixIcon: "e-calender"
});
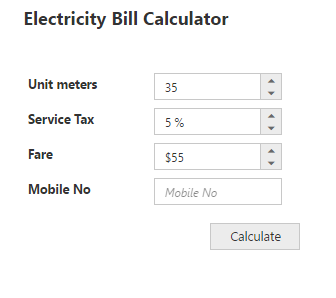
});The following screenshot illustrates the output of the above code examples.
Set the Strict Mode Option
You can set the “strict mode” option to restrict entering values defined outside the range. The following code example illustrates how to set strict mode option.
// Declares Necessary variable creation
        $(function () {
            // simple Numeric creation
            $("#unitCalc").ejNumericTextbox({
                watermarkText: "Units", // sets watermark in numeric
                value: 35, // sets value
                minValue: 1, // sets min value
                maxValue: 10000, // sets max value
                enableStrictMode: true // sets strict mode to true
            });
            // simple Percentage creation
            $("#service").ejPercentageTextbox({
                watermarkText: " Service Tax", // sets watermark in percentage
                value: 3, // sets value
                minValue: 5, // sets min value
                maxValue: 100// sets max value
            });
            // simple Currency creation
            $("#amountPerUnit").ejCurrencyTextbox({
                watermarkText: " Amount per unit", // sets watermark in currency
                value: 55, // sets value
                minValue: 5, // sets min value
                maxValue: 55// sets max value
            });
            // simple MaskEdit creation
            $("#mobileNo").ejMaskEdit({
                watermarkText: "Mobile No", // sets watermark in MaskEdit
                maskFormat: "99-999-99999"// sets the mask format
            });
            // Simple Button creation
            $("#calcBill").ejButton({
                width: "100px",
                height: "30px",
            });
        });
Run the above code example and you can see that it restricts entering a value exceeding the minValue and maxValue range mentioned in the Numeric textbox.
Set Calculation process with NumericTextBox Widget
You can use events to calculate the total and display the value. You can achieve this with the help of “click” event in the button widget. The calculation steps have to be written in the call back function of button’s “click” event.
// Declares Necessary variable to create the Application
var unitMeter, serviceTax, amountPerKm;
$(function () {
// Refers to the Textboxes customization section
// Simple Button creation
$("#calcBill").ejButton({
click: "calculateBill",
width: "100px",
height: "30px",
});
unitMeter = $("#unitCalc").data("ejNumericTextbox");// Object of Numeric
serviceTax = $("#service").data("ejPercentageTextbox");// Object of Percentage
amountPerKm = $("#amountPerUnit").data("ejCurrencyTextbox"); // Object of Currency
mobileNumber = $("#mobileNo").data("ejMaskEdit"); // Object of MaskEdit
});
// Simple Bill amount calculation.
function calculateBill() {
// This is used to calculate the Net amount
var netAmount = unitMeter.model.value * amountPerKm.model.value;
// This is used to calculate the service tax amount
var sTax = (netAmount * serviceTax.model.value) / 100;
// This shows the calculated amount for the units
alert("The amount $" + (netAmount + sTax) + " has been sent as message to " + mobileNumber.model.value + ".");
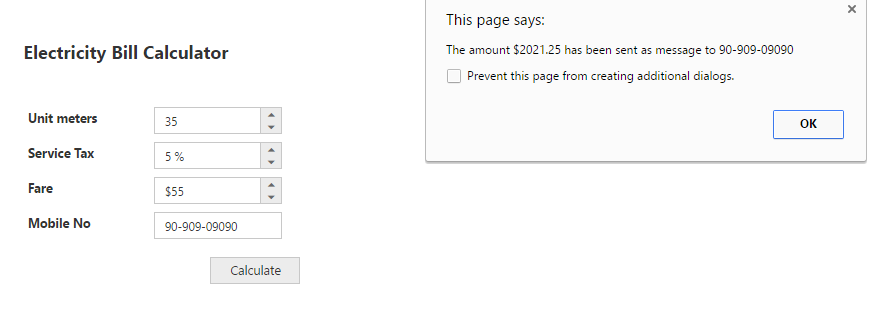
}Run the above code example, fill the required Textbox fields and click the Calculate button. The values are displayed and an alert message is shown. The following screenshot illustrates the final output of the Electricity bill calculator.