Worksheet Rows and Columns Manipulation
9 Feb 202424 minutes to read
The Essential XlsIO provides rows and columns manipulation options equivalent to Excel such as insertion, deletion, hiding, adjusting dimensions, grouping, sub-totaling and more through IWorksheet interface.
Insert Rows and Columns
The following code snippet illustrates how to insert rows and columns in a worksheet.
using (ExcelEngine excelEngine = new ExcelEngine())
{
  IApplication application = excelEngine.Excel;
  application.DefaultVersion = ExcelVersion.Xlsx;
  FileStream fileStream = new FileStream("Sample.xlsx", FileMode.Open, FileAccess.Read);
  IWorkbook workbook = application.Workbooks.Open(fileStream);
  IWorksheet worksheet = workbook.Worksheets[0];

  //Insert a row
  worksheet.InsertRow(3, 1, ExcelInsertOptions.FormatAsBefore);
  //Inserting a column
  worksheet.InsertColumn(2, 1, ExcelInsertOptions.FormatAsAfter);

  //Saving the workbook as stream
  FileStream stream = new FileStream("Book1.xlsx", FileMode.Create, FileAccess.ReadWrite);
  workbook.SaveAs(stream);
  stream.Dispose();
}
using (ExcelEngine excelEngine = new ExcelEngine())
{
IApplication application = excelEngine.Excel;
application.DefaultVersion = ExcelVersion.Xlsx;
IWorkbook workbook = application.Workbooks.Open("Sample.xlsx");
IWorksheet worksheet = workbook.Worksheets[0];
//Insert a row
worksheet.InsertRow(3, 1, ExcelInsertOptions.FormatAsBefore);
//Inserting a column
worksheet.InsertColumn(2, 1, ExcelInsertOptions.FormatAsAfter);
workbook.SaveAs("Book1.xlsx");
}Using excelEngine As ExcelEngine = New ExcelEngine()
Dim application As IApplication = excelEngine.Excel
application.DefaultVersion = ExcelVersion.Xlsx
Dim workbook As IWorkbook = application.Workbooks.Open("Sample.xlsx")
Dim worksheet As IWorksheet = workbook.Worksheets(0)
'Inserting a row
worksheet.InsertRow(3, 1, ExcelInsertOptions.FormatAsBefore)
'Inserting a column
worksheet.InsertColumn(2, 1, ExcelInsertOptions.FormatAsAfter)
workbook.SaveAs("Book1.xlsx")
End UsingA complete working example to insert rows and columns in an Excel worksheet in C# is present on this GitHub page.
NOTE
Row and Column index of Insert methods are “one based”.
To know more about insert rows and columns, refer to the WorksheetImpl in API section.
Delete Rows and Columns
The following code shows how to delete rows and columns.
using (ExcelEngine excelEngine = new ExcelEngine())
{
  IApplication application = excelEngine.Excel;
  application.DefaultVersion = ExcelVersion.Xlsx;
  FileStream fileStream = new FileStream("Sample.xlsx", FileMode.Open, FileAccess.Read);
  IWorkbook workbook = application.Workbooks.Open(fileStream);
  IWorksheet worksheet = workbook.Worksheets[0];

  //Delete a row
  worksheet.DeleteRow(3);
  //Delete a column
  worksheet.DeleteColumn(2);

  //Saving the workbook as stream
  FileStream stream = new FileStream("Book1.xlsx", FileMode.Create, FileAccess.ReadWrite);
  workbook.SaveAs(stream);
  stream.Dispose();
}
using (ExcelEngine excelEngine = new ExcelEngine())
{
IApplication application = excelEngine.Excel;
application.DefaultVersion = ExcelVersion.Xlsx;
IWorkbook workbook = application.Workbooks.Open("Sample.xlsx");
IWorksheet worksheet = workbook.Worksheets[0];
//Delete a row
worksheet.DeleteRow(3);
//Delete a column
worksheet.DeleteColumn(2);
workbook.SaveAs("Book1.xlsx");
}Using excelEngine As ExcelEngine = New ExcelEngine()
Dim application As IApplication = excelEngine.Excel
application.DefaultVersion = ExcelVersion.Xlsx
Dim workbook As IWorkbook = application.Workbooks.Open("Sample.xlsx")
Dim worksheet As IWorksheet = workbook.Worksheets(0)
'Delete a row
worksheet.DeleteRow(3)
'Delete a column
worksheet.DeleteColumn(2)
workbook.SaveAs("Book1.xlsx")
End UsingA complete working example to delete rows and columns in an Excel worksheet in C# is present on this GitHub page.
TIPS
To extract values little faster or to delete a larger number of rows and columns, use Un-Safe code option of IApplication interface as follows
//XlsIO supports DataProviderType of IApplication in Windows Forms, WPF and UWP platforms alone.application.DataProviderType = ExcelDataProviderType.Unsafe;application.DataProviderType = ExcelDataProviderType.UnsafeMove Rows and Columns
In addition, cells can be deleted by shifting other cells in a row or column towards up/left by one step. This can be done by using the Clear method as shown in the following code.
using (ExcelEngine excelEngine = new ExcelEngine())
{
  IApplication application = excelEngine.Excel;
  application.DefaultVersion = ExcelVersion.Xlsx;
  FileStream fileStream = new FileStream("Sample.xlsx", FileMode.Open, FileAccess.Read);
  IWorkbook workbook = application.Workbooks.Open(fileStream);
  IWorksheet worksheet = workbook.Worksheets[0];

  //Shifts cells towards Left after deletion
  worksheet.Range["A1:E1"].Clear(ExcelMoveDirection.MoveLeft);
  //Shifts cells toward Up after deletion
  worksheet.Range["A1:A6"].Clear(ExcelMoveDirection.MoveUp);

  //Saving the workbook as stream
  FileStream stream = new FileStream("Book1.xlsx", FileMode.Create, FileAccess.ReadWrite);
  workbook.SaveAs(stream);
  stream.Dispose();
}
using (ExcelEngine excelEngine = new ExcelEngine())
{
IApplication application = excelEngine.Excel;
application.DefaultVersion = ExcelVersion.Xlsx;
IWorkbook workbook = application.Workbooks.Open("Sample.xlsx");
IWorksheet worksheet = workbook.Worksheets[0];
//Shifts cells towards Left after deletion
worksheet.Range["A1:E1"].Clear(ExcelMoveDirection.MoveLeft);
//Shifts cells toward Up after deletion
worksheet.Range["A1:A6"].Clear(ExcelMoveDirection.MoveUp);
workbook.SaveAs("Book1.xlsx");
}Using excelEngine As ExcelEngine = New ExcelEngine()
Dim application As IApplication = excelEngine.Excel
application.DefaultVersion = ExcelVersion.Xlsx
Dim workbook As IWorkbook = application.Workbooks.Open("Sample.xlsx")
Dim worksheet As IWorksheet = workbook.Worksheets(0)
'Shifts cells towards Left after deletion
worksheet.Range("A1:E1").Clear(ExcelMoveDirection.MoveLeft)
'Shifts cells towards Up after deletion
worksheet.Range("A1:A6").Clear(ExcelMoveDirection.MoveUp)
workbook.SaveAs("Book1.xlsx")
End UsingA complete working example to move rows and columns in an Excel worksheet in C# is present on this GitHub page.
NOTE
Deletion by using above method is more efficient than looping.
Row/Column index of these methods are “one based”.
Show or Hide Rows and Columns
Visibility of rows and columns can be set by using the ShowRow and ShowColumn methods as shown as follows.
using (ExcelEngine excelEngine = new ExcelEngine())
{
  IApplication application = excelEngine.Excel;
  application.DefaultVersion = ExcelVersion.Xlsx;
  FileStream fileStream = new FileStream("Sample.xlsx", FileMode.Open, FileAccess.Read);
  IWorkbook workbook = application.Workbooks.Open(fileStream);
  IWorksheet worksheet = workbook.Worksheets[0];

  //Hiding the first column and second row
  worksheet.ShowColumn(1, false);
  worksheet.ShowRow(2, false);

  //Saving the workbook as stream
  FileStream stream = new FileStream("Book1.xlsx", FileMode.Create, FileAccess.ReadWrite);
  workbook.SaveAs(stream);
  stream.Dispose();
}
using (ExcelEngine excelEngine = new ExcelEngine())
{
IApplication application = excelEngine.Excel;
application.DefaultVersion = ExcelVersion.Xlsx;
IWorkbook workbook = application.Workbooks.Open("Sample.xlsx");
IWorksheet worksheet = workbook.Worksheets[0];
//Hiding the first column and second row
worksheet.ShowColumn(1, false);
worksheet.ShowRow(2, false);
workbook.SaveAs("Book1.xlsx");
}Using excelEngine As ExcelEngine = New ExcelEngine()
Dim application As IApplication = excelEngine.Excel
application.DefaultVersion = ExcelVersion.Xlsx
Dim workbook As IWorkbook = application.Workbooks.Open("Sample.xlsx")
Dim worksheet As IWorksheet = workbook.Worksheets(0)
'Hiding the first column and second row
worksheet.ShowColumn(1, False)
worksheet.ShowRow(2, False)
workbook.SaveAs("Book1.xlsx")
End UsingA complete working example to hide rows and columns in an Excel worksheet in C# is present on this GitHub page.
Show or Hide Specific Range
The Essential XlsIO allows to set visibility for a specific range through ShowRange. The following code snippet shows how to set the visibility of a range.
using (ExcelEngine excelEngine = new ExcelEngine())
{
  IApplication application = excelEngine.Excel;
  application.DefaultVersion = ExcelVersion.Xlsx;
  IWorkbook workbook = application.Workbooks.Create(1);
  IWorksheet worksheet = workbook.Worksheets[0];
  IRange range = worksheet[1, 4];

  //Hiding the range ‘D1’
  worksheet.ShowRange(range, false);
  IRange firstRange = worksheet[1, 1, 3, 3];
  IRange secondRange = worksheet[5, 5, 7, 7];
  RangesCollection rangeCollection = new RangesCollection(application, worksheet);
  rangeCollection.Add(firstRange);
  rangeCollection.Add(secondRange);

  //Hiding a collection of ranges
  worksheet.ShowRange(rangeCollection, false);

  //Saving the workbook as stream
  FileStream stream = new FileStream("Book1.xlsx", FileMode.Create, FileAccess.ReadWrite);
  workbook.SaveAs(stream);
  stream.Dispose();
}
using (ExcelEngine excelEngine = new ExcelEngine())
{
IApplication application = excelEngine.Excel;
application.DefaultVersion = ExcelVersion.Xlsx;
IWorkbook workbook = application.Workbooks.Create(1);
IWorksheet worksheet = workbook.Worksheets[0];
IRange range = worksheet[1, 4];
//Hiding the range ‘D1’
worksheet.ShowRange(range, false);
IRange firstRange = worksheet[1, 1, 3, 3];
IRange secondRange = worksheet[5, 5, 7, 7];
RangesCollection rangeCollection = new RangesCollection(application, worksheet);
rangeCollection.Add(firstRange);
rangeCollection.Add(secondRange);
//Hiding a collection of ranges
worksheet.ShowRange(rangeCollection, false);
workbook.SaveAs("Book1.xlsx");
}Using excelEngine As ExcelEngine = New ExcelEngine()
Dim application As IApplication = excelEngine.Excel
application.DefaultVersion = ExcelVersion.Xlsx
Dim workbook As IWorkbook = application.Workbooks.Create(1)
Dim worksheet As IWorksheet = workbook.Worksheets(0)
Dim range As IRange = worksheet(1, 4)
'Hiding the range ‘D1’
worksheet.ShowRange(range, False)
Dim firstRange As IRange = worksheet(1, 1, 3, 3)
Dim secondRange As IRange = worksheet(5, 5, 7, 7)
Dim rangeCollection As RangesCollection = New RangesCollection(application, worksheet)
rangeCollection.Add(firstRange)
rangeCollection.Add(secondRange)
'Hiding a collection of ranges
worksheet.ShowRange(rangeCollection, False)
workbook.SaveAs("Book1.xlsx")
End UsingA complete working example to hide specific range in an Excel worksheet in C# is present on this GitHub page.
NOTE
Resetting column width manually or through AutoFit, for the columns hidden using ShowColumn/HideColumn methods will make the hidden columns visible.
Resetting row height manually or through AutoFit, for the rows hidden using ShowRow /HideRow methods will make the hidden rows visible.
Adjust Row Height and Column Width
Rows and columns can be resized based on its contents. The XlsIO allows to resize rows and columns in the following ways:
- Resize a specific row or column
- Resize a range of rows or columns
Resize a specific row or column
A single row or column can be resized by the SetRowHeight and SetColumnWidth methods of IWorksheet. Similarly, the height and width of a single row or column can be accessed using the GetRowHeight or GetColumnWidth.
The following code snippet shows how to resize a single row and column.
using (ExcelEngine excelEngine = new ExcelEngine())
{
  IApplication application = excelEngine.Excel;
  application.DefaultVersion = ExcelVersion.Xlsx;
  IWorkbook workbook = application.Workbooks.Create(1);
  IWorksheet worksheet = workbook.Worksheets[0];

  //Modifying the row height
  worksheet.SetRowHeight(2, 25);
  //Modifying the column width
  worksheet.SetColumnWidth(1, 20);

  //Saving the workbook as stream
  FileStream stream = new FileStream("Book1.xlsx", FileMode.Create, FileAccess.ReadWrite);
  workbook.SaveAs(stream);
  stream.Dispose();
}
using (ExcelEngine excelEngine = new ExcelEngine())
{
IApplication application = excelEngine.Excel;
application.DefaultVersion = ExcelVersion.Xlsx;
IWorkbook workbook = application.Workbooks.Create(1);
IWorksheet worksheet = workbook.Worksheets[0];
//Modifying the row height
worksheet.SetRowHeight(2, 25);
//Modifying the column width
worksheet.SetColumnWidth(1, 20);
workbook.SaveAs("Book1.xlsx");
}Using excelEngine As ExcelEngine = New ExcelEngine()
Dim application As IApplication = excelEngine.Excel
application.DefaultVersion = ExcelVersion.Xlsx
Dim workbook As IWorkbook = application.Workbooks.Create(1)
Dim worksheet As IWorksheet = workbook.Worksheets(0)
'Modifying the row height
worksheet.SetRowHeight(2, 25)
'Modifying the column width
worksheet.SetColumnWidth(1, 20)
workbook.SaveAs("Book1.xlsx")
End UsingResize a range of rows or columns
Multiple rows or columns can be resized and accessed by using the RowHeight and ColumnWidth properties of IRange. The following code snippet shows how to resize multiple rows and columns.
using (ExcelEngine excelEngine = new ExcelEngine())
{
  IApplication application = excelEngine.Excel;
  application.DefaultVersion = ExcelVersion.Xlsx;
  IWorkbook workbook = application.Workbooks.Create(1);
  IWorksheet worksheet = workbook.Worksheets[0];

  //Modifying the row height
  worksheet.Range["A2:A6"].RowHeight = 25;
  //Modifying the column width
  worksheet.Range["A1:D1"].ColumnWidth = 20;

  //Saving the workbook as stream
  FileStream stream = new FileStream("Book1.xlsx", FileMode.Create, FileAccess.ReadWrite);
  workbook.SaveAs(stream);
  stream.Dispose();
}
using (ExcelEngine excelEngine = new ExcelEngine())
{
IApplication application = excelEngine.Excel;
application.DefaultVersion = ExcelVersion.Xlsx;
IWorkbook workbook = application.Workbooks.Create(1);
IWorksheet worksheet = workbook.Worksheets[0];
//Modifying the row height
worksheet.Range["A2:A6"].RowHeight = 25;
//Modifying the column width
worksheet.Range["A1:D1"].ColumnWidth = 20;
workbook.SaveAs("Book1.xlsx");
}Using excelEngine As ExcelEngine = New ExcelEngine()
Dim application As IApplication = excelEngine.Excel
application.DefaultVersion = ExcelVersion.Xlsx
Dim workbook As IWorkbook = application.Workbooks.Create(1)
Dim worksheet As IWorksheet = workbook.Worksheets(0)
'Modifying the row height
worksheet.Range("A2:A6").RowHeight = 25
'Modifying the column width
worksheet.Range("A1:D1").ColumnWidth = 20
workbook.SaveAs("Book1.xlsx")
End UsingA complete working example to resize rows and columns in an Excel worksheet in C# is present on this GitHub page.
NOTE
If a column width or a row height is 0, then the column or row is hidden.
Column width and row height can also be set in pixels, by using the SetColumnWidthInPixels and SetRowHeightInPixels methods of IWorksheet respectively.
Auto-Fit Rows and Columns
The XlsIO allows to auto-size the width and height of a cell to fit its content. This section demonstrates various methods to auto-fit rows and columns of a worksheet.
Auto-Fit a Single Row or Column
The following code snippet shows how a row and a column is re-sized to its content.
using (ExcelEngine excelEngine = new ExcelEngine())
{
  IApplication application = excelEngine.Excel;
  application.DefaultVersion = ExcelVersion.Xlsx;
  IWorkbook workbook = application.Workbooks.Create(1);
  IWorksheet worksheet = workbook.Worksheets[0];

  worksheet.Range["A1"].Text = "This is a long text";
  worksheet.Range["A1"].WrapText = true;

  //AutoFit applied to a single row
  worksheet.AutofitRow(1);
  worksheet.Range["A3"].Text = "This is a long text";

  //AutoFit applied to a single column
  worksheet.AutofitColumn(3);

  //Saving the workbook as stream
  FileStream stream = new FileStream("Book1.xlsx", FileMode.Create, FileAccess.ReadWrite);
  workbook.SaveAs(stream);
  stream.Dispose();
}
using (ExcelEngine excelEngine = new ExcelEngine())
{
IApplication application = excelEngine.Excel;
application.DefaultVersion = ExcelVersion.Xlsx;
IWorkbook workbook = application.Workbooks.Create(1);
IWorksheet worksheet = workbook.Worksheets[0];
worksheet.Range["A1"].Text = "This is a long text";
worksheet.Range["A1"].WrapText = true;
//AutoFit applied to a single row
worksheet.AutofitRow(1);
worksheet.Range["A3"].Text = "This is a long text";
//AutoFit applied to a single column
worksheet.AutofitColumn(3);
workbook.SaveAs("Book1.xlsx");
}Using excelEngine As ExcelEngine = New ExcelEngine()
Dim application As IApplication = excelEngine.Excel
application.DefaultVersion = ExcelVersion.Xlsx
Dim workbook As IWorkbook = application.Workbooks.Create(1)
Dim worksheet As IWorksheet = workbook.Worksheets(0)
worksheet.Range("A1").Text = "This is a long text"
worksheet.Range("A1").WrapText = True
'AutoFit applied to a single row
worksheet.AutofitRow(1)
worksheet.Range("A3").Text = "This is a long text"
'AutoFit applied to a single column
worksheet.AutofitColumn(3)
workbook.SaveAs("Book1.xlsx")
End UsingNOTE
Row and Column indexes are “one based”.
There is an alternative way to auto-fit row or column by accessing the row or column, which is shown in the following code snippet.
//AutoFit applied to first row
worksheet.Rows[0].AutofitRows();
//AutoFit applied to first column
worksheet.Columns[0].AutofitColumns();
//AutoFit applied to first row
worksheet.Rows[0].AutofitRows();
//AutoFit applied to first column
worksheet.Columns[0].AutofitColumns();'AutoFit applied to first row
worksheet.Rows(0).AutofitRows()
'AutoFit applied to first column
worksheet.Columns(0).AutofitColumns()NOTE
Here column and row indexes are “zero based”.
Auto-Fit Multiple Rows or Columns
Multiple rows or columns can be auto fitted based on the range specified. This is depicted in the following code.
using (ExcelEngine excelEngine = new ExcelEngine())
{
  IApplication application = excelEngine.Excel;
  application.DefaultVersion = ExcelVersion.Xlsx;
  IWorkbook workbook = application.Workbooks.Create(1);
  IWorksheet worksheet = workbook.Worksheets[0];

  //Assigning text to cells
  worksheet.Range["A1:D1"].Text = "This is the Long Text";
  worksheet.Range["A2:A5"].Text = "This is the Long Text using AutoFit Columns and Rows";
  worksheet.Range["A2:A5"].WrapText = true;

  //Auto-Fit the range
  worksheet.Range["A1:C1"].AutofitColumns();
  worksheet.Range["A2:A5"].AutofitRows();

  //Auto-fits all the columns used in the worksheet
  worksheet.UsedRange.AutofitColumns();

  //Saving the workbook as stream
  FileStream stream = new FileStream("Book1.xlsx", FileMode.Create, FileAccess.ReadWrite);
  workbook.SaveAs(stream);
  stream.Dispose();
}
using (ExcelEngine excelEngine = new ExcelEngine())
{
IApplication application = excelEngine.Excel;
application.DefaultVersion = ExcelVersion.Xlsx;
IWorkbook workbook = application.Workbooks.Create(1);
IWorksheet worksheet = workbook.Worksheets[0];
//Assigning text to cells
worksheet.Range["A1:D1"].Text = "This is the Long Text";
worksheet.Range["A2:A5"].Text = "This is the Long Text using AutoFit Columns and Rows";
worksheet.Range["A2:A5"].WrapText = true;
//Auto-Fit the range
worksheet.Range["A1:C1"].AutofitColumns();
worksheet.Range["A2:A5"].AutofitRows();
//Auto-fits all the columns used in the worksheet
worksheet.UsedRange.AutofitColumns();
workbook.SaveAs("Book1.xlsx");
}Using excelEngine As ExcelEngine = New ExcelEngine()
Dim application As IApplication = excelEngine.Excel
application.DefaultVersion = ExcelVersion.Xlsx
Dim workbook As IWorkbook = application.Workbooks.Create(1)
Dim worksheet As IWorksheet = workbook.Worksheets(0)
'Assigning text to cells
worksheet.Range("A1:D1").Text = "This is the Long Text"
worksheet.Range("A2:A5").Text = "This is the Long Text using AutoFit Columns and Rows"
worksheet.Range("A2:A5").WrapText = True
'Auto-Fit the range
worksheet.Range("A1:C1").AutofitColumns()
worksheet.Range("A2:A5").AutofitRows()
'Auto-fits all the columns used in the worksheet
worksheet.UsedRange.AutofitColumns()
workbook.SaveAs("Book1.xlsx")
End UsingA complete working example to autofit rows and columns in an Excel worksheet in C# is present on this GitHub page.
NOTE
1) If a Range is text wrapped, the AutoFitColumn method will not be applied on it.
2) If a Range is merged, the Auto-Fit methods will not be applied on it. Note that this is the behavior of Excel as well.
3) Auto fitting is a time consuming process so, it might cause performance issues when used excessively.
4) When using AutoFitRows or AutofitColumns, the hidden rows or columns in the range will be adjusted based on the cell content which makes the row height or column width increase from zero. So, the hidden rows or columns will be visible. This is the behavior of XlsIO.
Group or Ungroup Rows and Columns
Rows and columns can be grouped or ungrouped to summarize the data, which is given in the following code snippet.
using (ExcelEngine excelEngine = new ExcelEngine())
{
  IApplication application = excelEngine.Excel;
  application.DefaultVersion = ExcelVersion.Xlsx;
  FileStream fileStream = new FileStream("Sample.xlsx", FileMode.Open, FileAccess.Read);
  IWorkbook workbook = application.Workbooks.Open(fileStream);
  IWorksheet worksheet = workbook.Worksheets[0];

  //Group Rows
  worksheet.Range["A1:A3"].Group(ExcelGroupBy.ByRows, true);
  worksheet.Range["A4:A6"].Group(ExcelGroupBy.ByRows);
  //Group Columns
  worksheet.Range["A1:B1"].Group(ExcelGroupBy.ByColumns, false);
  worksheet.Range["C1:F1"].Group(ExcelGroupBy.ByColumns);

  //Ungroup Rows
  worksheet.Range["A1:A3"].Ungroup(ExcelGroupBy.ByRows);
  //Ungroup Columns
  worksheet.Range["C1:F1"].Ungroup(ExcelGroupBy.ByColumns);

  //Saving the workbook as stream
  FileStream stream = new FileStream("Book1.xlsx", FileMode.Create, FileAccess.ReadWrite);
  workbook.SaveAs(stream);
  stream.Dispose();
}
using (ExcelEngine excelEngine = new ExcelEngine())
{
IApplication application = excelEngine.Excel;
application.DefaultVersion = ExcelVersion.Xlsx;
IWorkbook workbook = application.Workbooks.Open("Sample.xlsx");
IWorksheet worksheet = workbook.Worksheets[0];
//Group Rows
worksheet.Range["A1:A3"].Group(ExcelGroupBy.ByRows, true);
worksheet.Range["A4:A6"].Group(ExcelGroupBy.ByRows);
//Group Columns
worksheet.Range["A1:B1"].Group(ExcelGroupBy.ByColumns, false);
worksheet.Range["C1:F1"].Group(ExcelGroupBy.ByColumns);
//Ungroup Rows
worksheet.Range["A1:A3"].Ungroup(ExcelGroupBy.ByRows);
//Ungroup Columns
worksheet.Range["C1:F1"].Ungroup(ExcelGroupBy.ByColumns);
workbook.SaveAs("Book1.xlsx");
}Using excelEngine As ExcelEngine = New ExcelEngine()
Dim application As IApplication = excelEngine.Excel
application.DefaultVersion = ExcelVersion.Xlsx
Dim workbook As IWorkbook = application.Workbooks.Open("Sample.xlsx")
Dim worksheet As IWorksheet = workbook.Worksheets(0)
'Group Rows
worksheet.Range("A1:A3").Group(ExcelGroupBy.ByRows, True)
worksheet.Range("A4:A6").Group(ExcelGroupBy.ByRows)
'Group Columns
worksheet.Range("A1:B1").Group(ExcelGroupBy.ByColumns, False)
worksheet.Range("C1:F1").Group(ExcelGroupBy.ByColumns)
'Ungroup Rows
worksheet.Range("A1:A3").Ungroup(ExcelGroupBy.ByRows)
'Ungroup Columns
worksheet.Range("C1:F1").Ungroup(ExcelGroupBy.ByColumns)
workbook.SaveAs("Book1.xlsx")
End UsingA complete working example to group rows and columns in an Excel worksheet in C# is present on this GitHub page.
A complete working example to ungroup rows and columns in an Excel worksheet in C# is present on this GitHub page.
Expand or Collapse Groups
Groups can be expanded and collapsed using the ExpandGroup and CollapseGroup methods of IRange, which is given in the following code snippet.
using (ExcelEngine excelEngine = new ExcelEngine())
{
  IApplication application = excelEngine.Excel;
  application.DefaultVersion = ExcelVersion.Xlsx;
  FileStream fileStream = new FileStream("Sample.xlsx", FileMode.Open, FileAccess.Read);
  IWorkbook workbook = application.Workbooks.Open(fileStream);
  IWorksheet worksheet = workbook.Worksheets[0];

  //Expand group with flag set to expand parent
  worksheet.Range["A5:A15"].ExpandGroup(ExcelGroupBy.ByRows, ExpandCollapseFlags.ExpandParent);

  //Collapse group
  worksheet.Range["A5:A15"].CollapseGroup(ExcelGroupBy.ByRows);

  //Saving the workbook as stream
  FileStream stream = new FileStream("Book1.xlsx", FileMode.Create, FileAccess.ReadWrite);
  workbook.SaveAs(stream);
  stream.Dispose();
}
using (ExcelEngine excelEngine = new ExcelEngine())
{
IApplication application = excelEngine.Excel;
application.DefaultVersion = ExcelVersion.Xlsx;
IWorkbook workbook = application.Workbooks.Open("Sample.xlsx");
IWorksheet worksheet = workbook.Worksheets[0];
//Expand group with flag set to expand parent
worksheet.Range["A5:A15"].ExpandGroup(ExcelGroupBy.ByRows, ExpandCollapseFlags.ExpandParent);
//Collapse group
worksheet.Range["A5:A15"].CollapseGroup(ExcelGroupBy.ByRows);
workbook.SaveAs("Book1.xlsx");
}Using excelEngine As ExcelEngine = New ExcelEngine()
Dim application As IApplication = excelEngine.Excel
application.DefaultVersion = ExcelVersion.Xlsx
Dim workbook As IWorkbook = application.Workbooks.Open("Sample.xlsx")
Dim worksheet As IWorksheet = workbook.Worksheets(0)
'Expand group with flag set to expand parent
worksheet.Range("A5:A15").ExpandGroup(ExcelGroupBy.ByRows, ExpandCollapseFlags.ExpandParent)
'Collapse group
worksheet.Range("A5:A15").CollapseGroup(ExcelGroupBy.ByRows)
workbook.SaveAs("Book1.xlsx")
End UsingA complete working example to expand or collapse groups in an Excel worksheet in C# is present on this GitHub page.
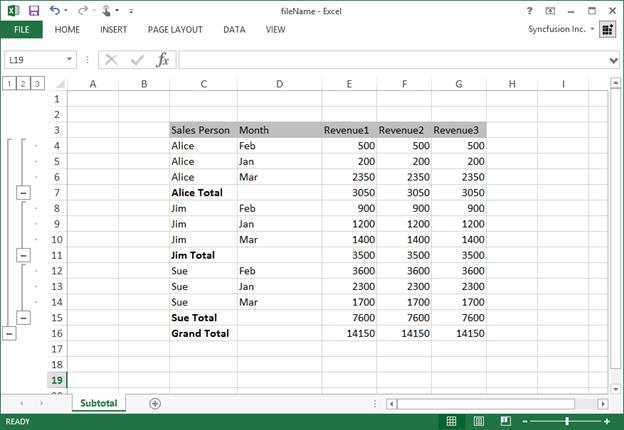
Subtotal
The XlsIO supports subtotaling a group to quickly calculate rows of related data by inserting subtotals and totals.
Various Subtotal options like Summary below data, Replace current subtotals, Page break between groups can be used to customize data.
The following code shows how to add subtotal for a given range.
using (ExcelEngine excelEngine = new ExcelEngine())
{
  IApplication application = excelEngine.Excel;
  application.DefaultVersion = ExcelVersion.Xlsx;
  FileStream fileStream = new FileStream("Sample.xlsx", FileMode.Open, FileAccess.Read);
  IWorkbook workbook = application.Workbooks.Open(fileStream);
  IWorksheet worksheet = workbook.Worksheets[0];

  //Set the range for subtotaling
  IRange range = worksheet.Range["C3:G12"];

  //Perform subtotals for the range with every change in first column and subtotals to be included for specified list of columns
  range.SubTotal(0, ConsolidationFunction.Sum, new int[] { 2, 3, 4 });

  //Saving the workbook as stream
  FileStream stream = new FileStream("Book1.xlsx", FileMode.Create, FileAccess.ReadWrite);
  workbook.SaveAs(stream);
  stream.Dispose();
}
using (ExcelEngine excelEngine = new ExcelEngine())
{
IApplication application = excelEngine.Excel;
application.DefaultVersion = ExcelVersion.Xlsx;
IWorkbook workbook = application.Workbooks.Open("Sample.xlsx");
IWorksheet worksheet = workbook.Worksheets[0];
//Set the range for subtotaling
IRange range = worksheet.Range["C3:G12"];
//Perform subtotals for the range with every change in first column and subtotals to be included for specified list of columns
range.SubTotal(0, ConsolidationFunction.Sum, new int[] { 2, 3, 4 });
workbook.SaveAs("Book1.xlsx");
}Using excelEngine As ExcelEngine = New ExcelEngine()
Dim application As IApplication = excelEngine.Excel
application.DefaultVersion = ExcelVersion.Xlsx
Dim workbook As IWorkbook = application.Workbooks.Open("Sample.xlsx")
Dim worksheet As IWorksheet = workbook.Worksheets(0)
'Set the range for subtotaling
Dim range As IRange = worksheet("C3:G12")
'Perform subtotals for the range with every change in first column and subtotals to be included for specified list of columns
range.SubTotal(0, ConsolidationFunction.Sum, New Integer() {4})
workbook.SaveAs("Book1.xlsx")
End UsingNOTE
Here column and row indexes are “zero based”.
The screenshot of the output with SubTotal generated from the previous code.
NOTE
Summary of a group can be shown above the rows and left of the column using the IsSummaryRowBelow and IsSummaryColumnRight properties of IPageSetup interface. By default, these properties are set to TRUE.